Search
  • Journal
  • Recipes
  • About
  • Say Hello
  • Subscribe
Close
Menu
Search
Close
  • Journal
  • Recipes
  • About
  • Say Hello
  • Subscribe
Menu

sprig of thyme

August 21, 2020

Zucchini Fritters with Feta and Herbs / Кюфтета от Тиквички

by Iglika in Bulgarian recipe


Sprig_Of_Thyme_Zucchini_Frittres_Cover.jpg


Zucchinis are one of these vegetables that either you are excited about, or you really don’t know what on earth to do with them (except frying them like the Greeks, grilling them, or the popular in the recent years zucchini noodles). My zucchini sorry is one of success. Of turning I don’t care to love! 

As a kid, I fell in the first category for many, many years, until one day my mom made zucchini fritters, and then all the sudden I got really excited about eating zucchinis in the summer. Fast forward to a few years ago, I discovered the joy of raw zucchini by making a salad of them with mustard vinaigrette, goat cheese and mint ( recipe here). And most recently, adding zucchinis to romanesco in the fall for a silky, and very dreamy cream soup (recipe here). 

Throughout the years I discovered that zucchini, at least to me, needs some gentle help from other bright ingredients to taste more like itself. And nowadays I think of the humble zucchini an empty canvas to the abundance of spices, herbs and other ingredients out there. 

And this brings me to the zucchini fritters recipe of today’s story. These little babies could either be super delicious, or very disappointing – especially when tasting bland, and after all the peeling and grating they fall apart when attempting to flip them in the frying pan. So what is the secret to a really good zucchini fritters? One part of the secret is that they need to have an abundance of flavor – think spices, herbs, even chicken (per my mom’s recommendation). And the other secret, is that you have to squeeze the liquid out of the grated zucchini so those cute patties don’t fall apart in the pan the moment you try to flip them. 

So onto my own recipe. What is so special about it? Well, it is not that revolutionary when you compare it to the sea of zucchini fritters recipes out there. But, if you ask me what I love about it, I would tell you that this recipe on one level incorporates the abundance of the summer season. It has fragrant mint and dill, and a lovely side of cherry heirloom tomatoes and diced cucumber, which adds freshness, a bit of acid to balance, and crunchiness when enjoyed all together. The other part about this recipe that I love, is that it brings me back to my childhood, to Bulgaria where we enjoy fried zucchini and zucchini fritters with dill and garlic yogurt. It reminds me of summer and of home. It’s an escape during this crazy year of 2020 when I can’t go travel back home to smell the air, walk in the streets of Sofia and eat all the food that fills my heart with joy. 

So cook my friends! Cook anything that fills your heart with joy, and what helps you stay connected to the good things in life. Connected to all the love, friends, family and fuzzy creatures out there. Until next time ❤

Oh, and if you make this recipe don’t forget to let me know what you think!

Zucchini_Fritters_Step1.jpg
Zucchini_Fritters_Step3.jpg
Zucchini_Fritters_Step2.jpg
Zucchini_Fritters_Step4.jpg
Zucchini_Frittres_Ingredients.jpg
Zucchini_Frittres_Plate1.jpg
Zucchini_Frittres_Plate2.jpg

Zucchini Fritters with Feta and Herbs

Makes about 15 small fritters (about 4 servings)

Ingredients:

Fritters
• 5-6 small zucchini
• 1/4 teaspoon of sea salt
• 1/3 cup chopped fresh dill, plus more for garnish
• 1/3 cup chopped fresh mint, plus more for garnish
• 3/4 cup crumbled French or Israeli Feta*
• 1/2 cup all purpose flour
• 1 large egg
• Black pepper
• 3-4 tablespoons of olive (or sunflower) oil for frying

Lemony, garlic yogurt
• 1 cup of full-fat Greek or Icelandic yogurt
• 1 garlic clove, mashed
• 1 tablespoon of chopped fresh dill
• Zest of 1 lemon
• 1 tablespoon lemon juice

Tomato and cucumber garnish
• 16-20 heirloom cherry tomatoes
• 1/2 English cucumber, peeled and diced
• Salt
• Pepper
• Olive oil

Directions:


To make the fritters:

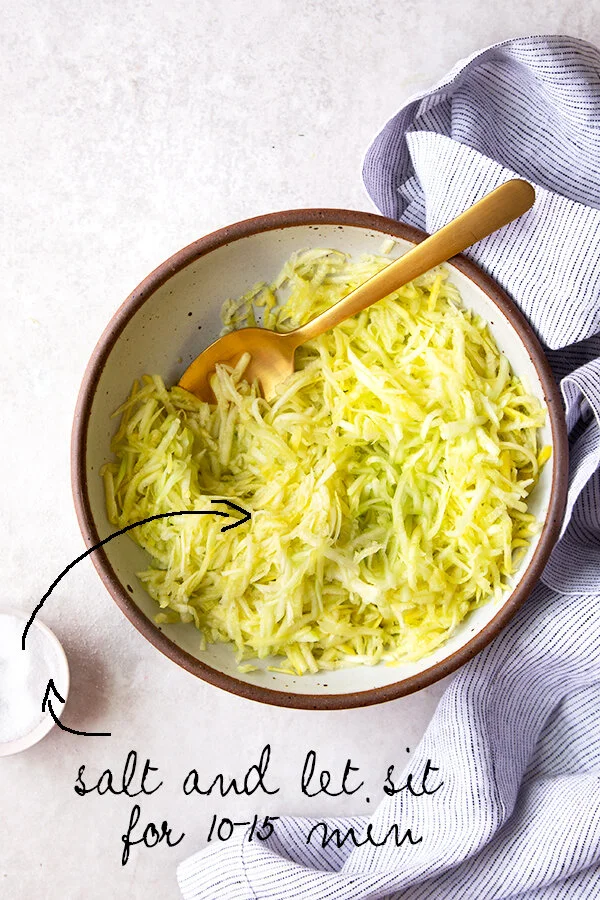
  1. Peel the zucchini and grate them on the large wholes of a box grater (yields about 2-2.5 cups of shreds). Place grated zucchini in a large mixing bowl, add the sea salt and mix really well using your hands until the zucchini start feeling wet to the touch. Leave for 10-15 minutes to allow the juices to release.

  2. Line a bowl with a cheese cloth, flour sack or a cotton kitchen towel, leaving the edges of the cloth to hang to the sides of the bowl. Place a handful of shredded zucchini in the center of the cloth (don’t be tempted to add more shreds as it will be difficult to squeeze the liquid out.) Twist the cloth and squeeze as much liquid as possible. Place the squeezed shreds in a large mixing bowl. Repeat with the rest of the wet zucchini shreds. Add the rest of the fritters ingredients (except the oil) to the mixing bowl with the squeezed zucchinis, mix really well using your hands. Add more salt if needed.

  3. Heat 3 tablespoons of the oil in a large non-stick frying pan over medium-high heat. Add 2 tablespoons of mixture to your hands and flatten slightly to create a patty (about 3” diameter). Place in the hot pan with oil. Repeat and cook, in batches, for 2–3 minutes each side or until golden. You might have to add additional 1 tablespoon of oil to the pan between batches. 

  4. Place fritters on a large plate lined with paper towel. Set aside.

To make the yogurt sauce:
Place yogurt, garlic, dill, lemon juice and zest in a bowl, mix well. Add salt and freshly ground black pepper to taste. 

To make the tomato salad garnish:
Cut the tomatoes in half and place in a bowl. Add a splash of olive oil and salt to taste. Toss to mix.

To assemble:
Divide the yogurt sauce between 4 plates (or shallow pasta bowls). Using the back of a spoon, spread the yogurt on one side of each plate. Place 3-4 fritters on top of yogurt. Spoon the tomato salad on the other side of the fritters, follow with the diced cucumber. Sprinkle with black pepper, chopped mint and dill (optional.)  Enjoy!


* Lets talk feta cheese! The crumbled, packaged, domestic stuff from the grocery store will overpower this dish (unless you absolutely love that type of pungent, salty feta). French and Israeli feta are far more mild, buttery and creamy. The bonus of French and Israeli feta is that they come in a big block and you can slice them or crumble them to whatever size you want. And, you will have some leftover cheese which is so good on an open-face grilled feta sandwich with asparagus and mint :)

Print Recipe

Comment

TAGS: lunch, main dish, zucchini, summer, cucumber, tomatoes, mint


July 19, 2020

Turkish Eggs / Яйца по Панагюрски

by Iglika in Bulgarian recipe


Photography by Eliesa Johnson Styling + Recipe by Iglika/Sprig of Thyme

Photography by Eliesa Johnson
Styling + Recipe by Iglika/Sprig of Thyme

Photography by Eliesa Johnson Styling + Recipe by Iglika/Sprig of Thyme

Photography by Eliesa Johnson
Styling + Recipe by Iglika/Sprig of Thyme


Turkish Eggs (as known in the West) or Яйца по Панагюрски (as known in Bulgaria) was one of my favorite dishes growing up in Bulgaria. My mom made this dish as a treat to us, or on a lazy hot summer weekend when we were hungry and she didn’t feel like cooking a super elaborate meal. I loved Turkish Eggs as a kid. I felt like I am eating a super special dish that was meant for important occasions and somehow I got lucky because my mom made it by mistake on a casual Sunday. This dish always made me so excited for lunch! And I don’t know if it was the creaminess of the yogurt combined with the rich, lush poached eggs. Or the crunchy toast dunked in the runny yolk and the wonderful, garlic, herb yogurt. Or the salty, rich chunks of crumbled feta cheese. Or!!! My favorite – the yummy paprika infused brown butter, which made the whole dish just better. Honestly, I am not sure. Maybe it was all of these elements together. All I know is that there is something magical and special about this simple dish.  

Now, all grown up, I make this dish on a Sunday as an easy brunch side to share with my friends. I still love it as much as in my childhood and I hope that after you try it that it will become a favorite of yours too.

If you want some of my Iggy tips to make this dish even more yummier, here you go:
• My mom always topped the eggs with paprika-infused brown butter, and I do the same. I find that butter alone (not butter mixed with olive oil) is far more delicious. 
• Make the paprika-infused brown butter your own. If you like it more spicy add chili, chipotle, or ancho peppers powder. For more smokiness, add more smoked paprika.
• I use lots of herbs in this dish, and I find that herbs add a layer of unexpected deliciousness. Dill, parsley, time, oregano. They are wonderful and they smell like a summer garden. When married with the rest of the ingredients they transform the simple yogurt and egg into a decadent dish. I like them both mixed with the yogurt and as a topping at the end.
• Lets talk feta cheese. The crumbled, packaged, domestic stuff (in the United States) from the grocery store will overpower this dish (unless you absolutely love that type of pungent, salty feta). French and Israeli feta is far more mild, buttery and creamy, and it adds a layer of texture to this dish. Usually comes in a big block and you can slice it, or crumble it. A bonus is that you will have some leftovers which are so good on an open-face grilled feta sandwich with asparagus and mint :)

Photography by Eliesa Johnson Styling + Recipe by Iglika/Sprig of Thyme

Photography by Eliesa Johnson
Styling + Recipe by Iglika/Sprig of Thyme


Turkish Eggs  //  Яйца по Панагюрски

Serves 1 (very hungry person), or 2-3 people as a dip or a shared appetizer

Ingredients

• 3/4 cup full-fat Icelandic or Greek yogurt
• 1/4 cup crumbled Feta (French or Israeli) 
• 1 garlic clove, smashed 
• Handful of fresh herbs mix (dill, parsley, oregano, thyme)
• 1.5 tbsp butter
• 1/4 tsp of red pepper flakes
• 1/2 tsp of smoked paprika (plus more for garnish)
• 2 poached eggs (if looking for instructions, I got you covered)
• 2 pieces of crusty toast
• Salt 

Directions:

  1. Place the yogurt, the smashed garlic clove and the feta in a bowl. Rinse, pat dry, and roughly chop the fresh herbs. Add them to the bowl with the yogurt and mix to combine. Taste and add salt to taste. Set the bowl aside.

  2. To make the spiced brown butter: melt the butter in a small skillet over medium-high heat. Wait for a minute or so until the butter starts to foam. Watch carefully as lightly browned specks begin to form at the bottom of the skillet. Smell the butter; it should have a nutty aroma and golden-brown color. Turn the heat off immediately (so the butter doesn’t burn) and add the red pepper flakes and smoked paprika. Swirl the pan a few times to incorporate and infuse the butter.

  3. To assemble the dish: spoon the yogurt mixture in a shallow (pasta type) bowl. Use the back of a spoon to spread yogurt out into a bed for the eggs, carving ridges into the top to catch the oil. Add the poached eggs. Spoon the hot, spiced brown butter. Sprinkle some salt and smoked paprika. Add a few more dill and parsley leaves. Serve immediately with warm toast.

How to poach an egg

Fill a small saucepan with about 3 inches of water. Bring to a boil and add some salt and 1 tbsp of lemon juice, and turn the heat off. Crack an egg into a small bowl. Circle the water with a spoon to make a swirl and gently slip egg into the water, holding the bowl just above the surface of water. Repeat with the remaining egg (don’t swirl the water a second time). Cover the saucepan with a lid and let eggs sit until the whites are firm and the yolks have thickened but are not hard, about 5 minutes. Lift one of the eggs with a slotted spoon and gently press the yolk with your finger, the yolks should be just slightly firm around the edges, but not hard. If the yolks appear too soft to you, let the eggs sit in the water for another minute. Remove the eggs with a slotted spoon and place on a plate. Note: some recipes call for placing the poached eggs on a paper towel. I had never had success with that approach as my eggs will always stick to the paper towel, but try it and see if that works for you.

print recipe
2 Comments

TAGS: eggs, yogurt, appetizer, breakfast, brunch


April 16, 2020

Step-by-step how to make homemade ravioli

by Iglika in from scratch


IMG_1307_Cover2.jpg
IMG_1307_Cover2.jpg


If you have been following me, you have probably noticed that I write quite the lengthy stories (which, I am afraid, only a handful of very kind and patient creatures can read to the very end.) This post will be a bit unusual as the recipe and the instructions are so long that I have the feeling that if I write one of my usual sagas I might loose you somewhere in the middle.

So, my dear fiends, the only thing you should know is that fresh ravioli is one of my favorite things to make and eat. Fresh ravioli are a bit of a time investment, but just as anything in life that takes time to bloom, they are totally worth waiting for and make. When you make them for the first time you will feel so good, and will be so proud of yourself! Even if you screw them up, still proud! And if that happens, don’t despair, do it again another time, and ask me questions. I had even made a step-by-step visual tutorial, plus a fun little video for you to follow, to show you how easy ravioli are.

As I always say: Pour yourself a glass of your favorite wine, put your apron on and cook along!

Cooking Notes:

Does the dough recipe matters?
The below recipe proportions are based on my pasta dough recipe from my previous post. However, you could use a different dough recipe if you wish, just make sure it calls (or adjust it) for the same amount of flour as mine (1 cup, bit more or less) to ensure you end up with the same size dough. Why I prefer the pasta dough I make? It’s because it has a very high yolk content, which makes for a very silky dough that is very sturdy, and will keep itself together as well as the ravioli filling.

The pasta sheet thickness:
You want a pasta sheet that is not too thick, or one that is way too thin. In both cases your filling might burst out while boiling in the water. If your pasta sheet is too thick, it will be hard to glue the two ravioli sheets together as a packet. If your dough is too thin, it won’t be sturdy enough to hold the filling. To know you’ve got your pasta sheet thickness right, hold it up to the light and pass your hand behind it. If you can see the shadow of your hand, you’re good to go.

The filling size: 
I call for a 1/2 tablespoon of filling. This is meant to be more of a starting point than an absolute measurement. Play and adjust your filling since each piece of dough is going to be a different size. No two pieces of pasta roll out the same. I am a person that likes LOTS of filling, but often I am reminded during boiling, as things move and expand, the filling might burst in the water if there is too much of it. Test, test, test. Test to see what works for you.

Seal those ravioli babies:
Make sure that you individually press and seal really well the ravioli. Press with your fingers around the filling to get the air out of each packet and to seal the edges really well. This will ensure beautiful, even packets that will not burst while boiling.

Tools:
Set your table before you start making the ravioli.
• Small bowl of water (to seal the ravioli)
• Bowl with the ravioli filling
• Pastry wheel (I like the one that has straight edge on one side and fluted on the other for versatility)
• Rolling pin. I use a long, French rolling pin which allows me to cover a larger area, resulting in a wide 14” diameter circle sheet. However, if you have a standard American 10-12” rolling pin either cut your dough ball in two and roll two skinny and long sheets, or cur the dough ball in fourths and roll four skinny, long sheets.

IMG_1085.jpg
IMG_1149.jpg
Sprig_of_thyme_How-to-Rvioli__Step1.jpg
Sprig_of_thyme_How-to-Rvioli__Step2.jpg
Sprig_of_thyme_How-to-Rvioli__Step3.jpg
Sprig_of_thyme_How-to-Rvioli__Step4.jpg
Sprig_of_thyme_How-to-Rvioli__Step5.jpg
Sprig_of_thyme_How-to-Rvioli__Step6.jpg
Sprig_of_thyme_How-to-Rvioli__Step7.jpg
Sprig_of_thyme_How-to-Rvioli__Step8.jpg
Sprig_of_thyme_How-to-Rvioli__Step9.jpg
IMG_1288.jpg
Step-by-Step how to make homemade raviolli.jpg
IMG_1373.jpg

Ricotta and Spinach Ravioli Recipe

Serves 4

Ingredients

Fresh Pasta Dough
Follow this recipe from my previous blog post

Ricotta and Spinach Filling
• 1 bag (6oz) fresh spinach
• 2 tbsp olive oil
• 3/4 cup whole milk ricotta (preferably hand-dipped)
• 1/3 cup freshly grated Parmigiano Reggiano
• Rind of 1 lemon
• 1 tsp fresh thyme
• Salt 
• Pepper

Brown Butter Sauce
• 8 tbsp butter
• 20 sage leaves
• 8-10 garlic cloves, thinly sliced
• 4-5 tbsp not too sweet white wine
• 1/4 cup freshly grated Parmesan, plus more for garnish

Directions:

Pasta Dough
Follow the recipe from my previous post about making the pasta dough. You can use a different, or a favorite pasta dough recipe if you prefer (just make sure the flour proportion is same as mine, about a 1cup). As your dough is resting, make the ravioli filling:

Ravioli Filling

  1. Heat a large non-stick skillet over medium high heat. Add 1 tbsp of the olive oil and about half of the spinach (removing any yellow or wilted leaves) in the pan. Sprinkle some (but not too much) salt over the spinach (this will help the spinach to wilt faster). Lower your heat a bit and cook the spinach by tossing it frequently with tongs to ensure the leaves are wilting evenly. As the spinach wilts and looks about half of its size (after a minute or so), slowly add a handful of the remaining spinach from the bag, tossing with the tongs to help wilt evenly. Continue until all the spinach is in your pan. Add a splash of water or pinch of salt if the leaves need help wilting. Keep tossing until all the water has evaporated form the pan and all the spinach has wilted. Transfer spinach to a plate lined with 2-3 paper towels and let it cool for 10-15 minutes.

  2. Stack 2 paper towels and place the cooled spinach on top, cover the spinach with 2 more towels and press down with your hands to help extract all the extra water form the spinach. Repeat if needed to make sure all extra water is extracted from the spinach. You might need to replace the wet paper towels with dry ones and keep pressing. Removing the excessive water from the spinach will ensure your ravioli stays closed while cooking. 

  3. Place the spinach on a cutting board and chop very finely. Add the spinach to a small mixing bowl, with the rest of ravioli filling ingredients and the remaining 1 tbsp of olive oil. Mix well until evenly incorporated, taste and add salt and black pepper to taste.

Rolling the Pasta Dough

  1. Follow the recipe in my previous post about hand-rolling the pasta dough. Roll your pasta dough with a pasta machine if that works better for you. If you are hand-rolling, roll only half, or a fourth (see my NOTE) of the dough. Work with 1 piece at a time and keep the remaining dough wrapped in plastic. NOTE: I use a long, French rolling pin which allows me to cover a larger area, resulting in a wide 14” diameter circle sheet. However, if you have a standard American 10-12” rolling pin either cut your dough ball in two and roll two skinny and long sheets, or cur the dough ball in fourths and roll four skinny, long sheets. If using pasta machine, work with 1 piece at a time and keeping remaining dough wrapped in plastic as you work. 

  2. Make sure to roll the dough really thin (but not ultra thin). To know you’ve got your dough thin enough, hold it up to the light and pass your hand behind it. If you can see the shadow of your hand, you’re good to go.

Fill the Ravioli

  1. After your dough is thin enough, if you rolled your dough with a pasta machine, leave the sheet as is. If rolling by hand cut the sheet of dough in half lengthwise as well as the bottom 1” or so to have a straight line on top and bottom (if you wish, cut the sides too to create a rectangular piece, however, that is not necessary as those pieces will be cut removed during the ravioli cutting.) Starting 1” inch from the side, and 1” from the top, spoon the filling mixture, 1/2 tablespoon at a time, up length, spacing about 1” apart (you should get 4-5 mounds). Play and adjust your filling because each piece of dough is going to be a different size. No two pieces of pasta roll out the same. 

  2. Have a small bowl of water on the counter and dip your finger in and run a damp bead of water down each edge of the pasta and between each spoon full of filling. When done, flip the dough from the bottom over your filling.

  3. Dry your hands. Run your finger over the top edge by pressing just slightly to seal the ravioli. With the edges of your hands press down between each pocket of filling to seal together. Using a pastry wheel, run a straight line at the top to trim up the top and side edges and shape the ravioli. Make sure you don’t cut too close to the filling as it might come out during cooking. Run the pastry wheel between each pocket of filling to cut each individual ravioli. 

  4. One ravioli at the time, press around each pocket of filling to seal, then press outward toward edges, pushing out any air pockets. The most important part of this step is getting the air out of the ravioli when you seal it, otherwise it might burst in the water.

  5. Arrange ravioli on a baking sheet and dust top and bottom with semolina. Cover the ravioli loosely with plastic wrap. Repeat these steps with the remaining dough and filling.

Cook the Ravioli
Working in batches if needed, cook ravioli in a large pot of boiling salted water until tender, about 5 minutes. Remove with slotted spoon and place in serving pasta bowls. Keep about 1/2 cup of the pasta water in case you need it for the sauce.

Make the Sauce
In a medium saucepan, melt 4 tbsp butter over medium-high heat. Add half of the sage. Cook until leaves crisp up a bit and become a darker green (about a 1minute or less). Remove from heat and place leaves on a plate lined with a paper towel. Place the pan back on the heat and repeat with the remaining sage. Place the second batch of sage to the paper towel-lined plate. Add the remaining butter to the pan, let it melt and add the sliced garlic. Cook until fragrant, and the garlic becomes lightly golden color (be careful to not burn the garlic as this happens easily). Add the wine and let it cook for a few seconds. Add the Parmesan cheese and swirl the sauce around the pan to mix and melt cheese a bit (no more than few seconds). Sauce should look lightly brown and creamy. Turn the heat off. Spoon the sauce over the ravioli. Top with 5 sage leaves and freshly grated Parmigiano Reggiano. 

NOTE: Sometimes the ravioli dry out a bit while the sauce is cooking, or the sauce looks too thick. In that case, add a tablespoon or two of the pasta water to the sauce to loosen it.

Print recipe
Comment

TAGS: pasta, eggs, spinach, ricotta cheese, lunch


  • Newer
  • Older

Powered by Squarespace 6