Search
  • Journal
  • Recipes
  • About
  • Say Hello
  • Subscribe
Close
Menu
Search
Close
  • Journal
  • Recipes
  • About
  • Say Hello
  • Subscribe
Menu

sprig of thyme

March 28, 2020

How to make homemade pasta without pasta maker

by Iglika in from scratch


Sprig-of-thyme-pasta-dough-cover1.jpg


This pasta recipe is my all-time favorite. I have made it so many times over the years and its my go-to every time. Occasionally, I’ll try a new pasta recipe version – with less eggs, with only whole eggs, adding olive oil, adding lots of water – you name it, and I keep coming time after time to this one. It is a simple recipe containing only eggs and flour. I discovered its original version watching a Julia’s Child episode of ‘In Julia’s Kitchen with Master Chefs’ with Jimmy Sneed where he was so charming, showing Julia how to make pasta telling her that everyone can make a pasta, even a child can do it!  At the time I watched the episode for a first time, I had never made pasta before in my life. I was super intimidated by pasta making, thinking of it as this big, scary, fancy thing requiring years of special chef training, also that I must an Italian grandma, or at the very least must be living in Italy, breathing Italian air, and eating only double 00 flour in order to be able to make a good pasta. I don’t know about you, but growing up my mom only bought packaged dry pasta and the woman was a fabulous home-chef, baking bread and cooking cow’s tongue, but she never made pasta, so I never thought that could I possibly do it myself.  My other mental obstacle (yes, it’s always the head, isn’t it?) was that for years I believed that pasta can’t be made without a pasta roller/machine. And I thought to myself  “I can buy one, but what if I suck at pasta making and then I just blew $80 bucks and have a gadget that I can’t use for anything else! ” That is why that episode of Julia Child and Jimmy Sneed was so revolutionary for me – a turning point in my beliefs about pasta, challenging all of them. And the whole owning a pasta rolling machine, I got over that thought after having the realization that Italian grandmas have made pasta for years and years, far before the pasta machine became available, so if they can do it I can do it too. As a famous slogan goes: Just do it :) so, I put my apron on and I did it, and fresh pasta has become one of my favorite things to cook.

About the pasta dough: the original recipe called for half all-purpose flour and half semolina flour. The large quantity of semolina makes for a denser pasta and I personally prefer a soft pasta that is strong enough to hold ravioli filling, or thin noodles without falling apart. I also found that adding more semolina makes for a very hard dough to roll, mainly due to the high yolk content. So over the years I perfected the pasta consistency to what I like – a firm textured pasta, yet silky and very flavorful. In the recipe I call for mostly all-purpose flour and only a tablespoon of semolina in the dough. Additional semolina is used for the already made noodles as they are being tossed in the semolina, preventing them from sticking together. If you are a beginner at pasta making don’t despair if it doesn’t turn right the very first time, and don’t be an overachiever starting with ravioli, try an easy to cut pappardelle. And if you have a hard time rolling this eggy dough. Start over, or try a different recipe like this one.

IMG_0954_2.jpg
Sprig_of_thyme_Pasta_Dough_Step1.jpg
Sprig_of_thyme_Pasta_Dough_Step2.jpg
Sprig_of_thyme_Pasta_Dough_Step3.jpg
Sprig_of_thyme_Pasta_Dough_Step4.jpg
Sprig_of_thyme_Pasta_Dough_Step5.jpg
Sprig_of_thyme_Pasta_Dough_Step6.jpg
Sprig_of_thyme_Pasta_Dough_Step7.jpg
Sprig_of_thyme_Pasta_Dough_Step8.jpg

How to make homemade pasta without pasta maker

Serves 4

Ingredients:

• 1 cup of all-purpose flour (plus more for dusting)
• 1 tbsp semolina flour (plus more for preventing pasta form sticking together)
• 1/2 tsp salt 
• 3 egg yolks*
• 1 whole egg

*Wondering what to do with those 3 leftover egg whites? Make some meringues. They are so silky and wonderful to snack on, or crumble them over your favorite ice cream

Directions:

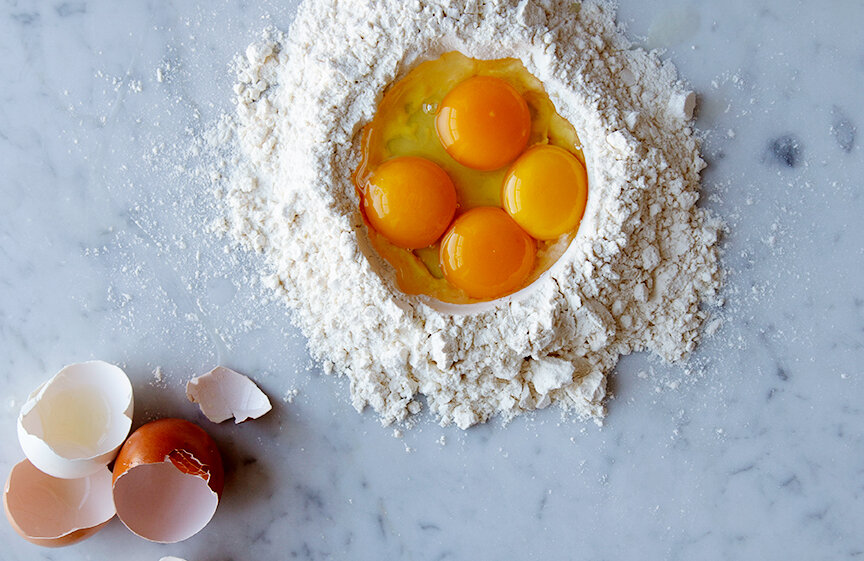
  1. Start with 3/4 cup all-purpose flour as the size of egg yolks vary. On a clean work surface or  a mixing bowl place flour, semolina and salt. Make a well in the center and add egg yolks and the egg. Starting from the center using a fork (easier to clean up and work with) or your fingers start by mixing the eggs together, working outward from the center of well, gradually incorporate flour mixture into egg mixture until a irregular dough forms. If using your hands and they are sticky, remove as much dough from them and wash hands before kneading the dough otherwise you will find it difficult to work. If the dough seems sticky add the remaining flour 1 tablespoon at a time. If the dough becomes stiff add 1 tablespoon of water, but only enough to keep the dough together.

  2. Transfer to a lightly floured work surface and knead until dough is smooth and springs back when pressed with a finger, 8 to 10 minutes. While kneading, add more water, 1 tablespoon at a time, if dough feels too dry; or add more flour, 1 tablespoon at a time, if dough feels too sticky.

  3. Shape dough in a ball, wrap it in a plastic wrap. Let it rest on the counter for 30 minutes.

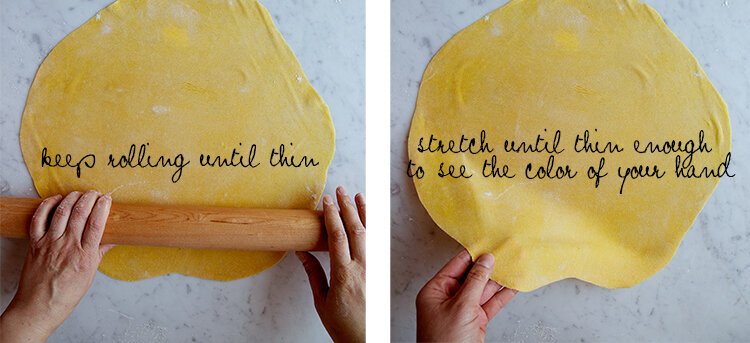
  4. Roll out the pasta: cut the dough in half. Roll out one half at a time, keeping the rest of the dough wrapped. Very lightly flour the work surface. Shape the dough into a ball. Press dough down so it flattens like a disk. Start rolling by placing your rolling pin in the center of the disk and roll away from you and then back towards you to even out the dough thickness. Lift up the dough and turn it 90 degrees, roll in the same manner described. With each pass as you roll, lift the dough up, re-dust the counter beneath if needed, and turn it over. Keep rolling and stretching until the pasta is thin enough to see the color of your hand or its print through it. 

    For pappardelle: flour the dough really well, roll it and cut strips as wide as you prefer. When done cutting, loosen up the ribbon-like strips and toss them generously with semolina. Place in an airtight container until ready to boil. 

    For ravioli: see my next post. 

  5. Repeat with the remaining dough. 

    To cook the pasta: Bring a pot of salted water to a boil. Shake off the extra semolina and add the pasta handful by handful to the water, gently stir, lower the heat to a medium-high and cook for 5 minutes. Taste a noodle to check if it is done to your desired firmness.

print recipe
Comment

TAGS: pasta, eggs, handmade pasta, main dish


December 24, 2018

Turmeric Roasted Carrots with Carrot Top Pesto and Roasted Garlic Sauce

by Iglika


Turmeric_Roasted_Carrots_Sprig_Of_Thyme_Blog_Cover_3.jpg


Days of sparkle, festive Christmas trees, buttery warm cookies, slow cooked foods that cover the entire house with a delightful aroma and make you jump out of the chair and go lick a spoon in the kitchen, steal a cookie or open the oven door to check on that roasting goodie that makes your mouth watering with anticipation. Busy house with fancy dressed family. Rushing people on the streets cozzied up with scarfs and mittens while caring bags of produce and presents. Passing strangers and neighbors wrapped in their scarfs, mittens and bags, nodding to say hello and smiling in this holiday togetherness. Colorful wrapping paper, long ribbons covering the living room floor as boxes and items are carefully wrapped, stacked and placed under the tree. 

Christmas to most of us is about family and traditions. Celebrating them. Recreating them. Making new ones. And this year, as with any other year that I have lived away from my family, I celebrate it – always, by making a wall tree out of Christmas ornaments simply because my apartment is waaaaay too small to fit a real tree. Recreate it – as I cook an odd numbers of vegan dishes on Christmas Eve. Make a new tradition – as I celebrate it with new “by Love” family eating Lasagna while hoping not to anger the Gods that I broke the tradition and the “rule” and ate meat and not vegan food on Christmas Eve. And coming up with new or revised traditional Bulgarian dishes because sometimes is hard to find the ingredients, and sometimes because as new life comes and asks me to renew, to be open, to change and to make something new while preserving the core.

So this year I decided to make, as always, the traditional bread with fortunes but with a new recipe. Make stuffed leaves, but rather than using ‘the hard to find’ grape leaves I am stuffing collard greens. And to make turmeric roasted carrots in place of the bean soup, not because I don’t like bean soup, in the contrary I LOVE it, but every year I eat too much of it (out of pure gluttony – hey, non of us is perfect) until my tummy hurts. So this year I decided to replace the soup with roasted carrots which I can eat by the loads without the belly ache.

Now onto the carrots. 

This recipe had fallen into my favorites box and which I have made a million times. Well, not that many times, but you get the idea of why something becomes my favorite – because it is insanely good and I crave it often. So why this recipe works? It is because the carrots are roasted with aromatics like turmeric and cumin. The cumin gives a middle eastern (and Bulgarian) flavor while the turmeric and the heat makes the carrots sweet and nicely roasted with that slightly brown exterior, soft but not mushy exterior and extremely sweet. The other part of the recipe that I love, even on its own or as an accompaniment to roasted potatoes, veggies or just to dip my bread are the carrot top pesto and the roasted garlic sauce. The carrot top pesto uses the entire carrot vegetable – the carrots, the leaves – yes, everything my friends. If you haven’t made or tasted carrot top pesto, let me tell you that it is so good that you might ditch your regular pesto and switch to this one, especially in the winter time when basil by the bunch is so expensive. This pesto has the same components as a traditional pesto but replaces the basil with carrot tops and handful of cilantro. The roasted garlic sauce is so rustic, full of flavor and easily addicting. It mixes roasted garlic with greek yogurt, lemon juice and olive oil that gives body and richness and it is whipped until smooth. When laid as a base for the roasted carrots and accompanied by the carrot top pesto is, in my perspective, is a match made in heaven and so addictive that it goes into the favorites box and to be made a million times.

Well, enough carrot-blabbing from me. I hope you have a very Merry Christmas with your family and loved ones. And don’t forget to celebrate your traditions, to recreate them and to make new ones as new life comes to you.

xoxo


IMG_8541.jpg
IMG_8656.jpg
IMG_8677.jpg

Turmeric Roasted Carrrots with Carrot Top Pesto and Roasted Garlic Sauce

Serves 4 (as a side dish)

Ingredients

For the Roasted Carrots
• 2 bunches of carrots scrubbed, tops trimmed to about 1/2 inch
• 1 tbsp cumin seeds
• 1 tbsp ground turmeric
• 1/4 tsp salt
• 3 tbsp olive oil

For the Carrot Top Pesto
• 1 bunch carrot tops (about 2 cups roughly chopped)
• 1/2 cup cilantro leaves
• 1/3 cup + 2 tbsp olive oil
• 1/4 tsp salt
• 3 tbsp lemon juice
• 1/3 cup chopped walnuts
• 1/3 cup freshly grated Parmesan
• 1 small garlic clove

For the Roasted Garlic Sauce
• 1 large garlic head
• 1 cup plain, full fat, greek or icelandic yogurt
• 1 tbsp olive oil
• 1-2 tbsp lemon juice
• Salt and pepper

Directions

Carrots

  1. Preheat oven to 425F.

  2. Cut the large carrots in half and leave small/skinny carrots whole. Toss them with the olive oil, turmeric, cumin and salt on a rimmed backing sheet. Prepare the garlic for the yogurt sauce: Peel and discard the papery outer layers of the whole garlic bulb, leaving intact the skins of the individual cloves of garlic. Using a sharp knife, cut 1/4 to a 1/2 inch from the top of cloves, exposing the individual cloves of garlic. Place the garlic on a piece of aluminum foil, drizzle a couple teaspoons of olive oil over the exposed head, and wrap the garlic the foil. Place in the pan with the carrots. Roast, shaking the pan occasionally, until the carrots are evenly browned and tender about 25 minutes. If your carrots are on the larger side, this might take a bit longer. If you like your carrots drier and sweeter (like I do) roast them for an attitudinal 15 minutes, but remove the garlic before doing that so it doesn’t burn. Remove carrots from the oven and set aside.

Carrot Top Pesto

  1. Rinse the carrot top greens to dislodge any dirt. Pick out and discard any dry, yellowed, or otherwise unappetizing looking leaves. Discard tough stems.

  2. Place the carrot tops greens, cilantro, garlic, olive oil, lemon juice and salt in a food processor or immersion blender. Pulse several times. Scrape the sides down with a rubber spatula. If the mixture is too thick and hard to work with, add 1-2 tbsp of olive oil or water. Add walnuts and Parmesan cheese and pulse or puree until smooth. I like my pesto really smooth, so I puree it on high for a long time until no chunks are left. Taste and add more salt and lemon juice. 

Roasted Garlic Sauce

Allow the garlic to cool enough so you can touch it without burning yourself. Use a small knife cut the skin slightly around each clove. Use a cocktail fork or your fingers to pull or squeeze the roasted garlic cloves out of their skins. Place all roasted garlic cloves into the food processor bowl. Add the rest of the roasted garlic sauce ingredients. Wizz until smooth. Taste and add more salt, pepper or lemon juice.

Assembly

Spoon 1-2 tbsp of the yogurt sauce on 4 individual plates. Place roasted carrots on top. Sprinkle few cilantro leaves (optional). Serve with the carrot top pesto.


Print Recipe


2 Comments

TAGS: carrots, Vegetarian, pesto, garlic, winter


November 24, 2018

Kiopoolu–Smoked Eggplant Dip

by Iglika in Bulgarian recipe


Smoked_Egplant_Dip_Sprig_Of_Thyme_Cover.jpg


Hello my dear blog! Sorry, I haven’t been here with you in a long time. And it’s not that I have forgotten you. Quite the opposite. I have worked on recipes for you, and I have taken tons of photos to make you beautiful, and been with some amazing food-cooking farm-living creatures to write you some good stories. Yet, somehow, sitting down and writing has been slipping away from me. Maybe it was the summer. Maybe it was the lovely people that surrounded me. Or maybe both. But hey, winter is here and I have no more excuses but to sit inside on a chilly day and write and write and write. So here I am.

And now, about today’s recipe:
Kiopoolu my dear American friends is the Bulgarian word for eggplant dip or Baba Ganoush. Just as the other well know forms/names of a eggplant dip the eggplant is roasted (or grilled) to soften the flesh, then the flesh is scooped and mixed with garlic, olive oil and some acid, like lemon juice or vinegar, and enjoyed as a side dish or an appetizer. I loved Kiopoolu when I was a kid because my dad always grilled the eggplant on a hot summer August night. Then while still hot, he removed the skin with a knife and mixed the flesh in a huge wooden mortar and pestle with some roasted red peppers, grated fresh tomatoes, garlic, vinegar and lots of parsley. I loved the smooth texture of the eggplant dip and the zesty-freshness of the tomatoes and the vinegar. My memory of these times is that my family always enjoyed the Kiopoolu on that hot summer night when all bunch of dips and salads replaced a cooked, dinner just because it was too hot to eat heavily cooked meal.

My version of Kiopoolu is a mix of the  Kiopoolu of my childhood combined with my experiences enjoying the different ways of eggplants and dips I had over the years as I lived in the United States or traveled to Greece. What I love about the eggplant as a vegetable is that its flesh is mild in flavor and absorbs and serves as a base for so many other flavors as it holds them together. You can go as basic as salt, olive oil, garlic and acid or, go all the way by adding parsley, mint, walnuts, and roasted peppers. In this recipe, I grilled the eggplants whole which hardened their skin and made it easy to scoop away the flesh and it added that slight smoky-summery flavor to the dip. I used lemon juice and added fresh grated tomatoes for a balanced and complex acidity. I also used both mint and parsley for freshness and mixed everything with fine ground walnuts. 


Hope you like it ❤

xoxo


IMG_8314.jpg
IMG_8351.jpg
IMG_8387_V2.jpg

Kiopoolu – Smoked Eggplant Dip

Serves 4-6 as an appetizer


Ingredients

• 2 medium size eggplants
• 2 Roma tomatoes, grated*
• 1/4 cup whole fat Greek or Icelandic yogurt
• 1 large garlic clove, finely minced 
• 3 tbsp olive oil + more for serving
• 1/3 cup raw or toasted walnuts, finely pulsed in a food processor 
• 2 tbsp finely chopped mint + few leaves for garnish
• 2 tbsp finely chopped parsley + few leaves for garnish
• 1/2 lemon, juiced (about 3 tbsp)
• Salt + Pepper 
• 1/2 tsp Sumac (optional) 


* To grate tomatoes: slice them in half and grate (flesh side against the grater) on the largest holes of a grater over a medium bowl until all that’s left is the flattened tomato skin and stem. Discard skin and stem. 


Directions

  1. Prepare a charcoal grill for medium heat (coals should be covered with ash and glowing red with no black remaining.) Place eggplants 2 inches from heat source. Allow skins to blister and char, turning with tongs until entire surface is blackened and eggplants are completely soft, about 10 to 12 minutes. Set aside on a large plate until cool enough to handle and to allow some of the juices to run out.

  2. Slice the eggplants lengthwise and scoop the flesh from the skin into a the bowl of a food processor (it’s okay if bits of charred skin get in there too). Discard burned skins. 

  3. Place the remaining ingredients except the sumac (if using) in the food processor and gently pulse until all ingredients are incorporated but still slightly chunky (Do not over blend or you will end up with a baby-food-like puree.) Taste and add more salt, lemon juice, herbs or olive oil per your liking.

  4. To serve, drizzle the dip with more oil and top with mint and parsley leaves and sumac (if using.)

Dip can be made up to 2 days ahead. Cover and keep chill.

Print Recipe
Comment

TAGS: appetizer, side dish, Vegetarian, eggplant, summer


  • Newer
  • Older

Powered by Squarespace 6