Search
  • Journal
  • Recipes
  • About
  • Say Hello
  • Subscribe
Close
Menu
Search
Close
  • Journal
  • Recipes
  • About
  • Say Hello
  • Subscribe
Menu

sprig of thyme

July 3, 2014

Wild mushroom risotto

by Iglika


“And it rained and rained and it rained. Piglet so told himself that never in all his life, and he was goodness knows how old–three, was it, or four?–never had he seen so much rain. Days and days and days” – Winnie the Pooh. 

Oh boy, this is how much rain we got here in Minnesota over the past few weeks. We got flooded. Literally. And what does one do after so much rain? One idea is putting rain boots on and jumping in the puddles (in my case street rivers and ponds) until happily drenched. Or grabbing a boat and paddling to work. But I had another idea for the blog, which did not involve more water...and that is mushroom picking.

When I was young, at our cabin in the mountains, and after days and days of rain, mushroom picking is what we did with my dad. We would wait a few days after the rain and if we were lucky enough to get several sunny days, we would get armed with baskets, bags, even huge burlap sacks (I am not kidding, my dad was pretty serious about mushroom picking), and we would be on our way to the mushroom kingdom.

When I first moved to the United States all the houses and the yards reminded me of my cabin. The idea of mushroom picking stayed with me, but the nicely trimmed and magazine perfect American lawns were not exactly the best place for mushroom picking. And it is not that I didn’t try – I did...and yes, I ate those mushrooms. But the result was a bit unexpected and quite unpleasant...

Since then I decided to go mushroom picking at my co-op only. They have such a good selection that to me, it is almost like mushroom picking in the forest. 

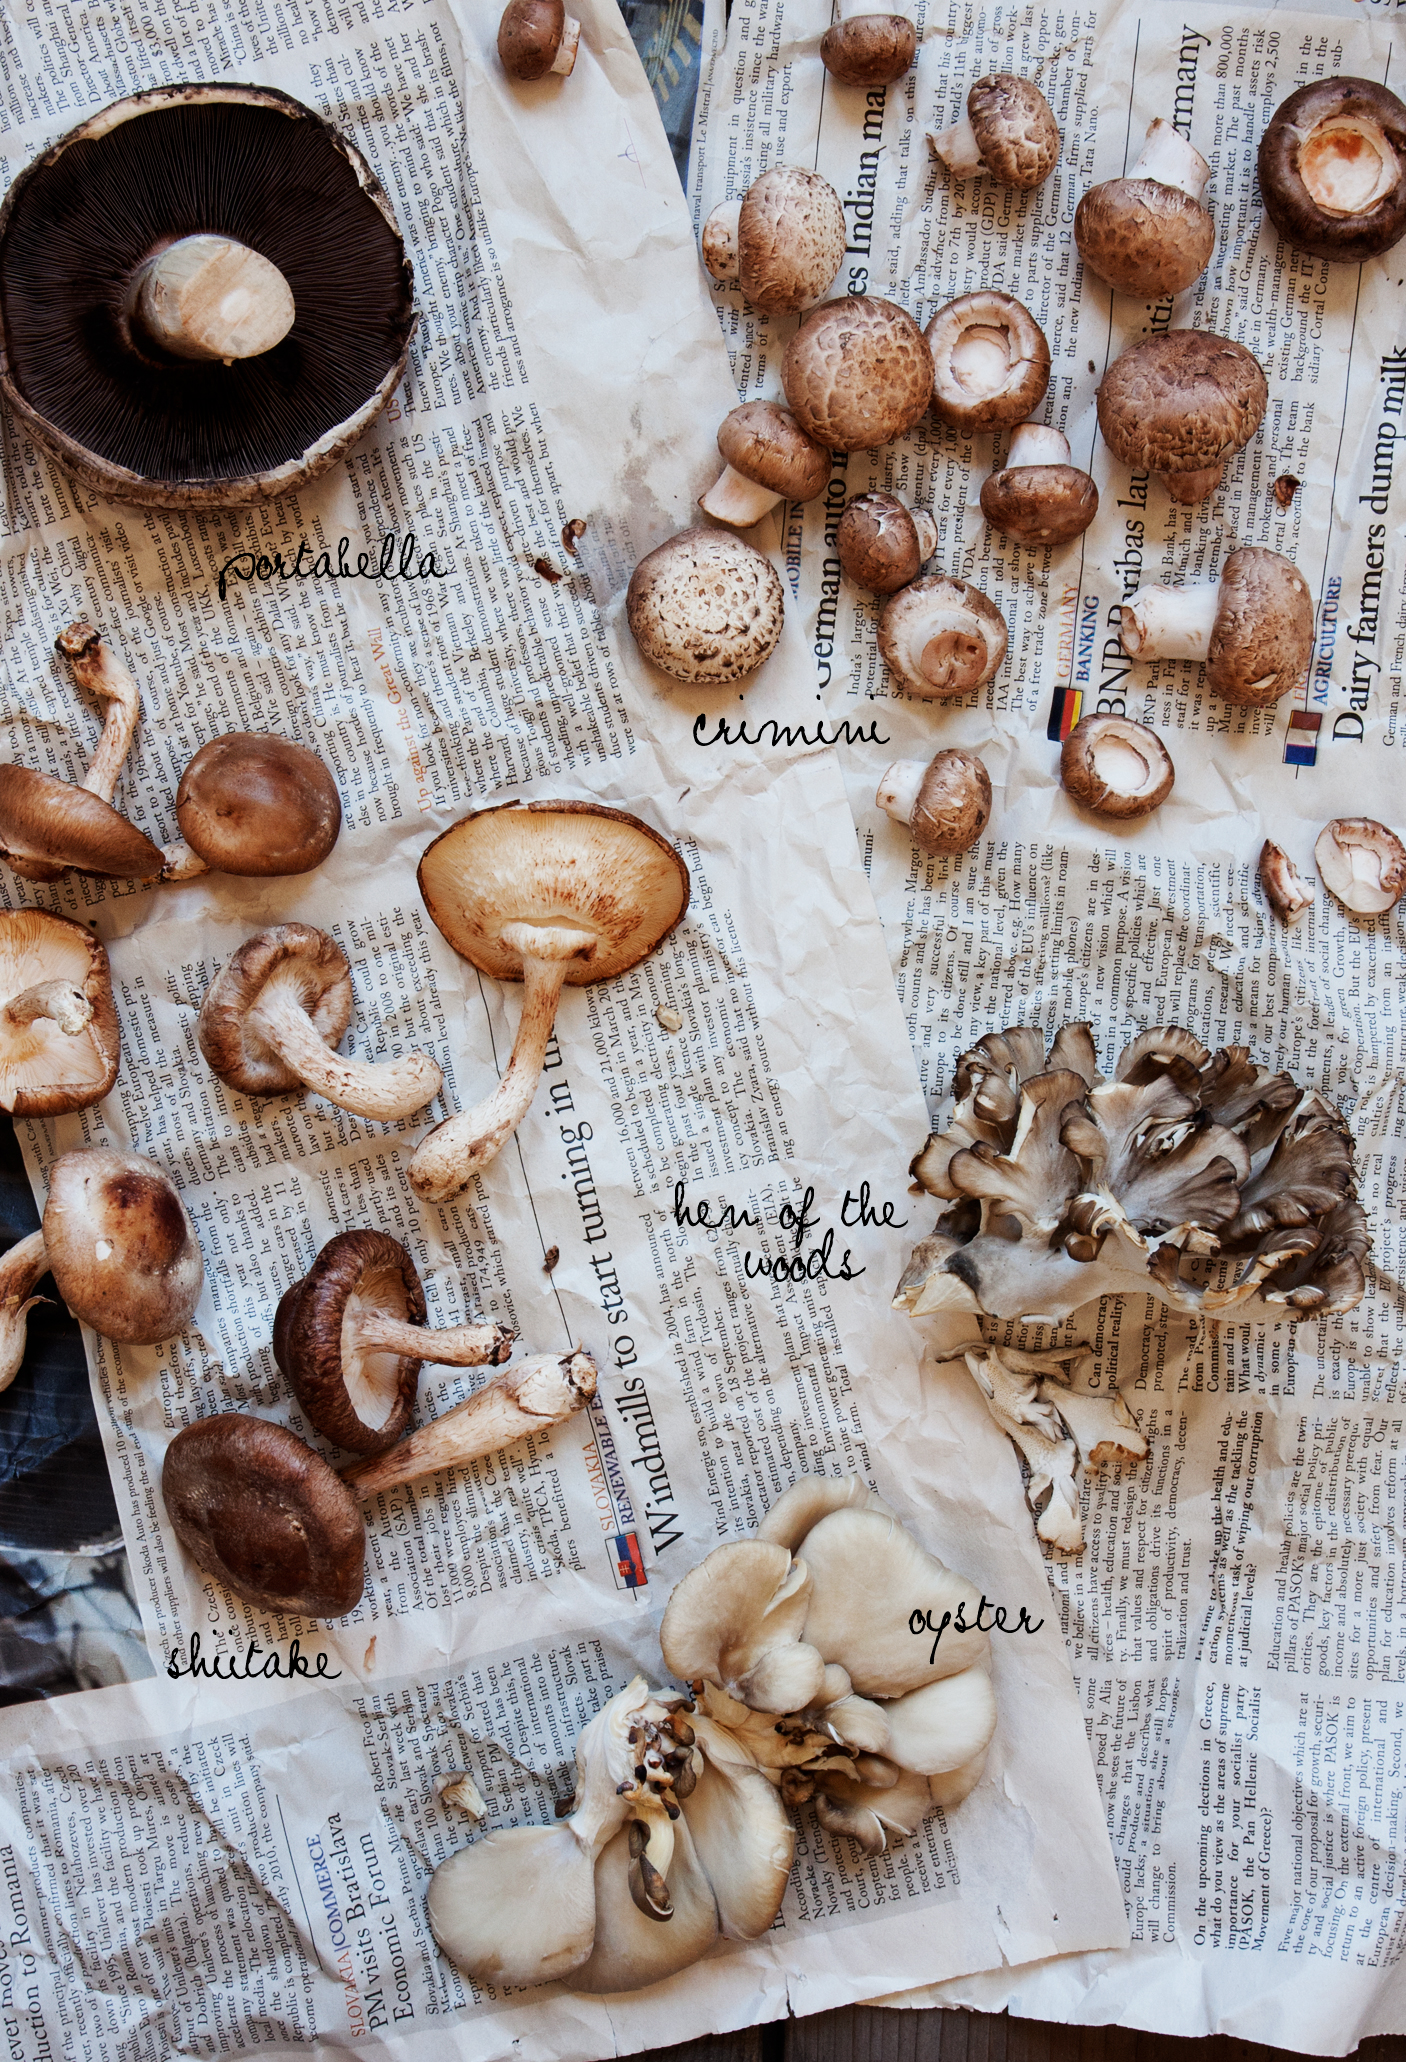
So today’s recipe is for a wild mushroom risotto. I picked blend of a few kinds of mushrooms that appealed to my taste, but feel free to use or experiment with mushrooms that are available to you. If you are lucky enough to get a farmers’ market around you that offers wild, hand-picked mushroom, you should take advantage of it and get mushrooms from there. The flavor would be superior. 

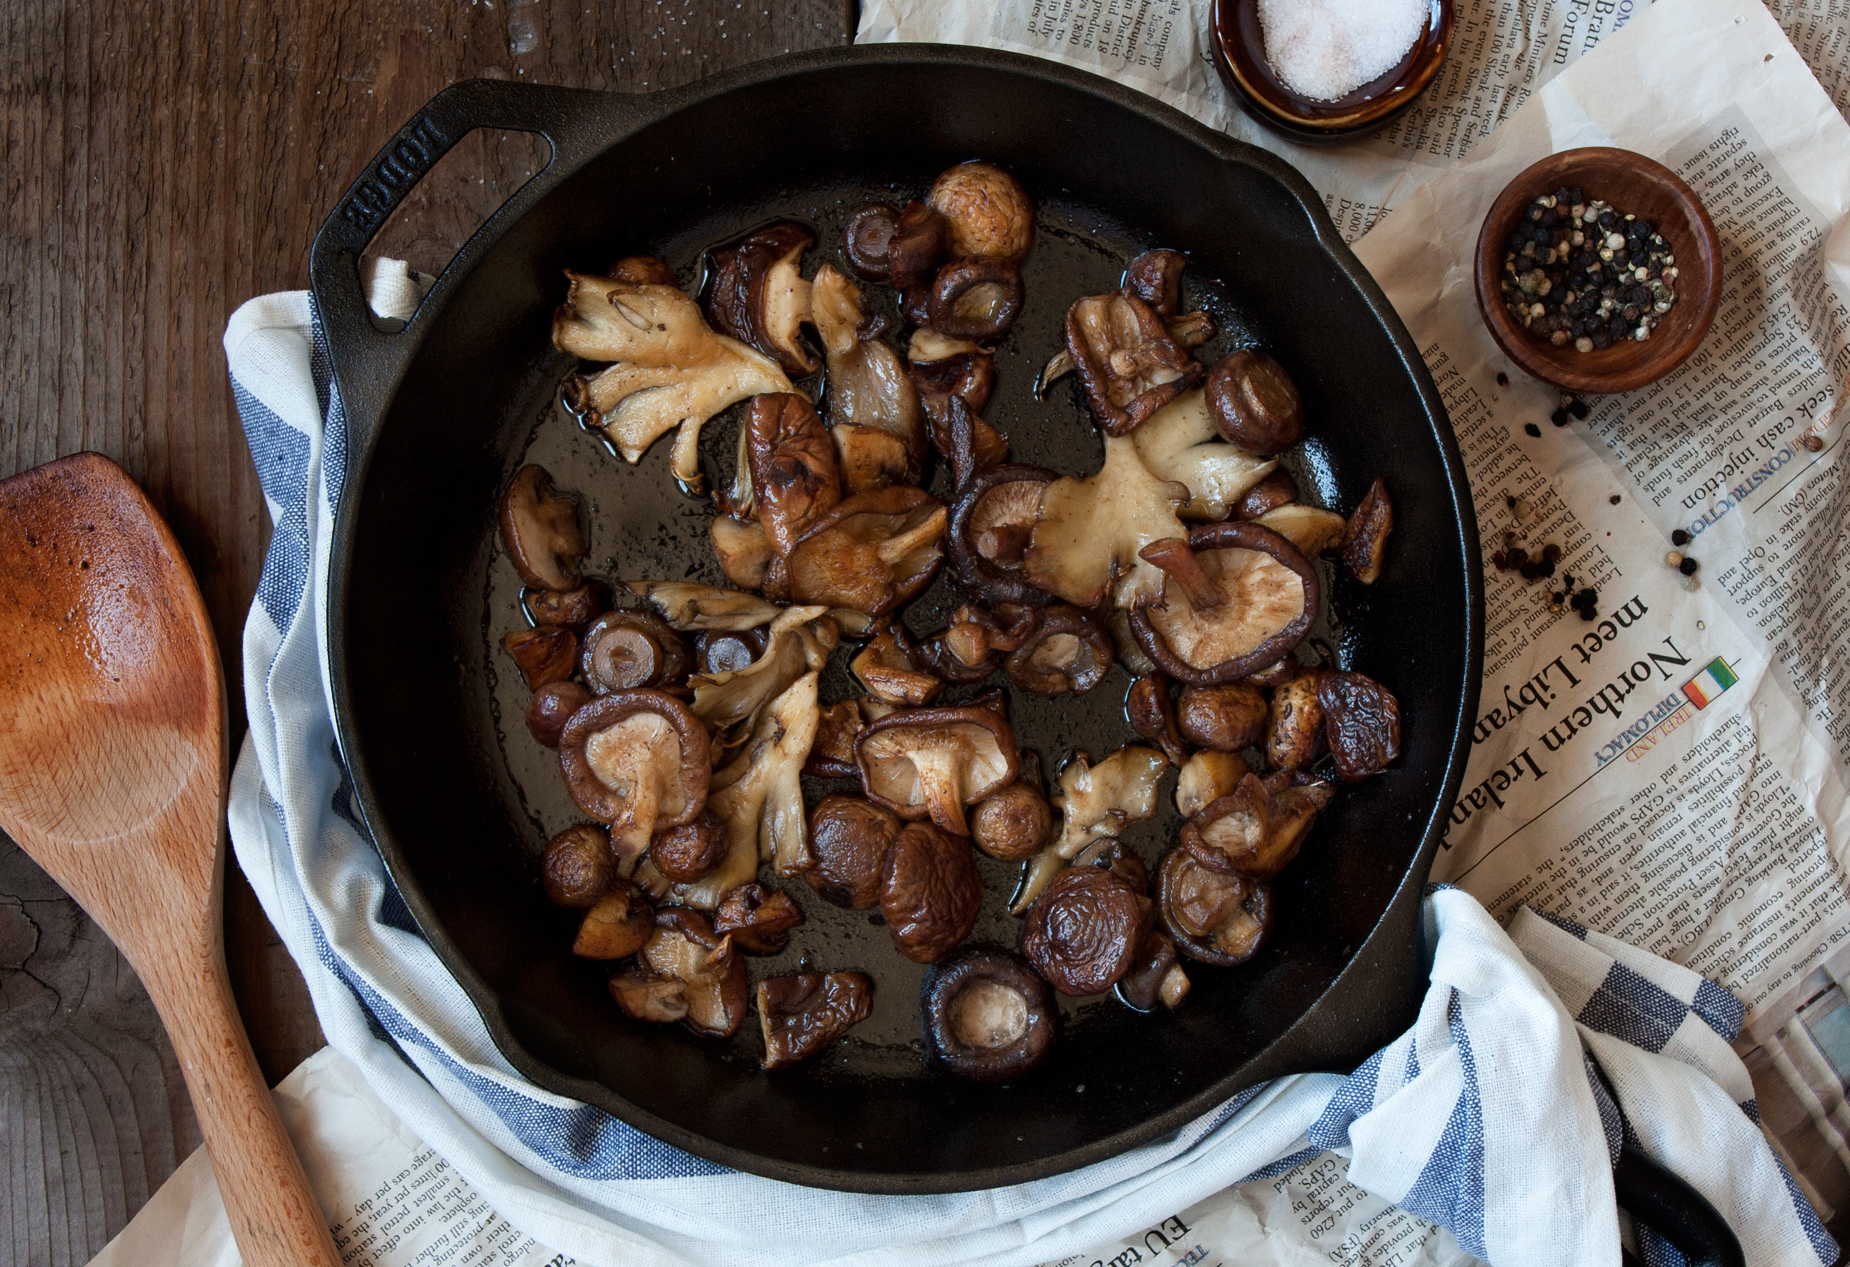
When cooking the mushrooms, use lots of butter and cook each kind separately. This way each kind will cook evenly.  Make sure you don’t overcrowd your pan with mushrooms and season after they are done. Salt releases the water from the mushrooms and you don’t want boiling mushrooms in the pan. I used both lemon juice and lemon rind in the risotto, which makes it very fresh and flavorful. At the end I added some fresh thyme, an herb that I find to go very well with mushrooms, but if you wish, you can use parsley instead.


Enjoy, and let me know how it was.

Sprig_of_Thyme_Mushroom_Risotto3.jpg

Wild Mushroom Risotto

Serves 2 (main course), 4 (side dish)


Ingredients:

• 7 tablespoons butter
• 1 lb fresh wild mushrooms (portabella, crimini, shiitake, hen of the woods, oyster)
• 2.5-3 cups low sodium chicken broth
• 1 tablespoon olive oil
• 1 small leek, finely chopped
• 3/4 cup arborio rice
• 1/4 cup white wine
• 1 garlic clove, minced
• 1/2 lemon, zested and juiced
• 1/2 cup grated Parmesan cheese, plus additional for serving
• Black pepper
• 1/2 teaspoon fresh thyme


Directions:

  1. Clean the mushroom by gently brushing or wiping the dirt from them. Remove the end part of the stems. Slice the large mushrooms, quarter the medium ones, halve the small mushrooms or leave them whole if tiny-tiny.

  2. Melt 2 tablespoons of butter in a heavy/cast iron skillet over medium-high heat. Add 1/3 of the mushrooms (same kind or size if possible). Sauté the mushrooms until tender and lightly brown, about 3-4 minutes by stir occasionally to avoid burning. Transfer the mushrooms in a medium bowl, sprinkle with salt and mix well. Repeat the same step with the remaining 2 batches of mushrooms and the 4 more tablespoons of butter.

  3. Bring the chicken broth to simmer in a small saucepan. Keep warm. Add the olive oil in a medium sauce pan over medium-high heat. Add the leek, sprinkle with salt and saute until soft, about 2 minutes. Add the rice and cook until the edges begin to look translucent, about 1 minute. Add the wine and garlic and stir until the liquid is absorbed, about 30 seconds. Add 1/2 cup of the chicken broth and stir until most of the liquid is absorbed, about 1 minute. Repeat 2 more times by adding 1/2 cup of the chicken broth each time until the rice is cooked halfway through. Add the mushrooms and stir. Continue with the remaining broth by adding 1/2 cup each time until almost absorbed before adding more, until the rice is cooked but firm to bite (al dente) and creamy, about 7 minutes. Stir the remaining 1 1/2 tablespoons of butter, lemon zest and juice, Parmesan cheese and thyme.

  4. Remove from the heat and let it stand for 5 minutes. If risotto seems sticky you can add 1/4 cup of chicken broth to loosen the texture. Taste and season with pepper and salt if needed.

  5. Serve the risotto immediately by dividing it between 2 bowls. Serve with a small bowl of grated Parmesan for topping.

print recipe
6 Comments

TAGS: mushrooms, risotto, lunch, Vegetarian, fall


June 15, 2014

Cabbage, radish and turnip salad with spicy dressing

by Iglika


Someone once said “The sun always shines – and is always beautiful”. Today the sun shined and it was exceptionally beautiful. It touched my skin so gently and warmly, it hugged my arms like a cashmere shawl in a late summer evening, and it felt like a soft loving kiss on my face. In a day like this everything feels somehow different, noting has changed and yet life around appears as seen for the first time. 

I grabbed my bag and I went on my daily trip to the store. I was about to fill my basket with the usual stuff, you know – the things we buy by habit, the ones that we grab with such certainty as if no other food existed. And I am not talking about basics like eggs, oil or flour – I am talking about the repetitive meal combinations that we end up eating every day. To me this ‘safe’ food is salad greens – the kind you can find at the American markets all year around.  I grab those so quickly when I am at the store, not even realizing that other foods are fresher and in season.

Today appeared to be no different. I was about to grab the greens when I felt the warmness and the energy of the morning sun. It made me excited and it somehow woke me up. I decided to put the salad greens down and to just walk around the fresh produce area of the store and pay attention to what else is around me. To my surprise, and right under my nose, there was a display of fresh local spring veggies and herbs. Beautiful radishes and turnips placed on display to be seen as you walk in the store, and which I had not for who knows how long. And as it often happens in life, abundance is right before our eyes, we just need to shift our focus so we can see it.

As I dropped the salad greens, I grabbed some fresh radishes and turnips. I had no idea if together they will taste any good, but I wanted to try them anyway. I left their nature to guide me on how to prepare them, rather than my habit. They were so crunchy and fresh, so I thought cabbage might go well with them. Since their taste and texture was fairly similar, I figured out a creamy avocado and a zesty and a bit more complex dressing will be a nice complement to the salad.

The end result was a refreshing and different salad. It made me feel happy and joyful about challenging myself, and it and it thought me a valuable lesson – to stop going on autopilot and to see what really is around me.

Cabbage, radish and turnip salad with spicy dressing

Ingredients:

Serves 4-6

• 1/2 medium cabbage (about 1 lb), shredded
• 1 bunch radishes (about 7-8), thinly sliced
• 1 bunch turnips (about 6-7), thinly sliced
• 1 cup arugula (optional)
• 1 ripe avocado, thinly sliced

Dressing:
• 1 cup Greek yogurt
• 1 cup cilantro leaves
• 1 tablespoon chopped pickled jalapeños
• 1 lime, juiced (about 2 tablespoons)
• 1 teaspoon grated ginger
• 3 tablespoons olive oil
• 1/2 teaspoon salt
• Pepper


Directions:

  1. Place all dressing ingredients in a standard or immersion blender and blend until smooth and creamy. Taste and add more lime, jalapeños or seasoning if preferred. Set the dressing aside or refrigerate (up to a week) if not used right away.

  2. Place the cabbage, radishes, turnips and arugula in a large bowl, add 2/3 of the dressing and mix well. Taste and add the rest of the dressing if needed. Top with the sliced avocado.

Note: Shredded (undressed) cabbage and whole trimmed radishes and turnips keep well for about a week in the refrigerator.

print recipe
6 Comments

TAGS: turnip, cabbage, avocado, yogurt, jalapeños, salad, radish, Vegetarian, spring


May 3, 2014

Italian brioches

by Iglika in Bulgarian recipe


So this year I completely forgot about Easter, maybe because it was so cold for so long that I somehow imagined that Easter would be in July, when the snow is finally gone. But no, it was in April, and I realized that a few days before the holiday, so I was completely unprepared.

For years my Easter bread has been a disaster so I really wanted to improve the recipe this year. But since it was too late to test, improve and post the recipe on time for Easter, so I decided to just go for Italian brioches.

For those of you who don’t know, brioches are sweet pastry treats which in Italy are as widely spread as the croissants in France. They are made of sweet dough, which is also used to make Easter bread in eastern Europe and Greece. In Italy, brioches are enjoyed all year around and they are sold in cafes and pastry shops. Italians have them with their morning espresso and the brioche filling can be anything from almond paste to vanilla cream and jam. I thought, since I am doing it the Italian way, why not give the Italians the whole tribute and make my brioches with Nutella, the very Italian chocolaty spread, mixed with crushed roasted hazelnuts.

For those of you that know how to make sweet dough or Easter bread, I have used egg yolks only in this recipe. I have found that the higher fat content of the egg yolks keeps the dough from drying out, resulting in softer brioches for several days. 

Making the sweet dough can be a half day process since the dough needs to rise twice. I have shortened the process by making the dough in the evening, letting it rise once, leaving it overnight in the refrigerator to rise the second time, and baking in the morning. Easy peasy and less stressful!


Sprig_of_thyme_Easter_Brioches_Step1.jpg
Sprig_of_thyme_Easter_Brioches_Step2.jpg

Italian brioches

Ingredients:

Makes 16 brioches

• 3 tablespoons of lukewarm water
• 1 1/2 teaspoons active dry yeast
• 1/3 cup granulated sugar
• 3 egg yolks (at room temperature)
• 1 egg white (for egg wash) (at room temperature)
• 2 3/4 cups unbleached all-purpose flour
• 1 teaspoon salt
• 1 lemon, zested
• 1 orange, zested
• 1 Vanilla bean (or 1 teaspoon vanilla extract)
• 2/3 cup whole milk
• 1/4 cup oil (vegetable, canola or sunflower)
• 1/2 cup Nutella
• 1/3 cup whole hazelnuts, skins removed, roasted and coarsely chopped


Directions:

1. Place the warm water (a bit warmer than lukewarm, but not too hot to kill the yeast), in a medium bowl and mix in 1 teaspoon of sugar, sprinkle the yeast over the mixture. Let sit until yeast foams and almost doubles its size, about 10-15 minutes.

2. Combine the flour, salt and sugar in a large mixing bowl and mix with a whisk. Run a sharp knife over the vanilla bean, split it like butterfly and scrape out the seeds with the back of the knife. Add the vanilla beans to a small sauce pan and pour the milk. Heat the milk and vanilla mixture over low heat, mix regularly until the milk is lukewarm or a little bit warmer, about 1 minute. 

Hand method:
3. Make a well in the center on the flour mixture and add the milk, yeast mixture, egg yolks, lemon and orange zest. Mix with your hand starting from the center of the well and working your way out by adding flour from the sides of the bowl. While mixing, slowly incorporate the oil by adding a small amount each time. Form a soft bowl and transfer it to a lightly floured surface and knead for about 10 minutes by adding small amounts of flour if necessary. The dough should be soft and it should bounce back when pressed with your finger.

Stand mixer method:
3. Place the flour mixture, milk mixture, yeast, egg yolks, lemon and orange zest in the bowl of the mixer. Slowly add the oil, one teaspoon at the time, incorporating well between additions. Mix on medium speed for 1 minute and then knead on medium-high speed for 5 minutes. The dough should be soft and it should bounce back when pressed with your finger.

4. Transfer the formed ball into a large lightly oiled mixing bowl. Brush some oil on the top of the dough, cover the bowl with plastic wrap and let it rise in a warm draft-free place until it doubles its original volume, about 1-2 hours depending on the temperature at your home.

5. While the dough is rising, mix the Nutella with the crushed roasted hazelnuts. Leave at a room temperature until ready to use.

6. Punch the risen dough with your hand to remove some of the air, transfer it to a flat lightly floured surface, cut in half and form a ball with each half. Take one of the balls, sprinkle some more flour onto the surface and over the ball, and roll it with a rolling pin until the circle becomes 13” in diameter. Using a sharp knife cut the dough into 8 equal triangles, using sharp strokes without dragging the knife through the dough.

7. Take one of the triangles, stretch it a bit more, about 5x7.5”, place a teaspoon of the Nutella mixture in the center of the wide end of the triangle. Roll the triangle to form a brioche, starting from the wide end of the triangle and moving to the thin end. Do not squeeze or tighten the roll too much while rolling. Repeat the process with the rest of the triangles and the second ball of dough. 

8. Divide the brioches between two 14x16” baking trays lined with parchment paper. Cover well with plastic wrap. The wrap should not be too loose or too tight (the brioches will rise and they need some room but also they shouldn’t form a skin). If baking the same day, let the brioches rise until they double its size, about 1 hour. If baking the next day, place the trays in the refrigerator and take them out 30-40 minutes prior to baking.

9. Preheat the oven to 350˚F.

10. Make an egg wash by mixing the preserved egg white with 1 tablespoon of water. Brush each brioche with the egg white sprinkle it with raw crushed hazelnuts if desired.

11. Place one of the trays in the oven and bake for about 20-25 minutes (depending on your oven) while rotating the tray halfway through the baking. Repeat with the other tray (if you have a fancy schmancy oven you can bake them at once).

Let the brioches cool for at least 20 minutes before enjoying.

print recipe
1 Comment

TAGS: brioches, breakfast, Easter, sweets, Козуначени кифлички с Нутела, spring


  • Newer
  • Older

Powered by Squarespace 6