Search
  • Journal
  • Recipes
  • About
  • Say Hello
  • Subscribe
Close
Menu
Search
Close
  • Journal
  • Recipes
  • About
  • Say Hello
  • Subscribe
Menu

sprig of thyme

April 18, 2014

Homemade yogurt

by Iglika in Bulgarian recipe, from scratch


If there is any food I continue to cherish and love that came from my homeland, it is yogurt. Not any yogurt, but Bulgarian yogurt. A friend of my sister told her once “You eat yogurt with everything”. And this is true. Bulgarians eat (plain) yogurt for breakfast, lunch and dinner; this includes plain yogurt on its own, as an ingredient or a condiment to savory dishes. We even make a yogurt drink (but I will not torture you with that recipe).

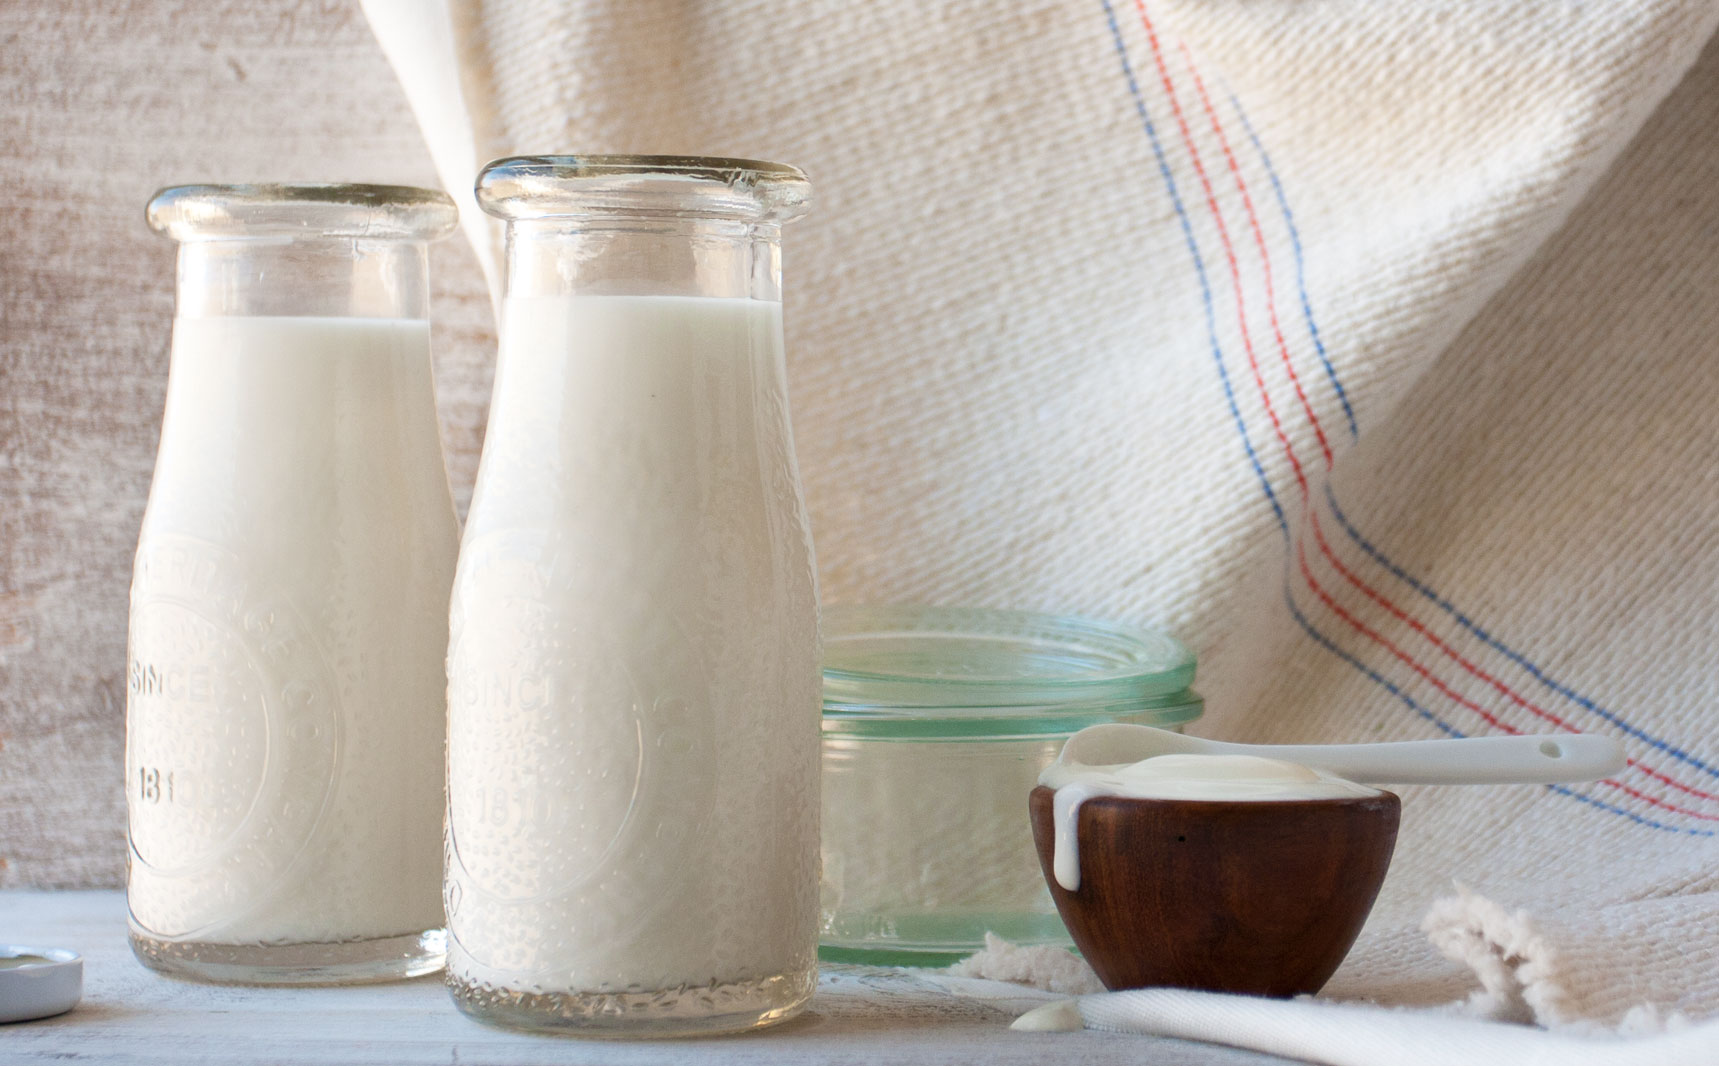
So, what is yogurt? It is nothing more than warm milk and a starter/culture. The two are mixed and kept in a warm place for a few hours (which allows the culture to grow), and when the desired thickness and tartness is reached, it is preserved in the refrigerator. 

Why homemade yogurt? It is fresh and healthy (no additives or sugars), but most importantly, the natural fermentation process minimizes the lactose content in the milk (which makes it easy to digest) and the formed bacteria is very good for your tummy because it creates an environment where the nutritional value of all the foods we eat is increased. Therefore, it helps your digestive system function more efficiently.

For breakfast, I love my homemade yogurt simple; a handful of berries, rolled oats, few sliced almonds and topped with honey. Yum! Yum! Yum!

I have listed 2 methods (2 different culture sources) for making homemade yogurt below. I prefer using whole farm milk (the one that comes in glass bottles).

Method 1:
Using a freeze-dried starter (found in most natural and organic food stores). Those are small packets of freeze-dried yogurt, which make about a quart (1 liter) of homemade yogurt. I prefer using them, because I get thicker, firmer yogurt and more consistent results.

Method 2:
My grandmother’s method, using a small amount of yogurt as a starter. In this method the consistency depends on the quality and the quantity of the starter. The only commercial yogurt that should be used as a starter is the one made with milk (and cream) and bacteria; NO gelatin, sugar, or pectin as an ingredients. Otherwise it will not work. Also, the fresher the starter is, the better.


Ingredients:

Makes a quart (1 liter) of yogurt

• 1 quart (1 liter) whole milk*, at a room temperature
• 1 packet of dry-freeze bacteria 
or
1 teaspoon of fresh plain yogurt (see note about Method 2), at a room temperature


Supplies:

• 2 (16 oz.) glass jars, or a 1-quart glass or a ceramic container (do not use plastic)
• Instant read thermometer (optional)
• Medium size sauce pan
• Warm blanket


Directions:

1. Fill your jars/container with hot water and leave them until ready to use.

2. Turn the stove to a medium-low heat and slowly heat the milk until it reaches 180 F (82 C) or until you see steam coming from the surface of the milk (it takes about 8-10 minutes).

Using freeze-dry bacteria starter:
3. Stir the freeze-dry bacteria with a small amount of lukewarm milk. Set aside.

4. Let the milk cool off until it reaches 125 F (51-52 C), it takes about 15-18 minutes.

5. Pour the dry-freeze and milk mixture into the pot of warm milk and stir well. 

Using fresh yogurt starter:
3. Mix the yogurt with a small amount of lukewarm milk. Set aside.

4. Let the milk cool off until it reaches 105 F (42-44 C), it takes about 30 minutes.

5. Take a spoon of the warm milk and mix it with the yogurt milk mixture you created earlier. Repeat the process with a few more warm milk spoons (this prevents the yogurt from curdling). Pour the yogurt/starter mixture into the warm milk and mix well.

6. Empty the water from your jars/container and fill with the warm yogurt mix. Cover the jars/container with foil or lids and wrap them in a warm blanket. Incubate for 6-8 hours. The longer they incubate, the firmer and tarter the yogurt will become (I leave mine for 8 hours). Refrigerate to stop the process. 


The homemade yogurt is good for about a week.

*The larger the fat content in the milk is, the thicker the yogurt will be.

print recipe
6 Comments

TAGS: yogurt, breakfast, Homemade yogurt, Домашно кисело мляко, Vegetarian


April 10, 2014

Mahi mahi with avocado cucumber sauce

by Iglika


I got up in the morning and was very excited to hear the birds on the trees right by my apartment. I opened the window and for the first time this year I smelled the freshness in the air and in the melting snow. I felt restless and excited, so I put my rain boots on (lots of puddles on the sidewalks), my coat and my red polka dot scarf and I went on a search for fresh spring ingredients.

Minnesota is no Italy or even NYC, so my local farmers market does not offer much local fresh foods in the winter (aaah, yes and the winter here lasts on average until May). So I went to my co-op. I wanted to cook some lake fish with greens (after all we are the land of 10,000 lakes), but to my disappointment I found that the only local fish I can find is not fresh but smoked and pretty much all the greens and veggies were a produced in Mexico or California.

So, I could either go home defeated or grab some Mexican produce and make a Mexican inspired dish. I did the second.

I am obsessed with cucumbers and yogurt, the Bulgarian speaking in me, so I grabbed those plus some avocados, cilantro, lime, mahi mahi fish and fingerling potatoes and I headed home. I wanted to make a cold cucumber and avocado soup to go with the fish, but as it often happens, I ended up with something else.

I have made cold soups before with much less ingredients and they tasted so good and fresh, but this one kept coming bland and tasteless. I changed the proportions over and over again and I kept making it over and over again – still bland. So I went back to the store and grabbed some green apples, fresh mint and tomatillos (for all of you who haven’t tasted tomatillos – they are green tomatoes that taste like apple and lime, but they have the texture of tomatoes; they are used in Mexican cuisine). Back in the kitchen, I added all of  the new ingredients back to the soup, and sure enough, the soup became more flavorful and complex. I was happy with the result but as I kept tasting it, I realized that the texture was resembling more of a blended juice than a soup. Cream soups are velvety and smooth and that is because they either have milk or butter. Those two were out of the question in my soup because the milk would curdle from all the acid ingredients and the butter would not melt in the cold soup. I could add some more yogurt, but I didn’t want the soup to thicken or become more tangy. So I decided to add just a bit of coconut milk – sure enough that fixed it and I was one happy bird.

As a reward for all of that hard work, I poured myself a bowl of soup and when I finished half of it, I thought that it might work better if it was served as a sauce to the fish, rather than as a soup. 

I pan seared the fish for a couple of minutes. Fish is so delicate and perfect in nature. When overcooked it tastes rubbery and dry, so about 3 minutes on a non-stick skillet is enough.

I added some cumin seeds to the fingerling potatoes since cumin is widely used in Mexican cuisine, and I baked them together. The toasted cumin added a magical flavor to the perfectly baked potatoes, and it was a match made in heaven to the avocado-cucumber sauce.

Buen provecho!!!


And don’t forget to tell me how it turned out for you.

Sprig_of_thyme_mahimahi_avocado_sauce_ingredients.jpg

Mahi mahi with avocado cucumber sauce

Serves 4

Ingredients:

Avocado cucumber sauce
• 1 1/2 ripened avocados
• 1/2 English cucumber, peeled and chopped
• 2 tomatillos, chopped
• 1/2 green apple, peeled, cored and chopped
• 1 shallot, minced
• 1/2 cup plain yogurt
• 1/2 cup coconut milk
• 1 cup cilantro leaves
• 2 limes, juiced
• 1 tablespoon chopped fresh mint
• Sea salt
• Pepper

Mahi-mahi and potatoes
• 1 1/2 lbs mahi-mahi fish
• 1 lb fingerling potatoes
• 1 teaspoon raw cumin seeds
• Sea salt
• Pepper
• Olive oil

Directions:

  1. Place all the ingredients for the avocado cucumber sauce in a blender and blend until smooth (about 2 minutes). Set aside if using right away, or refrigerate if using in several hours. You can make the sauce up to 2 days ahead.

  2. Meanwhile place the mahi-mahi on a plate to become to a room temperature. If the fillets are large cut them into pieces that are about 4x3”.

  3. Preheat the oven to 500 degrees F. While the oven is heating, place a baking dish/sheet to heat. Place the potatoes and cumin in a mixing bowl, add a liberal amount of olive oil (3-4 tablespoons), salt and pepper, and toss together until the potatoes are nicely coated. Remove the hot baking sheet from the oven (careful, it will be hot!), add the potatoes and spread them around with a spoon. Lower the heat to 425 F and bake for 20-30 minutes, depending on your oven. The potatoes are ready when they are tender on the inside.

  4. When the potatoes are ready, heat a large non-stick pan over medium-high heat (do not add oil). The pan needs to be very hot. Season the fish on both sides, first with a generous amount of olive oil, then with coarse salt and pepper. Add 2 tablespoons of olive oil to the hot pan and add the fish. Do not move or constantly flip the fillets, otherwise they will form a crust*. Sear the fish on one side, so that each fillet is cooked 2/3 of the way (watch the thick side of the fish, it will start to change from light pink (or opaque) color to white; this is how you can monitor how cooked the fish is). This will take 2-3 minutes. Then flip the fillets and cook for an additional minute.

  5. Place each fillet on a plate, add a generous amount of the avocado-cucumber sauce and the warm fingerling potatoes. If desired, add a spoonful of plain Greek yogurt.


 * Three things happen when a crust is formed through searing. First, the high heat and the crust lock all the juices inside the fillet and prevent it from drying out and becoming overcooked and rubbery. Second, the fillets are easier to flip. Third, the crust adds extra an flavor and texture to the fish.

print recipe
5 Comments

TAGS: main dish, fish, potatoes, avocado, cucumber, summer


March 31, 2014

Rustic Crostini

by Iglika


Once upon a time, there was a handsome Rustic Bread, who lived in a French bakery. The Bread really liked the bakery, especially the nice big oven where he would sit and warm up his feet until his toes would start dancing around. The bakery was a magical place. It was full of delightful aromas, big trays of  vanilla cream éclairs, buttery croissants and long crunchy baguettes. The Rustic Bread was given the prime spot in the bakery, he was placed on a high wooden shelf, neatly lined with a soft cloth where he would sit comfortably and observe all the customers who came to the bakery.

Not long after he made his way to the shelf,  a girl in a coat with the color of a fall leaf came to the bakery. She looked around and her eyes stopped on the Rustic Bread. She liked his dark brown coat and his big soft heart and asked if she could take him home. The Rustic Bread jumped in her bag and their journey began.

The girl’s home was smaller than the bakery, but it was bright and sunny, in fact it was so sunny that the Rustic Bread thought of it as a giant sunflower. Soon after he arrived, the Rustic Bread was introduced to a group of new friends; the wise lemony Ricotta, the cheerful Cherry Tomatoes, the classy Prosciutto, the good hearted Honey, the handsome Basil and the friendly familia of Bella Mushrooms. Everyone liked the Rustic Bread and he developed special friendships with each of them. If he felt like having a glass of wine, the Rustic Bread would call the lemony Ricotta, the bursting with life Tomatoes and the handsome Basil. Four of them (plus the latter addition of the thick accented Kalamata Olive) would get together and a bottle of wine will not be enough to share all their stories and laughs. The Bread also liked having long conversations about life with the wise Ricotta and good hearted Honey. But nothing could replace his weekend visits with the Bella Mushroom familia - there was something special about them that touched the Bread’s heart. Last but not least, the Rustic Bread liked the refined company of the classy Prosciutto and the beautiful Basil, who would sit around the fireplace and discuss art, fashion and music with a great passion and devotion. But above all, what the Rustic Bread enjoyed the most was when all of his friends gathered together. They would talk, tell stories, sing, dance, laugh – simply be happy to be around each other. After all that is what friendship is all about – a good circle of big hearted creatures who love each other for who they are.

The end.

...................................................

This is a story of friendship and today’s recipe is about food that is meant to be shared with friends. As every one of our friends is unique and different, so is each of the Crostini. Each one is perfect on its own, but together they create a special group. Try them all and let me know which ones are your favorites. I don’t want to spoil the surprise before you try them, but just a hint – I prefer red wine. 


Rustic Crostini

Serves 6-8 (when making all Crostini)


Ingredients:

Ricotta and roasted cherry tomatoes Crostini
• 1/2 loaf thick crusted rustic bread, sliced with each slice cut in half
• 1/2 pound cherry tomatoes (I used mixed blend)
• 1 1/2 cups whole milk ricotta❤  
• 1/4 cups whole Kalamata olives❤❤
• 1 clove garlic, whole
• 1/2 lemon, zested
• Coarse sea salt
• Pepper
• Olive oil
• Handful of fresh basil leaves

Ricotta and honey Crostini
• 
1/2 loaf thick crusted Rustic bread, sliced with each slice cut in half
• 1 1/2 cups whole milk ricotta❤
• 2 tablespoons honey
• 1/4 cup walnuts, toasted and roughly chopped
• 1/2 lemon, zested

Prosciutto and roasted cherry tomatoes Crostini
• 1/2 loaf thick crusted rustic bread, sliced with each slice cut in half
• 1/2 pound cherry tomatoes (I used mixed blend)
• 4-oz. prosciutto
• 1 clove garlic, whole
• Coarse sea salt
• Pepper
• Olive oil
• Handful of fresh basil leaves

Mushroom Crostini
• 
1/2 loaf thick crusted rustic bread, sliced with each slice cut in half
• 10-oz. baby bella (crimini) mushrooms
• 1 shallot, minced
• 1 tablespoon butter
• 1 tablespoon olive oil
• 1/4 teaspoon fresh oregano, chopped
• 2 tablespoons white wine
• Coarse sea salt
• Pepper

❤ If possible, buy hand dipped ricotta. It has creamier and velvety texture. Regular supermarket ricotta has a chalky and rubbery consistency and it has a higher water content. Hand dipped ricotta can be found in most organic food stores and co-ops.

❤❤ Whole olives (with the pits) are richer and more complex in flavor compared to pitted olives. To remove the pit, firmly press the olive with the flat side of  a knife, the olive will soften and the pit will be exposed. 


Directions:

  1. Mix the ricotta cheese, lemon zest and a dash of salt in a large bowl. Set aside (do not refrigerate if using right away).

  2. Preheat the oven to 350 F.

  3. Place the cherry tomatoes on a baking tray and add a liberal amount of olive oil (about 3 tablespoons), salt and pepper. Toss with your hands until the tomatoes are coated evenly. Spread on the tray and bake for 1 hour.

  4. Meanwhile, brush off the dirt form the mushrooms (mushrooms absorb a lot of water, brushing them with a soft kitchen brush instead of rinsing them it prevents them from becoming soggy). Chop the mushrooms roughly. Heat the butter and olive oil in a skillet over medium-high heat and add the mushrooms. Do not overcrowd the mushrooms, otherwise they will not brown evenly (do them in batches, if necessary). Stir the mushrooms frequently and cook until evenly brown (about 5 minutes). Add the chopped shallot and cook for about a minute. Then add the white wine and thyme and cook for an additional minute. Remove from the heat and add salt and pepper to taste.

  5. Toast the bread in a toaster, grill or oven broiler until the edges are brown (about 2 minutes). Do not make more than 8-10 toasts at the same time (the warmer the bread, the better). When ready, immediately rub a garlic clove (tip cut off to expose the juices) on one side of the bread and drizzle some olive oil. Omit the garlic and olive oil for the ricotta and honey version.

  6. For the ricotta and roasted cherry tomatoes Crostini: Top toasts with ricotta cheese and arrange 3-4 tomatoes, 2-3 Kalamata olive halves, crack some black pepper, a few torn pieces of basil leaves and drizzle a bit more olive oil.

  7. For the ricotta and honey Crostini: Top toasts with ricotta, sprinkle a few toasted walnuts and drizzle some honey.

  8. For the prosciutto and roasted cherry tomatoes Crostini: Top toasts with a few pieces of prosciutto, 3-4 tomatoes, crack some black pepper and add a few torn pieces of basil leaves.

  9. For the mushroom Crostini: Top toasts with the warm mushroom mix.

Print recipe
2 Comments

TAGS: tomatoes, ricotta cheese, mushrooms, prosciutto, honey, appetizer, Vegetarian, fall


  • Newer
  • Older

Powered by Squarespace 6