Search
  • Journal
  • Recipes
  • About
  • Say Hello
  • Subscribe
Close
Menu
Search
Close
  • Journal
  • Recipes
  • About
  • Say Hello
  • Subscribe
Menu

sprig of thyme

April 16, 2020

Step-by-step how to make homemade ravioli

by Iglika in from scratch


IMG_1307_Cover2.jpg
IMG_1307_Cover2.jpg


If you have been following me, you have probably noticed that I write quite the lengthy stories (which, I am afraid, only a handful of very kind and patient creatures can read to the very end.) This post will be a bit unusual as the recipe and the instructions are so long that I have the feeling that if I write one of my usual sagas I might loose you somewhere in the middle.

So, my dear fiends, the only thing you should know is that fresh ravioli is one of my favorite things to make and eat. Fresh ravioli are a bit of a time investment, but just as anything in life that takes time to bloom, they are totally worth waiting for and make. When you make them for the first time you will feel so good, and will be so proud of yourself! Even if you screw them up, still proud! And if that happens, don’t despair, do it again another time, and ask me questions. I had even made a step-by-step visual tutorial, plus a fun little video for you to follow, to show you how easy ravioli are.

As I always say: Pour yourself a glass of your favorite wine, put your apron on and cook along!

Cooking Notes:

Does the dough recipe matters?
The below recipe proportions are based on my pasta dough recipe from my previous post. However, you could use a different dough recipe if you wish, just make sure it calls (or adjust it) for the same amount of flour as mine (1 cup, bit more or less) to ensure you end up with the same size dough. Why I prefer the pasta dough I make? It’s because it has a very high yolk content, which makes for a very silky dough that is very sturdy, and will keep itself together as well as the ravioli filling.

The pasta sheet thickness:
You want a pasta sheet that is not too thick, or one that is way too thin. In both cases your filling might burst out while boiling in the water. If your pasta sheet is too thick, it will be hard to glue the two ravioli sheets together as a packet. If your dough is too thin, it won’t be sturdy enough to hold the filling. To know you’ve got your pasta sheet thickness right, hold it up to the light and pass your hand behind it. If you can see the shadow of your hand, you’re good to go.

The filling size: 
I call for a 1/2 tablespoon of filling. This is meant to be more of a starting point than an absolute measurement. Play and adjust your filling since each piece of dough is going to be a different size. No two pieces of pasta roll out the same. I am a person that likes LOTS of filling, but often I am reminded during boiling, as things move and expand, the filling might burst in the water if there is too much of it. Test, test, test. Test to see what works for you.

Seal those ravioli babies:
Make sure that you individually press and seal really well the ravioli. Press with your fingers around the filling to get the air out of each packet and to seal the edges really well. This will ensure beautiful, even packets that will not burst while boiling.

Tools:
Set your table before you start making the ravioli.
• Small bowl of water (to seal the ravioli)
• Bowl with the ravioli filling
• Pastry wheel (I like the one that has straight edge on one side and fluted on the other for versatility)
• Rolling pin. I use a long, French rolling pin which allows me to cover a larger area, resulting in a wide 14” diameter circle sheet. However, if you have a standard American 10-12” rolling pin either cut your dough ball in two and roll two skinny and long sheets, or cur the dough ball in fourths and roll four skinny, long sheets.

IMG_1085.jpg
IMG_1149.jpg
Sprig_of_thyme_How-to-Rvioli__Step1.jpg
Sprig_of_thyme_How-to-Rvioli__Step2.jpg
Sprig_of_thyme_How-to-Rvioli__Step3.jpg
Sprig_of_thyme_How-to-Rvioli__Step4.jpg
Sprig_of_thyme_How-to-Rvioli__Step5.jpg
Sprig_of_thyme_How-to-Rvioli__Step6.jpg
Sprig_of_thyme_How-to-Rvioli__Step7.jpg
Sprig_of_thyme_How-to-Rvioli__Step8.jpg
Sprig_of_thyme_How-to-Rvioli__Step9.jpg
IMG_1288.jpg
Step-by-Step how to make homemade raviolli.jpg
IMG_1373.jpg

Ricotta and Spinach Ravioli Recipe

Serves 4

Ingredients

Fresh Pasta Dough
Follow this recipe from my previous blog post

Ricotta and Spinach Filling
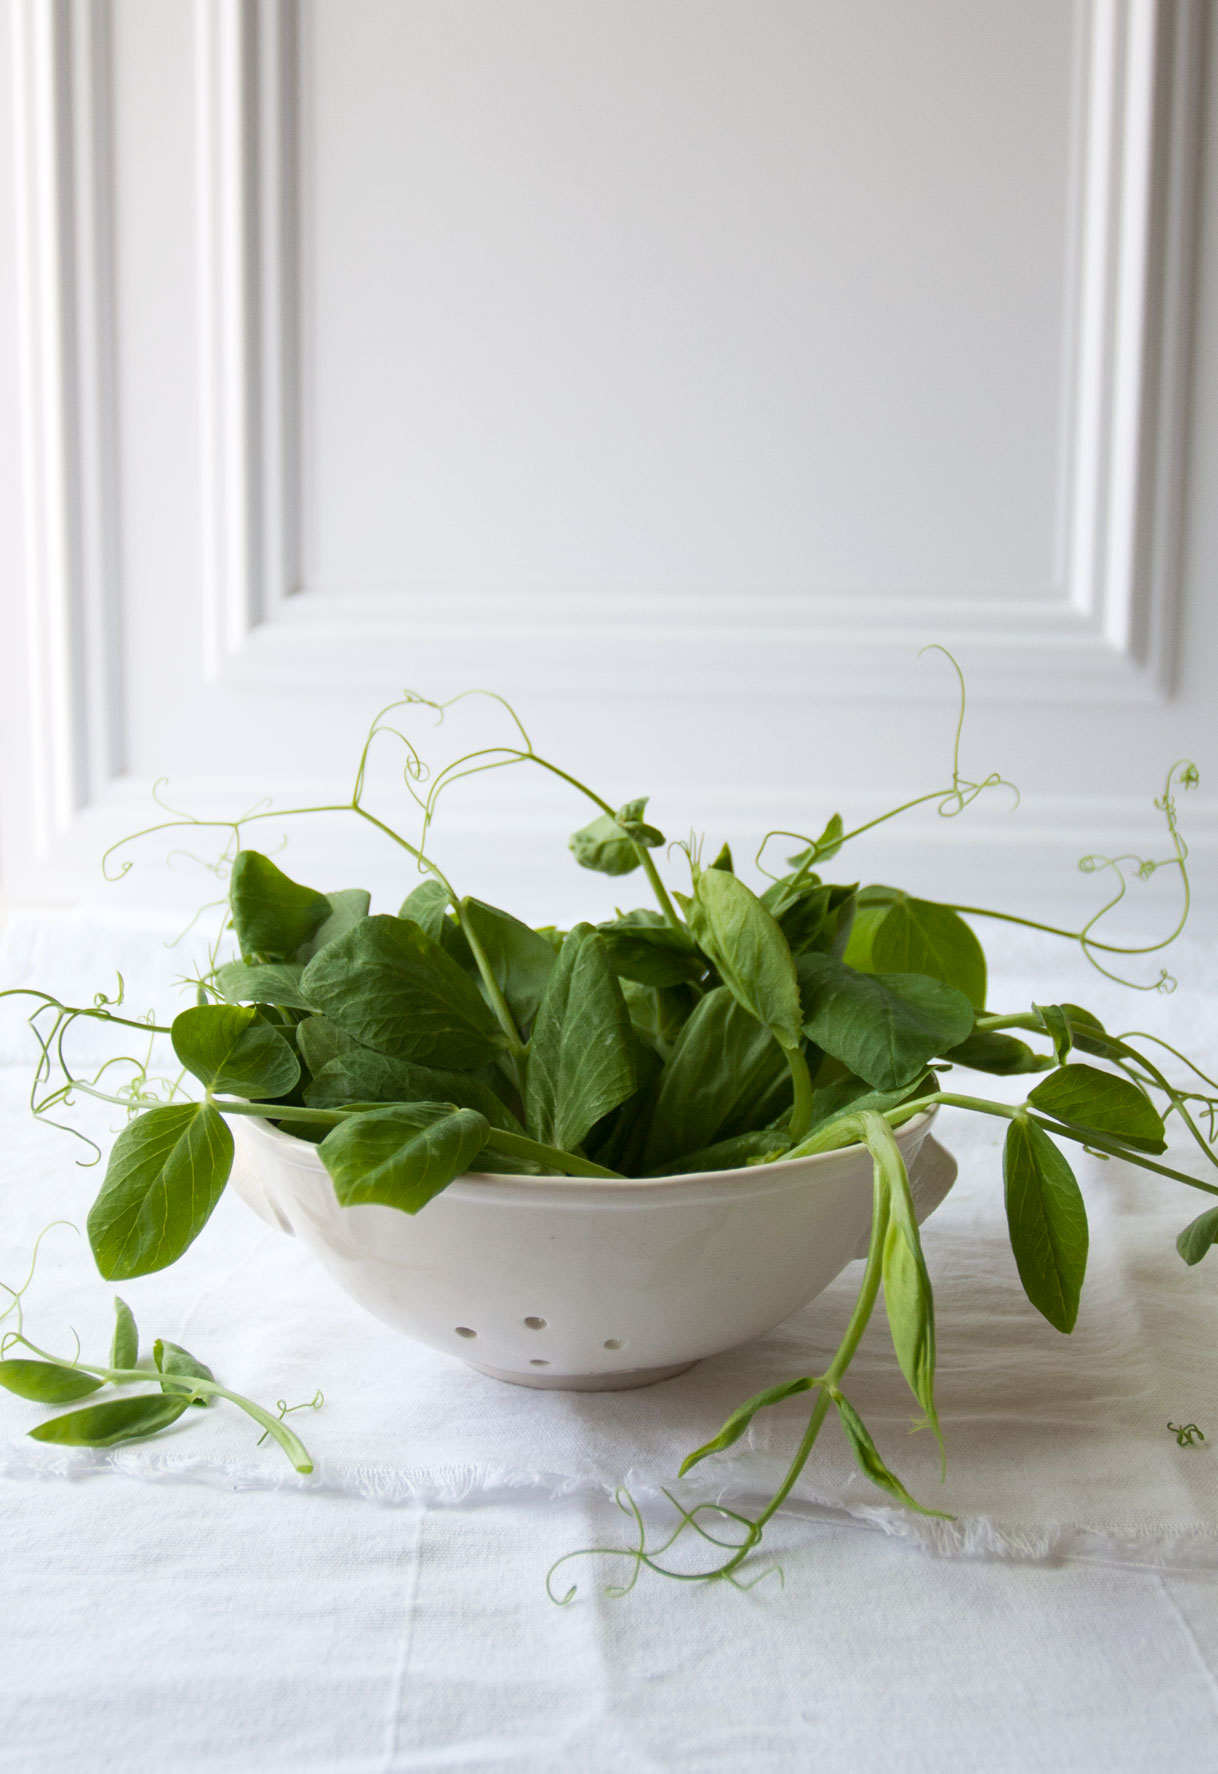
• 1 bag (6oz) fresh spinach
• 2 tbsp olive oil
• 3/4 cup whole milk ricotta (preferably hand-dipped)
• 1/3 cup freshly grated Parmigiano Reggiano
• Rind of 1 lemon
• 1 tsp fresh thyme
• Salt 
• Pepper

Brown Butter Sauce
• 8 tbsp butter
• 20 sage leaves
• 8-10 garlic cloves, thinly sliced
• 4-5 tbsp not too sweet white wine
• 1/4 cup freshly grated Parmesan, plus more for garnish

Directions:

Pasta Dough
Follow the recipe from my previous post about making the pasta dough. You can use a different, or a favorite pasta dough recipe if you prefer (just make sure the flour proportion is same as mine, about a 1cup). As your dough is resting, make the ravioli filling:

Ravioli Filling

  1. Heat a large non-stick skillet over medium high heat. Add 1 tbsp of the olive oil and about half of the spinach (removing any yellow or wilted leaves) in the pan. Sprinkle some (but not too much) salt over the spinach (this will help the spinach to wilt faster). Lower your heat a bit and cook the spinach by tossing it frequently with tongs to ensure the leaves are wilting evenly. As the spinach wilts and looks about half of its size (after a minute or so), slowly add a handful of the remaining spinach from the bag, tossing with the tongs to help wilt evenly. Continue until all the spinach is in your pan. Add a splash of water or pinch of salt if the leaves need help wilting. Keep tossing until all the water has evaporated form the pan and all the spinach has wilted. Transfer spinach to a plate lined with 2-3 paper towels and let it cool for 10-15 minutes.

  2. Stack 2 paper towels and place the cooled spinach on top, cover the spinach with 2 more towels and press down with your hands to help extract all the extra water form the spinach. Repeat if needed to make sure all extra water is extracted from the spinach. You might need to replace the wet paper towels with dry ones and keep pressing. Removing the excessive water from the spinach will ensure your ravioli stays closed while cooking. 

  3. Place the spinach on a cutting board and chop very finely. Add the spinach to a small mixing bowl, with the rest of ravioli filling ingredients and the remaining 1 tbsp of olive oil. Mix well until evenly incorporated, taste and add salt and black pepper to taste.

Rolling the Pasta Dough

  1. Follow the recipe in my previous post about hand-rolling the pasta dough. Roll your pasta dough with a pasta machine if that works better for you. If you are hand-rolling, roll only half, or a fourth (see my NOTE) of the dough. Work with 1 piece at a time and keep the remaining dough wrapped in plastic. NOTE: I use a long, French rolling pin which allows me to cover a larger area, resulting in a wide 14” diameter circle sheet. However, if you have a standard American 10-12” rolling pin either cut your dough ball in two and roll two skinny and long sheets, or cur the dough ball in fourths and roll four skinny, long sheets. If using pasta machine, work with 1 piece at a time and keeping remaining dough wrapped in plastic as you work. 

  2. Make sure to roll the dough really thin (but not ultra thin). To know you’ve got your dough thin enough, hold it up to the light and pass your hand behind it. If you can see the shadow of your hand, you’re good to go.

Fill the Ravioli

  1. After your dough is thin enough, if you rolled your dough with a pasta machine, leave the sheet as is. If rolling by hand cut the sheet of dough in half lengthwise as well as the bottom 1” or so to have a straight line on top and bottom (if you wish, cut the sides too to create a rectangular piece, however, that is not necessary as those pieces will be cut removed during the ravioli cutting.) Starting 1” inch from the side, and 1” from the top, spoon the filling mixture, 1/2 tablespoon at a time, up length, spacing about 1” apart (you should get 4-5 mounds). Play and adjust your filling because each piece of dough is going to be a different size. No two pieces of pasta roll out the same. 

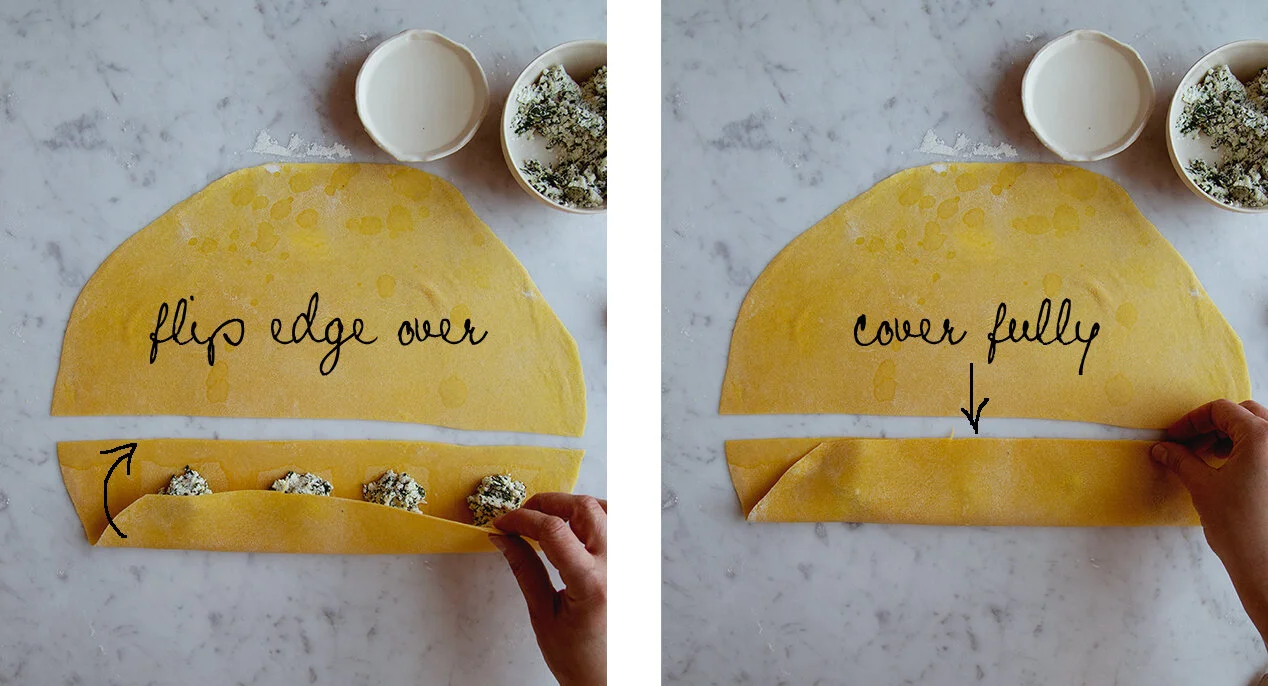
  2. Have a small bowl of water on the counter and dip your finger in and run a damp bead of water down each edge of the pasta and between each spoon full of filling. When done, flip the dough from the bottom over your filling.

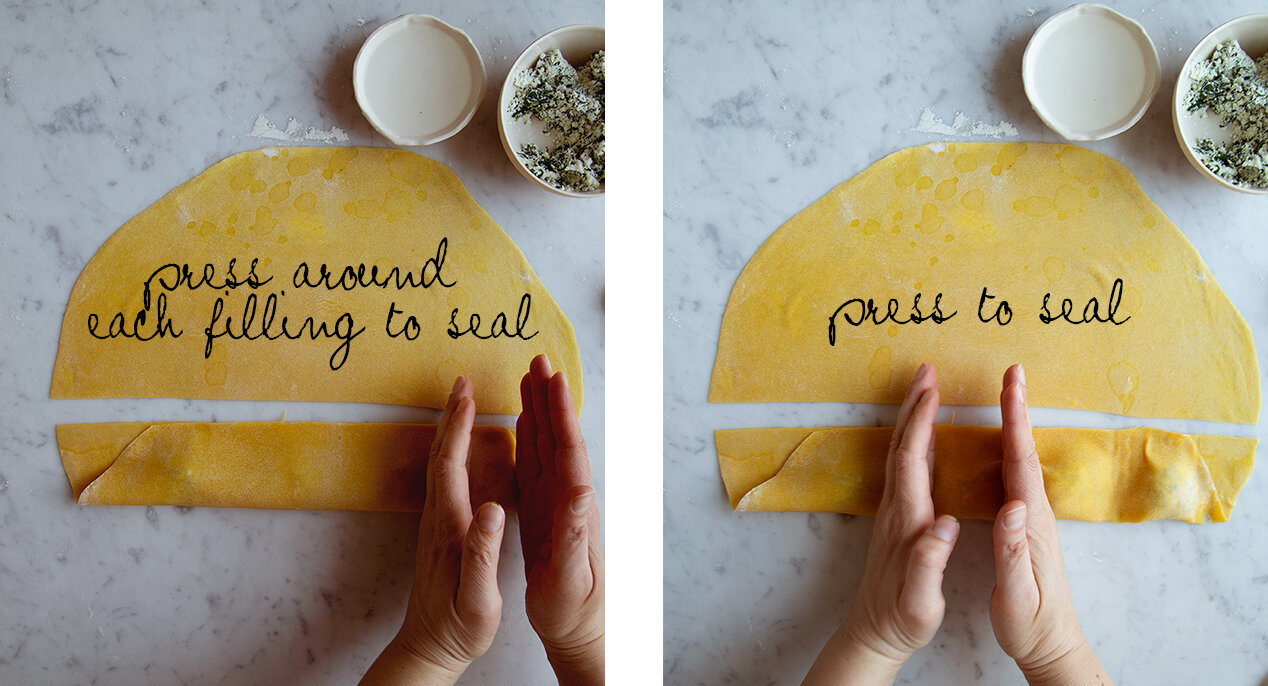
  3. Dry your hands. Run your finger over the top edge by pressing just slightly to seal the ravioli. With the edges of your hands press down between each pocket of filling to seal together. Using a pastry wheel, run a straight line at the top to trim up the top and side edges and shape the ravioli. Make sure you don’t cut too close to the filling as it might come out during cooking. Run the pastry wheel between each pocket of filling to cut each individual ravioli. 

  4. One ravioli at the time, press around each pocket of filling to seal, then press outward toward edges, pushing out any air pockets. The most important part of this step is getting the air out of the ravioli when you seal it, otherwise it might burst in the water.

  5. Arrange ravioli on a baking sheet and dust top and bottom with semolina. Cover the ravioli loosely with plastic wrap. Repeat these steps with the remaining dough and filling.

Cook the Ravioli
Working in batches if needed, cook ravioli in a large pot of boiling salted water until tender, about 5 minutes. Remove with slotted spoon and place in serving pasta bowls. Keep about 1/2 cup of the pasta water in case you need it for the sauce.

Make the Sauce
In a medium saucepan, melt 4 tbsp butter over medium-high heat. Add half of the sage. Cook until leaves crisp up a bit and become a darker green (about a 1minute or less). Remove from heat and place leaves on a plate lined with a paper towel. Place the pan back on the heat and repeat with the remaining sage. Place the second batch of sage to the paper towel-lined plate. Add the remaining butter to the pan, let it melt and add the sliced garlic. Cook until fragrant, and the garlic becomes lightly golden color (be careful to not burn the garlic as this happens easily). Add the wine and let it cook for a few seconds. Add the Parmesan cheese and swirl the sauce around the pan to mix and melt cheese a bit (no more than few seconds). Sauce should look lightly brown and creamy. Turn the heat off. Spoon the sauce over the ravioli. Top with 5 sage leaves and freshly grated Parmigiano Reggiano. 

NOTE: Sometimes the ravioli dry out a bit while the sauce is cooking, or the sauce looks too thick. In that case, add a tablespoon or two of the pasta water to the sauce to loosen it.

Print recipe
Comment

TAGS: pasta, eggs, spinach, ricotta cheese, lunch


June 3, 2018

Nettle Dumplings / Gnudi

by Iglika


Nettle_Dumplings_Cover.jpg


Boy it has been hot this week. Like a steaming mid-August hot accompanied by all the humidity and stickiness one could expect in Minnesota with the only difference that was May. I keep reminding myself that we got 16 inches a snow a month ago so I should not be complaining but to be honest, it was damn hot. This Minnesota weather is almost like a temperamental teenager, one day is sweet and lovely and the next day they hate you and the rest of the world. But what is a girl to do. Put a dress on, sunscreen and head out to the farmers market hoping to steal the fast-coming-and-dissapering spring greens.

My most vivid memories of spring are back from the days when I was a temperamental and hijacked by confusing emotions teenager myself. Early springtime my dad, my grandma and I would go to our house in the mountains to plant the veggies for the season. Bringing a little of food with us we would walk the area around the house and the hills collecting wild edible greens – dandelion, spinach, spring garlic and nettle. In a typical teenage fashion, I was so skeptical about all this foraged greenery and I didn’t think it would taste much like anything. But then my grandma would whip them all together in a lovely and simple soup or a risotto topped with plain yogurt and dill instead of cheese and I would lick my fingers off and finish up all of the green goodness on my plate. I couldn’t really figure out what was it about it. Was it the nettle, or the young wild garlic, or the other greens, or the cool mountain air that made every scent and experience intensified by a hundred times. The only thing I know is that I kept eating and immersing myself in these wild and wonderful flavors. It was almost like the young green grass got married to the rain and the wet ground and the fresh air and they created this beautiful thing together that I got to experience and enjoy. So as every winter ends and spring begins I dream of these flavors and hold the wish that hopefully this spring will be long and cool and will last for a couple of months only so I could enjoy, just for a little longer, these wonderful flavors. 

____

These pillowy and soft dumplings have a hint of nettle that marries really well with the young spring onion and the garlic/butter sauce. The onion flowers have a wonderful mild oniony flavor and bring the whole dish together, plus they make the plate really pretty!


xoxo


IMG_6525.jpg
IMG_6665.jpg
IMG_6646.jpg
IMG_6655.jpg
IMG_6662.jpg
IMG_6684.jpg
IMG_6705.jpg
 

Nettle Dumplings / Gnudi

Sevres 4-6


Ingredients

For the Nettle Dumplings
• 2 cups nettle leaves, packed (use gloves when handing since it might sting you)
• 1 pound (2 cups) fresh ricotta cheese
• 1/2 cup of plain flour, plus more for dusting
• 1/2 cup grated Parmesan cheese
• 1 large egg
• 1/2 tsp salt
• 1/4 tsp black pepper

For the Butter Sauce
• 4 tbsp of butter
• 4 long stems of young spring onion, thinly sliced, reserving the flowers (if you cant find the
young onion use 4-5 scallions)
• 4 garlic cloves, thinly sliced
• 2 tbsp of white wine
• Zest of 1 lemon
• 1 tsp of chopped fresh thyme
• Salt + Pepper 


Directions:

Dumplings

  1. Bring 6 cups of salted water to a boil. Turn the heat off, add the nettle (handle with gloves so it doesn’t sting you) and let it sit for 5 minutes. Drain the nettle in a colander and let it sit for a few minutes to cool down slightly. Finely chop the nettle and add to a large mixing bowl together with all the dumpling ingredients. Mix well, taste and add more seasoning if needed.

  2. Place the dusting flour in a bowl. Dust a large baking sheet generously. Using two spoons, dip them in the bowl with flour then with one of them scoop a heaping amount of the dumplings mixture and with the help of the other spoon slide the dumpling out on the dusted baking sheet. Repeat until no mixture is left.

  3. Refrigerate the dumplings for 30 minutes so they harden and are easier to handle.

Sauce and Assembly

  1. Bring a large pot of salted water to a boil. Add the dumplings in batches (about 2 bathes in my case) and gently cook for 5 minutes. Transfer with a slotted spoon to a plate.

  2. Meanwhile, in a large non-stick pan add the butter, the garlic, the onions and a pinch of salt, sauté until the onion is soft and the garlic is slightly golden but not burned. Add the wine and cook for 10 more seconds. If you think that your pan will not fit all the dumplings, spoon half of the sauce in a bowl and reserve half of the dumplings. Add the dumplings to the pan and shake the pan slightly to cover the dumplings with the sauce but do not move them around with a spoon since they might fall apart. If the dumplings look dry, add a bit of the dumplings water. Cook for a minute and transfer to a serving plate. Repeat the process with the other half of the dumplings and sauce if you have reserved them. Top dumplings with the lemon rind, thyme, the reserved onion flowers (if using) and sprinkle with black pepper. Serve immediately.

Print recipe
Comment

TAGS: ricotta cheese, pasta, Vegetarian, lemon, lunch, main dish, spring


June 20, 2015

Spinach, nettle and pea shoots dumplings

by Iglika


Oh, how much I love early summer Saturday mornings. These slow days of the week when the sun is bright and happy, and warmly invites you to enjoy its kisses all day long. Saturdays are happy days for me and I have always found something graceful about them. A day when everything happens in a perfect speed – neither too slow nor too fast. Every moment appears in the right time and it lasts just as long as it should. Peacefully. Lovingly. One moment leads seamlessly to the next one in a perfect graceful manner. 

I love to wake up early (hey, but not too early!) on Saturday and head out to my new favorite city farmers market. There is nothing like grabbing a freshly baked croissant (or maybe a few more – you never know how much you will like them) from the bakery stand, a cup of hot coffee, some beautiful peonies and then wonder around for an hour or so while filling my bag with everything that nature is giving us at this time of the year. This particular farmers market is small and it doesn’t have a huge selection of produce, but I find it to be a wonderful gathering community of people who love their city and who appreciate everyone that grows or makes food locally. In essence, it reminds me of European cities where farmers markets appear right in their hearths and are inseparable parts of the local community. 

I never know what I will find at the market and I love the feeling of discovery. In that early summer day the peas, leafy greens, herbs and garlic scapes are in season, I even spotted some fresh nnettle and pea shoots. I decided to grab some beautiful greens, plus some never tried, or never tried produce and make something out of it. I filled my bag with pea shoots (first time for me ever), nettle, fresh spinach and mint and headed home.

I wanted to use all the produce in the same recipe and to retain the freshness of the beautiful greens. For some reason (and totally unrelated to this post) lately I have been thinking of gnocchi, so I decided to make pea shoots and nettle dumplings .

If you haven’t tried nettle one thing you should know is that it sting, so be careful when handling it (if necessary, use gloves). It has a unique flavor and it has been known for centuries for its purifying medicinal qualities. Nettle is at its best in late spring and early summer and you can forage it yourself or get it (quite cheap) at the local farmers market. Blanch or sauté nettle to remove the stinging or add directly to soups.

For this recipe, I sautéed all the greens separately, since each takes a different amount of time to wilt. This  reduces their volume and released the juices. Then I squeezed the juices out so the filling is not watery and loose and added some fresh mint, ricotta and lemon zest. I added a small amount of four, just enough to hold everything together, which made the dumplings soft. Then I boiled them and sautéd them in butter (a good quantity of it), just as you would do with gnocchi, and this made them soft on the inside and crispy on the outside. Most spinach and ricotta dumplings are served with tomato sauce but I like them served with cherry tomatoes and olives lightly drizzled with olive oil.

I loved the result and hope you make the recipe and enjoy it too. Until the next time my friends.

Au revoir!


Spinach, Nettle and Pea Shoots Dumplings

Serves 4


Ingredients:
• 1 bag (125 gr) baby spinach leaves
• 1 cup (loose) fresh nettle 
• 2 cups (loosely) pea shoots (leaves only)
• 1 cup (200 gr) fresh ricotta
• 2/3 cup (50 gr) finely grated Parmesan, plus extra to serve
• 5 spring onions, chopped
• 1 clove garlic, crushed
• 1/4 cup fresh mint leaves (chopped) plus extra to serve
• Zest of 1 lemon
• 1/3 cup (50 gr) plain flour, plus extra for dusting
• 2 eggs
• 4-5 tbsp (45 gr) butter
• 1 1/2 cups (300 gr) halved cherry tomatoes
• 1/3 cup kalamata olives (pit removed)


Directions:

  1. Drizzle a large notstick skillet with some olive oil and heat over medium-high heat. Add the spinach (in batches, if necessary), a pinch of salt and sauté for 2-3 minutes until wilted. Transfer to a bowl and repeat the process with the nettle and the pea shoots. Place all wilted greens on 2 sheets of paper towel and squeeze the water.

  2. Meanwhile, heat a medium pot with water until it starts boiling. Place the wilted greens and rest of the ingredients (except butter) in a large bowl and mix until a sticky dough is formed and add salt and pepper to taste. Roll tablespoons of the mixture into balls and roll in the extra butter. Drop the dumplings (in batches) into the hot water, making sure the boil is gentle and not vigorous, otherwise they can fall apart. Remove with a slotted spoon and set aside.

  3. Toss the tomatoes and olives in a bowl and add olive oil and salt to taste and set aside. Place half of the butter in a large nonstick skillet, heat over medium-high heat and add half of the dumplings. Cook until golden brown (2-3 minutes), then flip and cook on the other side. Place on a plate lined with paper towel and repeat with the remaining butter and dumplings.

  4. Serve while still warm with a side of the tomato/olive salad, extra Parmesan and extra mint leaves.

Print Recipe
Comment

TAGS: spinach, tomatoes, ricotta cheese, olives, lunch, spring


  • Newer
  • Older

Powered by Squarespace 6