Search
  • Journal
  • Recipes
  • About
  • Say Hello
  • Subscribe
Close
Menu
Search
Close
  • Journal
  • Recipes
  • About
  • Say Hello
  • Subscribe
Menu

sprig of thyme

July 9, 2017

Swiss Chard Caesar Sald

by Iglika


On my latest visits to New York I have been stopping by a fabulous, small, wood burning pizza place with a cozy atmosphere, wonderful, yummy pizzas and the most delicious crab cakes and Swiss chard Caesar salad on this planet. Every time I am there I tell myself that I will try something new and every time I am faced with the impossible choice – if I order something new, then I won’t be eating my favorite crab cakes and chard salad, which I have been dream-drooling for months. But if I order my favorites, then I won’t be trying something new, which could be as equally fabulous as the crab cakes and the salad. Some could argue that I should order all; my cakes, my salad and something new. And believe me I have done that, but to be honest, a girl can’t really eat that much food at once or her tummy will be hurting. The thought of not having (but constantly thinking of) the buttery crab cake and the lemony-parmesan chard salad is killing my food loving soul so, at the end, I do order my favorites, as you might have guessed. 

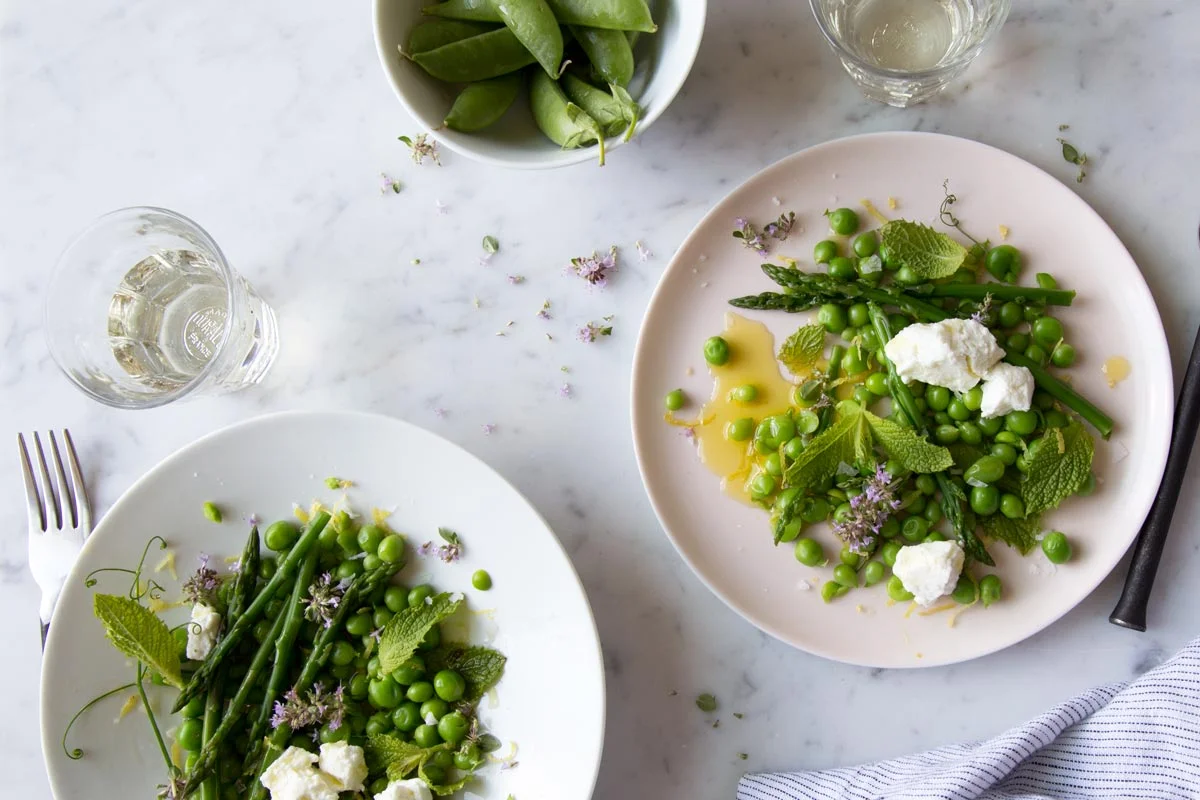
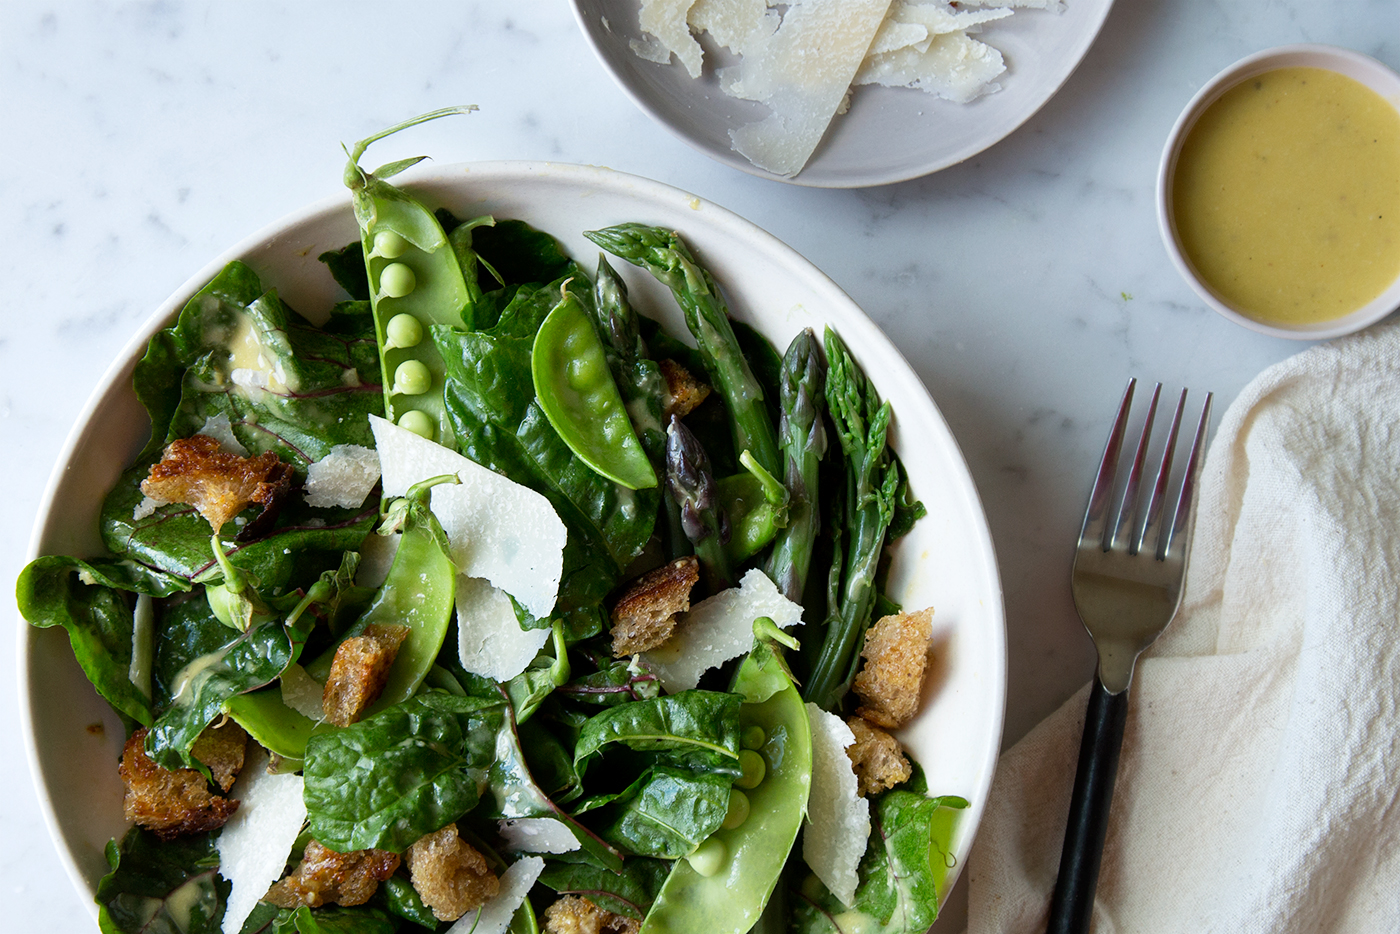
Ever since the first time I had the creamy-lemony-parmesan dressing on the chard salad, I was blown away how something so simple can be so yummy and how wonderfully it complements the tender Swiss chard leaves.  After my last visit I began my usual journey of trying to recreate this yummy salad so I can enjoy it ALL the time. First, I started with the dressing and I made all bunch of different versions of a homemade Caesar dressing, but the result was either too garlicky or too fishy or mustardy – something was not quite right and not quite as I remembered it. Then I started again from scratch, ignoring the classic Caesar recipes and went by taste memory. I started with a whole egg for a whiter, thicker consistency. I added lemon rind and a generous amount of lemon juice for freshness and a handful of grated Parmesan cheese for complexity. The final result was a creamy, lemony aioli which married so well with the delicate young spring chard leaves. I also added snap peas and asparagus to the salad since they are abundant at the farmers market at this time of the year. I finished the salad with warm sourdough croutons, tossed in the lemony dressing for yumminess. I was so happy with my recreation that I ate the salad for lunch and dinner every day for a whole week. And the dressing is just so delicious – I have been making a jar every week and spreading it on sandwiches or dipping chunks of bread while enjoying a class of wine when standing at the kitchen counter and watching reruns of Frasier.

So my dear friends, I do hope with all my heart that you will gather your courage and try this salad. And even if you don’t, I do hope that you grab a canvas bag andstop by your local farmers market, find some fresh green things, get inspired – either by me or other people and make something fresh, local and yummy.


xoxo


Swiss Chard Caesar Salad


Ingredients:
Serves 4 (medium size salads)


Dressing
• 1 large lemon
• 1 large egg
• 1/2 cup of olive or sunflower oil
• 1 really small garlic clove, crushed
• 1/3 cup of freshly grated Parmesan cheese
• Salt and pepper

Salad
• 1 bunch of rainbow chard (preferably, tender and young leaves)
• 1 bunch fresh asparagus (about 16 asparagus), hard bottoms trimmed
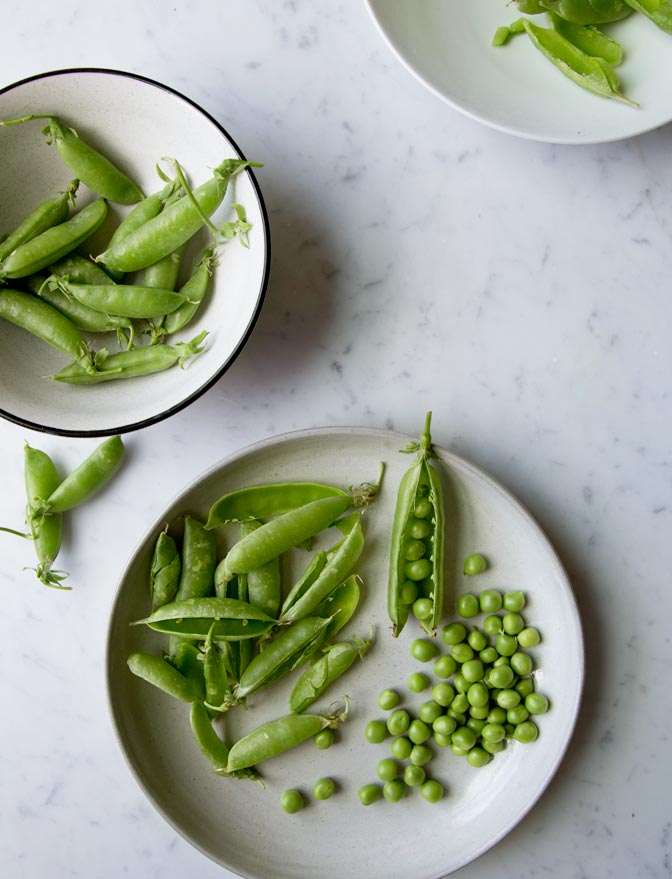
• 2 handfuls of snap peas, strings removed
• 2 thick slices of sourdough bread
• Fresh Parmesan shaves for serving


Directions:

  1. Grate the rind of the lemon and set aside.

  2. Break the egg in the food processor and whizz once or twice. Add the garlic. With the motor running on low start adding the oil slowly so it drips trough the top of the food processor. When all the oil is incorporated add the lemon zest, the juice of 1/2 lemon and the Parmesan cheese. Whizz until incorporated and add salt and pepper to taste. Taste again and add more lemon juice if you like it lemony (like me). If the dressing runs thin add 2-4 tablespoons of oil and whizz until it thickens. Be careful not to make it thick (like mayo) and if it gets too thick add a 1-2 tablespoons of water or lemon juice. Place the dressing in a jar and refrigerate.

  3. Heat a small pan over medium-high heat. Tear the bread into uneven 1/2-inch chunks, toss liberality with olive oil and add to the pan. Turn the heat on low and toast the croutons by flipping them a few times until golden brown.

  4. Meanwhile, bring a large pot of salted water to a boil. Turn off the heat and add the asparagus. Remove the asparagus after 2-3 minutes and drop them immediately in a large bowl of ice cold water to stop the cooking process and to preserve their bright green color. Remove from the water after 2-3 minutes, pat dry, cut in half and set aside in a large bowl.

  5. Clean the Swiss chard, wash and dry really well (this will ensure a nice coating of the dressing). Remove the stem and the central vein, tear the leaves into 2-inch chunks and add to the asparagus. Add the snap peas, the croutons and half of the dressing. Toss well with your hands, taste and add more dressing if desired (I like my salad smothered with dressing). Divide into 4 plates and top with the shaved Parmesan.

Enjoy!

PRINT RECIPE
Comment

TAGS: Swiss Chard, salad, parmesan, lemon, side dish, spring, asparagus, peas


July 3, 2016

Fresh peas salad

by Iglika


Have you had fresh green peas before? I didn’t. At least not until recently. I had canned, I had frozen, dried...but fresh. No, not fresh. And I had no idea why. I have seen their brightly colored coats at the farmers market every spring and I always been intrigued by them. But maybe because of lack of a habit (or maybe because of I had a habit of eating other spring veggies) I kept ignoring my natural curiosity towards these green beauties. And this spring I decided that I will no longer just admire them, I will get them and make something...even though I had no idea what. And to be honest, I had no idea how to eat them. I was even a bit scared of messing them up. I tend to feel really bad if I kill a beautiful, fresh produce by lack of knowledge. But as people say, there always a first time for everything, and my first time eating fresh green peas was kind of disaster. I decided to blanch them whole with the pod, and make a fresh cold pea soup. Not a very good idea. I will not go in full detail describing this strange experience but if you remember how you felt when you were a kid and had to eat an odd textured soup at the kindergarten and you really didn’t feel like eating it, but you had to...Yeah, that’s it. 

Now you might be wondering why on earth I am about to share a fresh green peas recipe with you even though I just described my very first (not exactly successful) experience with them. It is because I don’t give up easily. Not without trying. I have always liked green peas, so I figured that it must be me and my method of preparing rather than the peas themselves. So I went back to the market, I got some more, I blanched them again, but this time I shelled them so the only thing left of them was their sweet little round hearts. I added some fresh asparagus form the farmers market too, some lemon juice, mint and soft goat cheese and...viola, a full of life and flavor fresh salad that I can eat over and over and over...and over again.

So grab your bags and go to the farmers market and get some fresh green peas. And if they are all gone, just grab something else that is fresh and grown with love and care and enjoy it to the fullest.

xoxo


Fresh Peas Salad
 

Serves 4 (small size salads)


Ingredients:
• 2 cups fresh peas
• 1 bunch fresh asparagus (about 16 asparagus), cut in half
• 2 lemons
• 2 garlic cloves, crushed
• 1 cup fresh mint leaves, chopped
• 1/4 cup thyme flowers (optional)
• 4 oz. fresh goat cheese
• Salt and pepper
• Olive oil


Directions:

  1. Bring a medium pot of salted water to boil. Turn the heat off and add the fresh peas and asparagus. Blanch for 4 minutes.

  2. Meanwhile, zest one of the lemons and juice both of them. Drain the peas and the asparagus and place them in ice bath to stop the cooking process and to retain their bright green color.

  3. Drain the peas and asparagus really well and place them in a bowl with the lemon juice, lemon zest, garlic and the mint leaves. Add salt, pepper and olive oil to taste and toss to combine.

  4. Divide the salad among 4 plates and top with chinks of goat cheese and sprinkle with thyme flowers (if using).

print recipe
Comment

TAGS: peas, salad, mint, asparagus, spring


April 7, 2015

Pasta with Peas and Prosciutto

by Iglika


I am not sure about you, but cooking has a meditative and soothing effect on me. Maybe because it gives me structure, a result to look forward to and the hands-on process makes me focused on what I am doing at that specific moment. Quite often I catch myself being concentrated only on the specific task I am doing, maybe it is chopping a tomato or thin slicing a cucumber, my mind stops to spin around and it stays where my hands are. I am not trying to plan my next task. I am only concentrated on the one I am doing right at that moment and I want give my whole attention and respect to it. Then, when I am done, I move onto the next ingredient and I follow the same process. The coolest thing about it is that it comes to me naturally, I don’t force myself to do it that way, I don’t think about it. It just happens. And it is only when someone shares how frustrating cooking is for them that I start thinking why I love cooking so much.

For some reason cooking, traveling and dogs (the big, soft, happy, wet nosed kind!!!), are at no fear to me. I want to grab them, hug them, smell them and follow them (and not only the dogs – and even if they might be covered with mud and smell like a dead mouse). Doing and being around these things makes me very happy. That is the reason why I try to cook new recipes. They teach me new things and expand my perception of life. And that is not to say that I jump from one thing to another. Quite often I fall in love with a recipe that I want to cook until I perfect it – even if it means that I will have to eat potatoes every day for lunch and dinner for 2 weeks.

The following recipe is of the latest kind. I have been cooking and eating this pasta until I got it to the point of pure lovely yumminess. It is simple, yet it has all elements of a beautiful dish. It starts with building flavors by crisping the prosciutto and sautéing the shallots, garlic and wine in the prosciutto drippings. Then adding the al dente pasta and allowing it to soak all the yummy flavors. And finishing by tossing the pasta with lots of fresh Parmesan which makes for a creamy complex-flavored sauce.

This recipe is a favorite of mine. I often make it for my friends on the nights when laughing is more important than the heavy, multi-hours, 5 course – ala Martha Stewart type of cooking. And that recipe never failed me.

See you soon my fiends! Cook something tonight and be happy!


Pasta with Peas and Prosciutto


Ingredients:
Serves 2

• 1/3 dry spaghetti package
• 2 tbsp olive oil
• 4-5 prosciutto slices, torn into 1-inch pieces
• 1 medium size shallot
• 1 garlic clove, smashed
• 2 tbsp white wine
• 1/2 cup frozen peas, thawed 
• 1 tsp fresh thyme (or 1/4 dry thyme)
• 1/4 cup freshly grated Parmesan cheese, plus more for serving
• Salt and pepper


Directions:

  1. Pour yourself a glass of white wine, sip and enjoy the cooking:

  2. Heat a large pot with 4 quarts of salted water until it reaches the boiling point. Add the spaghetti and stir gently to separate. Lower the heat to medium-high, watch so water doesn’t over boil and stir from time to time to prevent the pasta from sticking. Cook until the pasta is al dente (neither crunchy nor too soft).

  3. Meanwhile, heat 1 tbsp of olive oil in a large non-stick pan. Arrange the prosciutto pieces so they cover the pan and are not touching each other. Adjust the heat to medium-low, cook the prosciutto for 1 minute, then turn the pieces on the other side and cook for an additional minute – until crispy but not burnt. Remove the prosciutto with a slotted spoon, place on a plate and set aside.

  4. Using the same pan (do not clean the prosciutto drippings) add the remaining 1 tbsp olive oil, shallot and the garlic. Cook until soft and fragrant, about 1 minute. Add the wine and peas and cook for 30 seconds. Using tongs or a spaghetti spoon (long, cupped, pronged spoon) take the spaghetti out of the water and place them into the pan with the rest of the ingredients. Add 2 ladles of the spaghetti water, stir well and cook on low heat until most of the water is absorbed, about 2 minutes. The pasta should be wet and have some liquid, if dry add a 1/2 ladle of the pasta water. Turn the heat off. Add thyme, prosciutto, Parmesan and pepper (to taste) to the pan. Toss the pasta gently using 2 spoons until Parmesan cheese coats the noodles and turns into a creamy sauce.

  5. Divide the pasta between 2 plates. Top with extra Parmesan cheese and serve right away.

    Enjoy!

TIP: If you forgot to thaw the peas in advance, place them in the pot with the boiling spaghetti. Remove them after 1-2 minutes using a slotted spoon

PRINT RECIPE
2 Comments

TAGS: prosciutto, peas, main dish, parmesan, summer


  • Newer
  • Older

Powered by Squarespace 6