When I was a kid, lasagna was this mystical dish that the cartoon character Garfield devoured with so much pleasure and excitement, so to the young me lasagna was the dish of the happy, joyful creatures of the world.
The very first time I had lasagna in my life was in December of 2000. This was the very same year in which I arrived in the United States, and the first of many years to be away from my family for Christmas. That year, a warm-hearted American family (who soon after became my American family) invited me to celebrate Christmas Eve with them, and to my surprise and dismay they served homemade lasagna with a salad at the Christmas Eve dinner.
Reading, you might be wondering what is so strange about having lasagna for dinner on Christmas Eve. You see, growing up our Bulgarian customs were to have vegan food for Christmas Eve dinner. And in fact there were some very specific traditions about it. For example: the number of dishes is to be an odd number, and some staple Bulgarian dishes have to be present – like: bean stew, rolled cabbage leaves, and fortune bread. For some unknown to this day reason, my child head believed that if I don’t honor Jesus’s birth and don’t eat vegan food I will be punished by the Gods. Don’t ask me which Gods since I made up the whole story. One could think that perhaps my family was religious, but in fact my family was not even remotely religious, therefore I have no idea where this story came about in my head, but strangely enough I believed in it – kind of like believing in Santa, until you don’t.
So here I was, sitting in a beautiful American home, surrounded by a loving group of people with a meat lasagna in front of me for Christmas Eve dinner.
I had to eat it. I couldn’t let down the most wonderful family who took a barely-speaking English young woman under their arm, and made her part of their family for Christmas. I was going to deal with the Gods later. And, to be honest, I was hoping that the Gods in America were different than in Bulgaria, and their will was that people had to eat meat Lasagna for Christmas dinner in order not to be punished by them.
The lasagna was amazing! The dinner was amazing! And in fact, it was one of the most memorable Christmas dinners in my life. However, the entire time I ate the lasagna my head was going through probable scenarios of me being punished by the Gods later. Some of the stories swirling in my head were around me getting in a car accident after leaving dinner. Or that my plane going back home would crash. All imaginary scenarios were very dramatic, and included very sudden and super deserved (as far as I was concerned) death.
On my way home from dinner, I kept waiting for my car to explode, or to be hit by a deer, but nope – I came home in one piece, my car and I were ok. Traveling back to Bulgaria a few days later, to my dismay the plane didn’t crash either. In fact nothing even remotely bad happened to me in the days and months following the Christmas dinner. Relieved by the outcome, I promised to my twenty-something years old self, that I will definitely eat lasagna for Christmas Eve dinner again someday.
So here I was, exactly 20 years later and during another year where old habits and traditions were being tested and broken by another huge life change – the virus. It was Christmas time, and I found myself remembering the lasagna story. It was then when I decided to have lasagna for Christmas again, as a tribute and a symbol of opening the door to a wonderful, and unexpected new traditions.
While rolling the lasagna sheets I was giggling to myself and thinking “Life is giving me the same unexpected gift for a second time in my life.” As one door closed, another one opened, and it gave me the chance to experience life in a new way.
About the recipe:
Lasagna with homemade lasagna sheets sounds impossible to make at home and waaaaay too complicated than it actually is. Don’t know about you, but for me the store-bought lasagna sheets seem like a real good idea until it’s time to dig-in and enjoy the final result of my hard labor. This is what usually happens to me: I put my fork into the mound of cheesy goodness and sauce, and all the saucy yumminess slides off to the side, leaving a massive amount of hot dough on my fork. Nope. Not a fan.
To me, the whole idea of lasagna is that the lasagna sheets have to hold the saucy, cheesy goodness together. But with most store-bought sheets usually the opposite happens. After many years of using the store stuff, getting excited, and then frustrated, I thought “what’s the point?” and I gave up on making lasagna at home ...until last year when I decided to make my own pasta sheets (eggs, salt, flour—that’s it!). I was freaking out at first, but my first attempt tasted so good, and I got hooked up and never looked back.
Unlike the store-bought lasagna sheets the homemade ones act like a sponge to the sauces and cheese, binding everything together for a perfect bite of silky dough and saucy goodness. The other nice part of making your own lasagna sheets is that you can make them the size of your pan, or cut them in strips like the store-bought ones, or make the sheets as thin or thick as you like. Added bonus — you don’t even have to boil the homemade lasagna sheets. Some people do, but I didn’t find any difference in taste, just more work (try fetching those soft, boiled sheets out of the hot water without tearing them apart—no, thank you!).
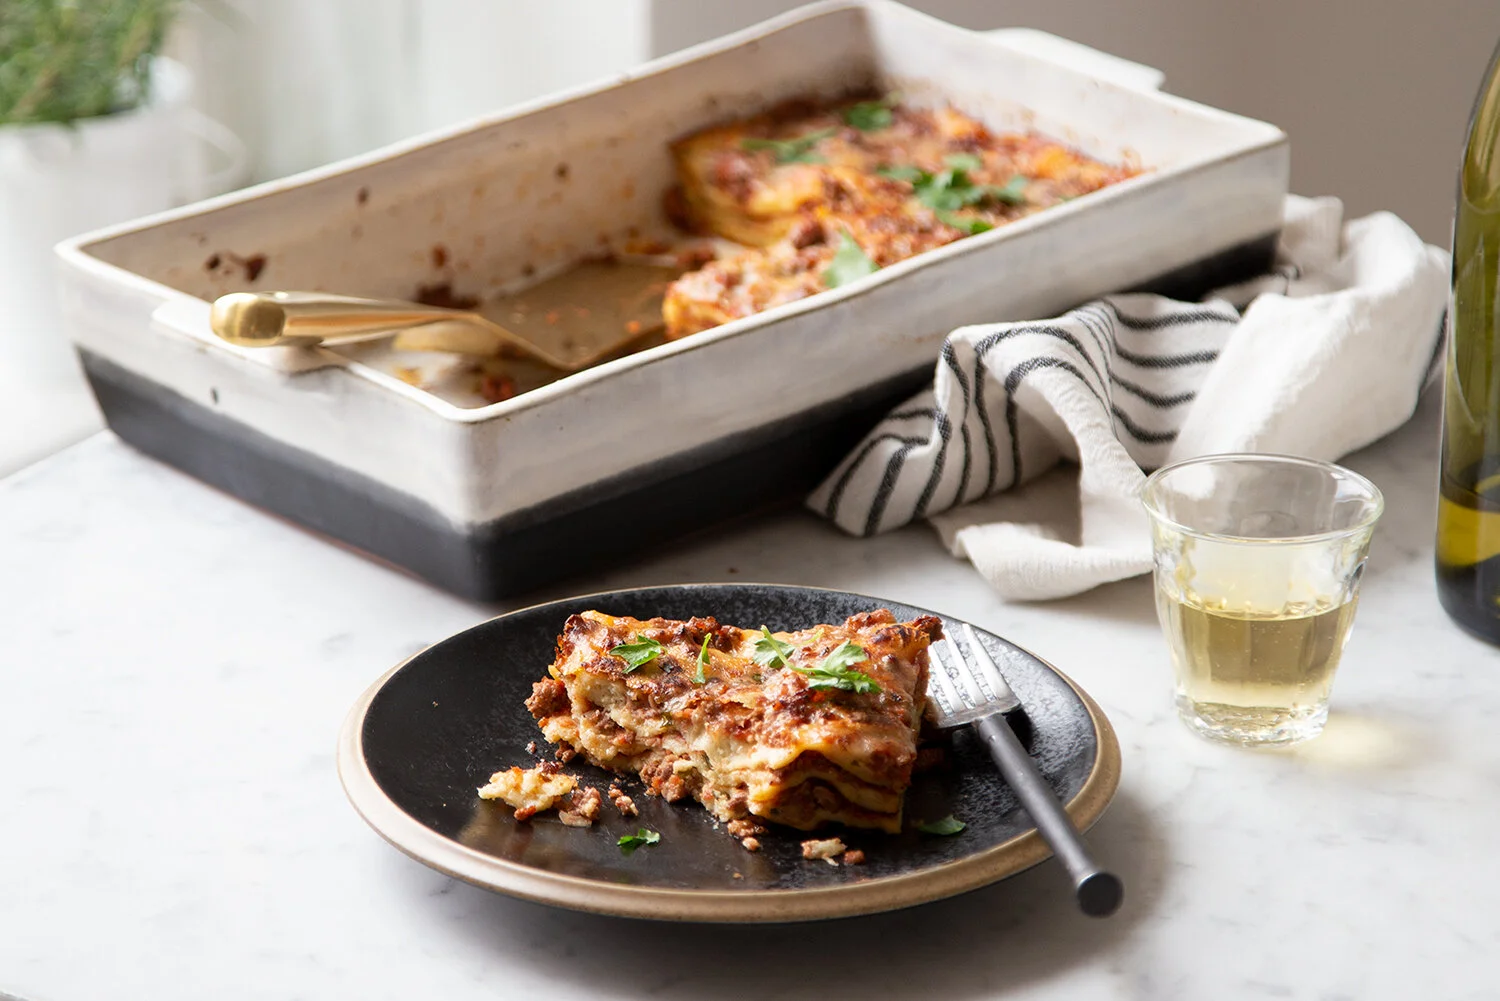
If I got your curiosity and excited to make lasagna again, yay! Now, roll up your sleeves, pour yourself a glass of wine, and let’s make lasagna!


Lasagna with Homemade Lasagna Noodles
Makes 8-10 servings
Ingredients:
Homemade Lasagna Noodles
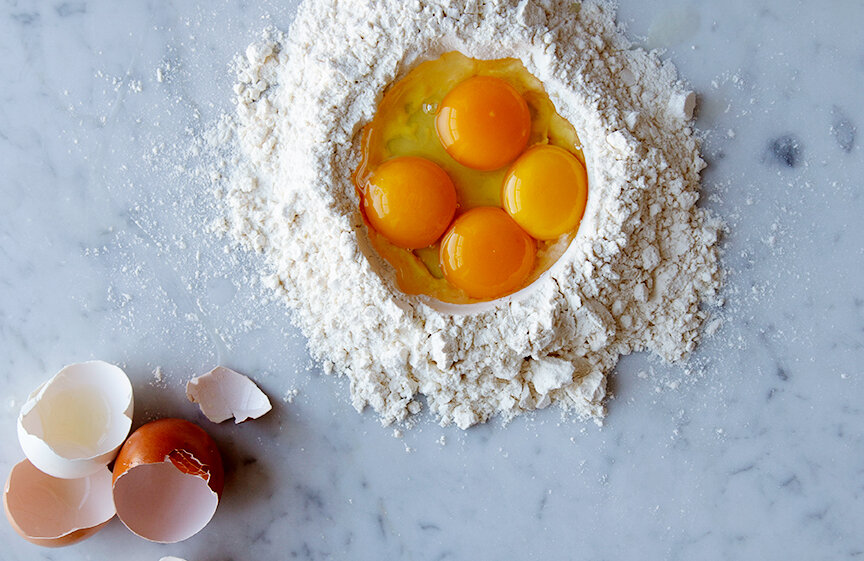
• 1 cup of all-purpose flour (plus more for dusting)
• 1 tbsp semolina flour (optional)
• 1/2 tsp salt
• 3 egg yolk
• 1 whole egg
Filling
• 1 can (28oz) whole tomatoes
• 1 medium onion, chopped
• 4-5 garlic cloves, mashed
• 1.5 pounds lean ground beef
• 2.5 cups whole milk ricotta cheese
• 1.5 cups + 1 cup (for topping) shredded Mozzarella = 2.5 cups
• 1 cup + 3/4 cup (for topping) freshly shredded Parmesan = 1.3/4 cups
• 1 egg
• 1/5 tbsp fresh thyme leaves
• 1/2 cup freshly chopped flat-leaf parsley + more for topping
• Salt
• Pepper
• Olive oil
Equipment
• Long rolling pin, or a Pasta Roller
• 8x12 or 9x13 baking pan
• Ruler
Directions:
To make the Pasta Dough: Follow my recipe from this blog post.
Make the dough per directions, form a ball, wrap in a plastic wrap and let it rest for 30min on the counter.
To make Lasagna filling:
While the dough is resting, place the canned whole tomatoes in a food processor and pulse a few times. The mixture should become slightly rough but without large tomato chunks. Set aside for later.
Heat a large skillet over medium-high heat, add some olive oil, onion and garlic, and sauté until soft and translucent (be careful not to burn the garlic as the flavor will become unpleasant). Place cooked onion and garlic in a bowl and set aside for later. Return the empty pan back to the stove and add the ground beef (work in 2 batches if necessary) brown and cook the meat thoroughly. Place the cooked meat on a paper towel to absorb some of the excess fat. Remove any fat from the pan, return the cooked ground beef back to the pan, and add the cooked onion and garlic, the tomatoes plus some salt and pepper. Mix well and simmer without a lid for 15-20 minutes by stirring from time to time, until the mixture is slightly thicker. Remove from heat, taste and add more salt or pepper if needed. Set aside to cool.
While the beef mixture is simmering, in a large bowl combine the ricotta, the 1.5 cup shredded mozzarella, 1 cup shredded Parmesan, parsley, thyme, the egg and a couple of pinches of salt and pepper. Mix well and set the bowl aside.
To make the Lasagna Sheets:
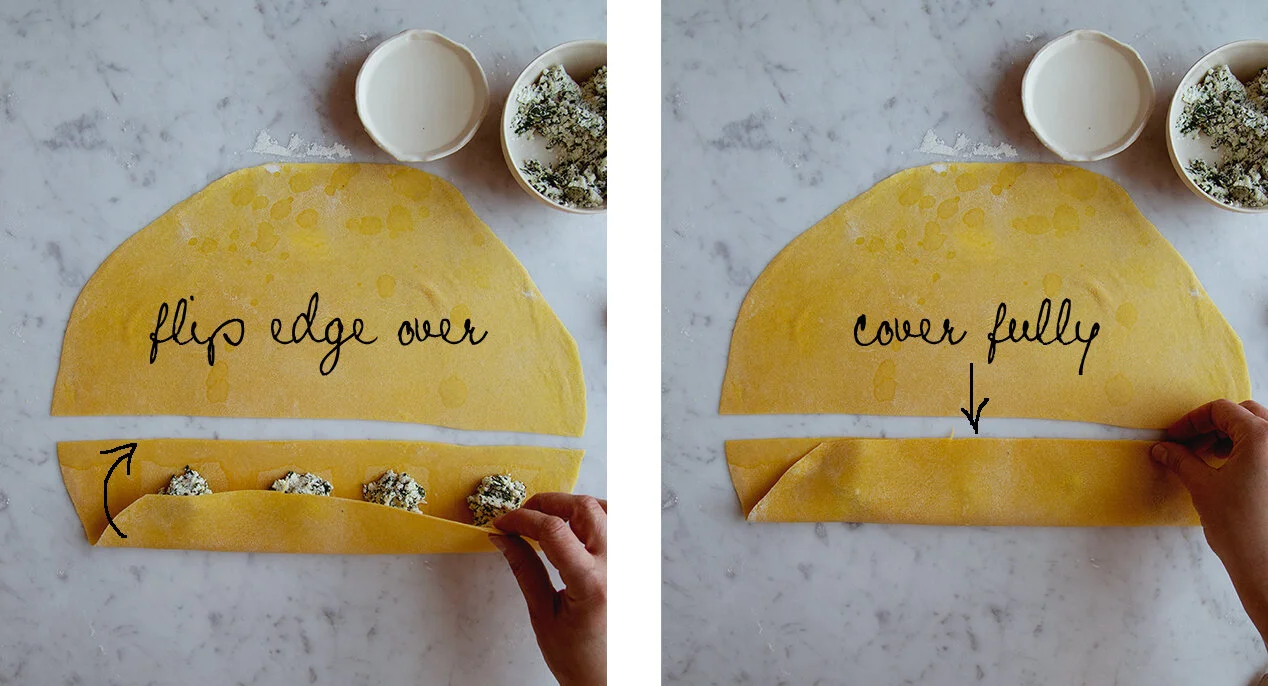
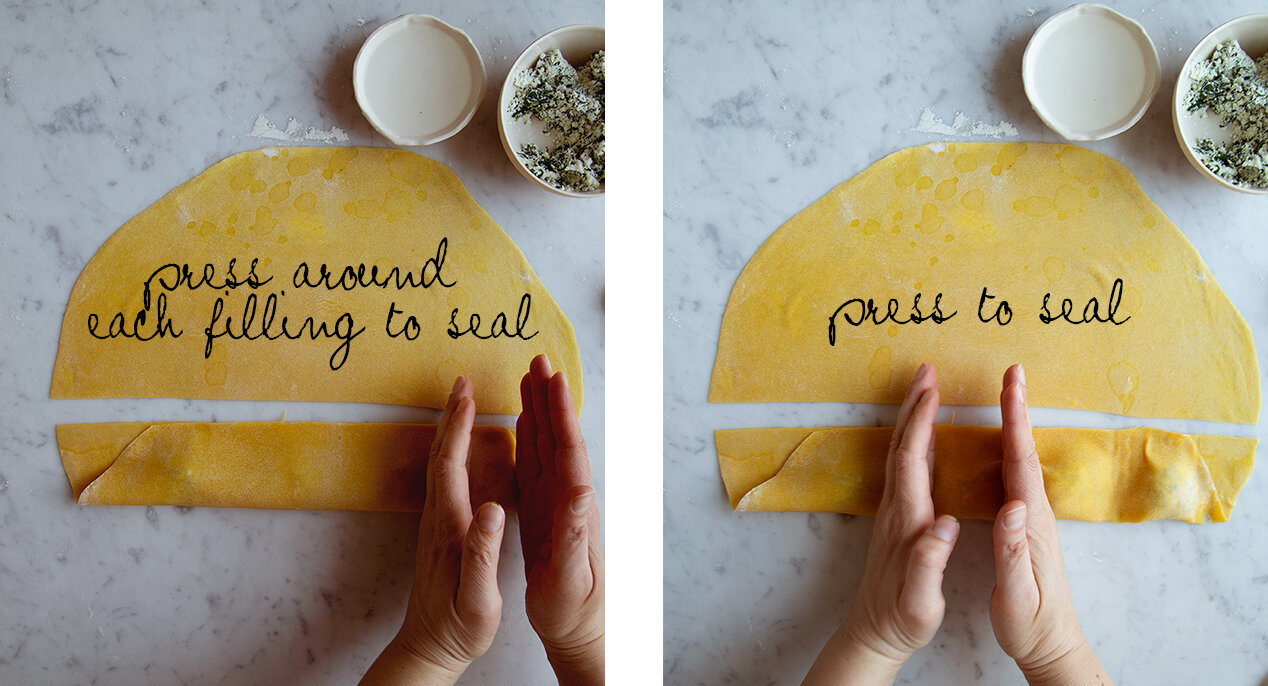
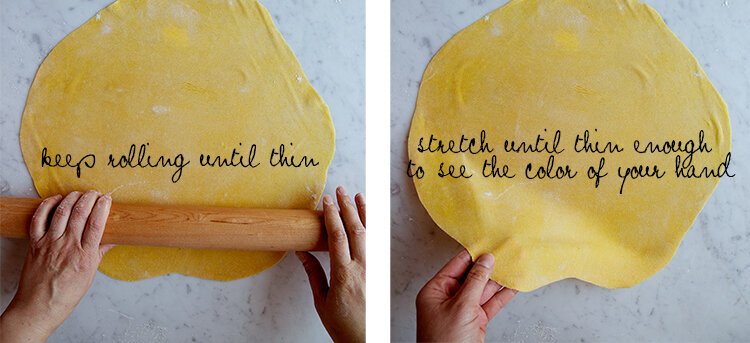
Have your pan nearby for size reference. Cut the dough in 3 and form 3 balls. Cover 2 of them with a plastic wrap and set aside. Lightly flour your surface, working 1 ball at the time and roll out the dough to the size of your pan. Oval shapes, not perfect rectangles, or slightly small or large lasagna sheets are totally fine. If you are using a pasta machine instead of a rolling pin, roll the dough as wide as possible and make the sheets a bit longer, so you can cut a piece to fill the empty spots in the pan. But if possible, roll the sheet as close to the size of the pan since that will make the spreading of the filling easier for you. Place the rolled out lasagna sheet on a parchment paper. Repeat with the remaining dough and place the rolled out sheets on top of each other separated by parchment paper.
To assemble:
Preheat oven to 350 F.
Spread 1 cup of meat and tomato mixture on the bottom of your pan. Place one lasagna sheet on top. Spread 1/3 of the ricotta mixture over the lasagna sheet, using a spoon. Follow with 1 cup of the meat and tomato sauce and spread well over the cheese mixture. Repeat the process with the remaining lasagna noodles. Your top layer should be a layer of meat and tomato sauce. Sprinkle the remaining 1cup of shredded Mozzarella and 3/4 cup shredded Parmesan. Cover with foil and bake for 45-50 min, or until fragrant and bubbly. Remove the foil and place lasagna back in the oven for additional 15-20 minutes or until the cheese is lightly browned.
Remove from oven and let rest for 20-30 minutes. Sprinkle with some chopped parsley if desired. Cut and serve until still warm.