Search
  • Journal
  • Recipes
  • About
  • Say Hello
  • Subscribe
Close
Menu
Search
Close
  • Journal
  • Recipes
  • About
  • Say Hello
  • Subscribe
Menu

sprig of thyme

August 4, 2015

Yellow Oyster Mushrooms on Melted Brie Toast

by Iglika


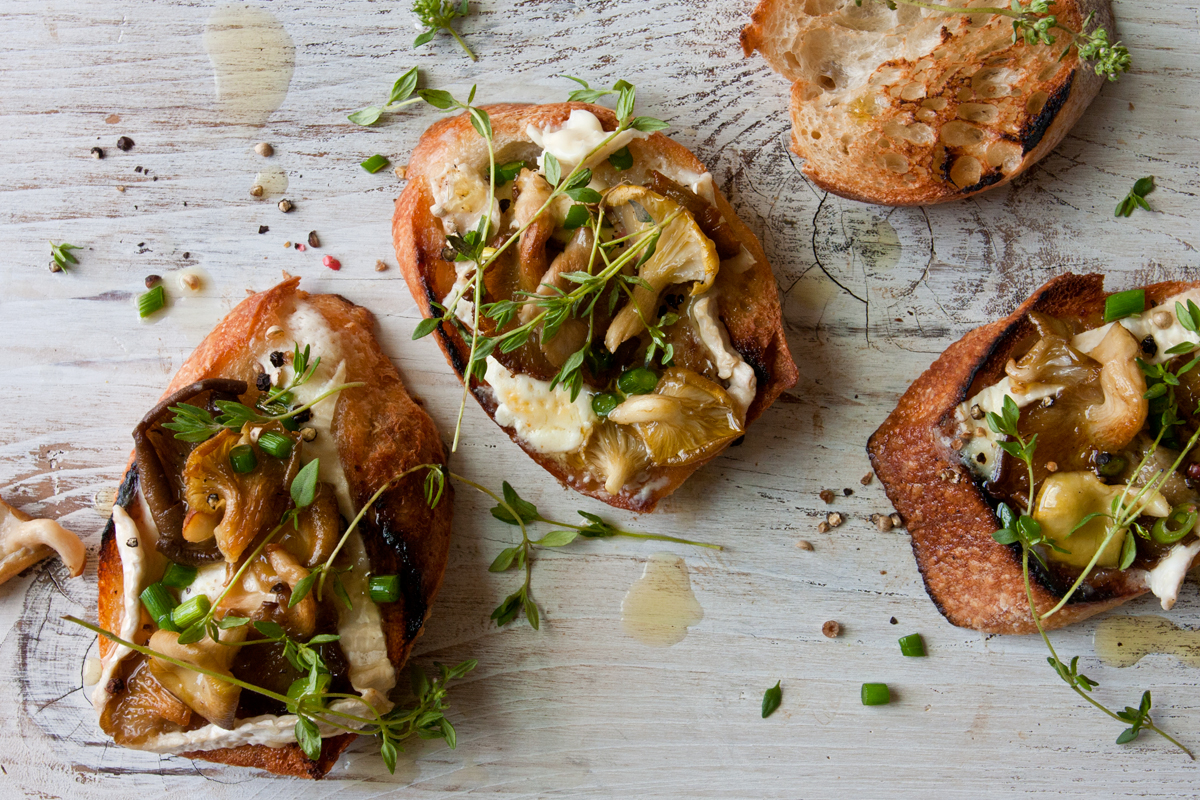
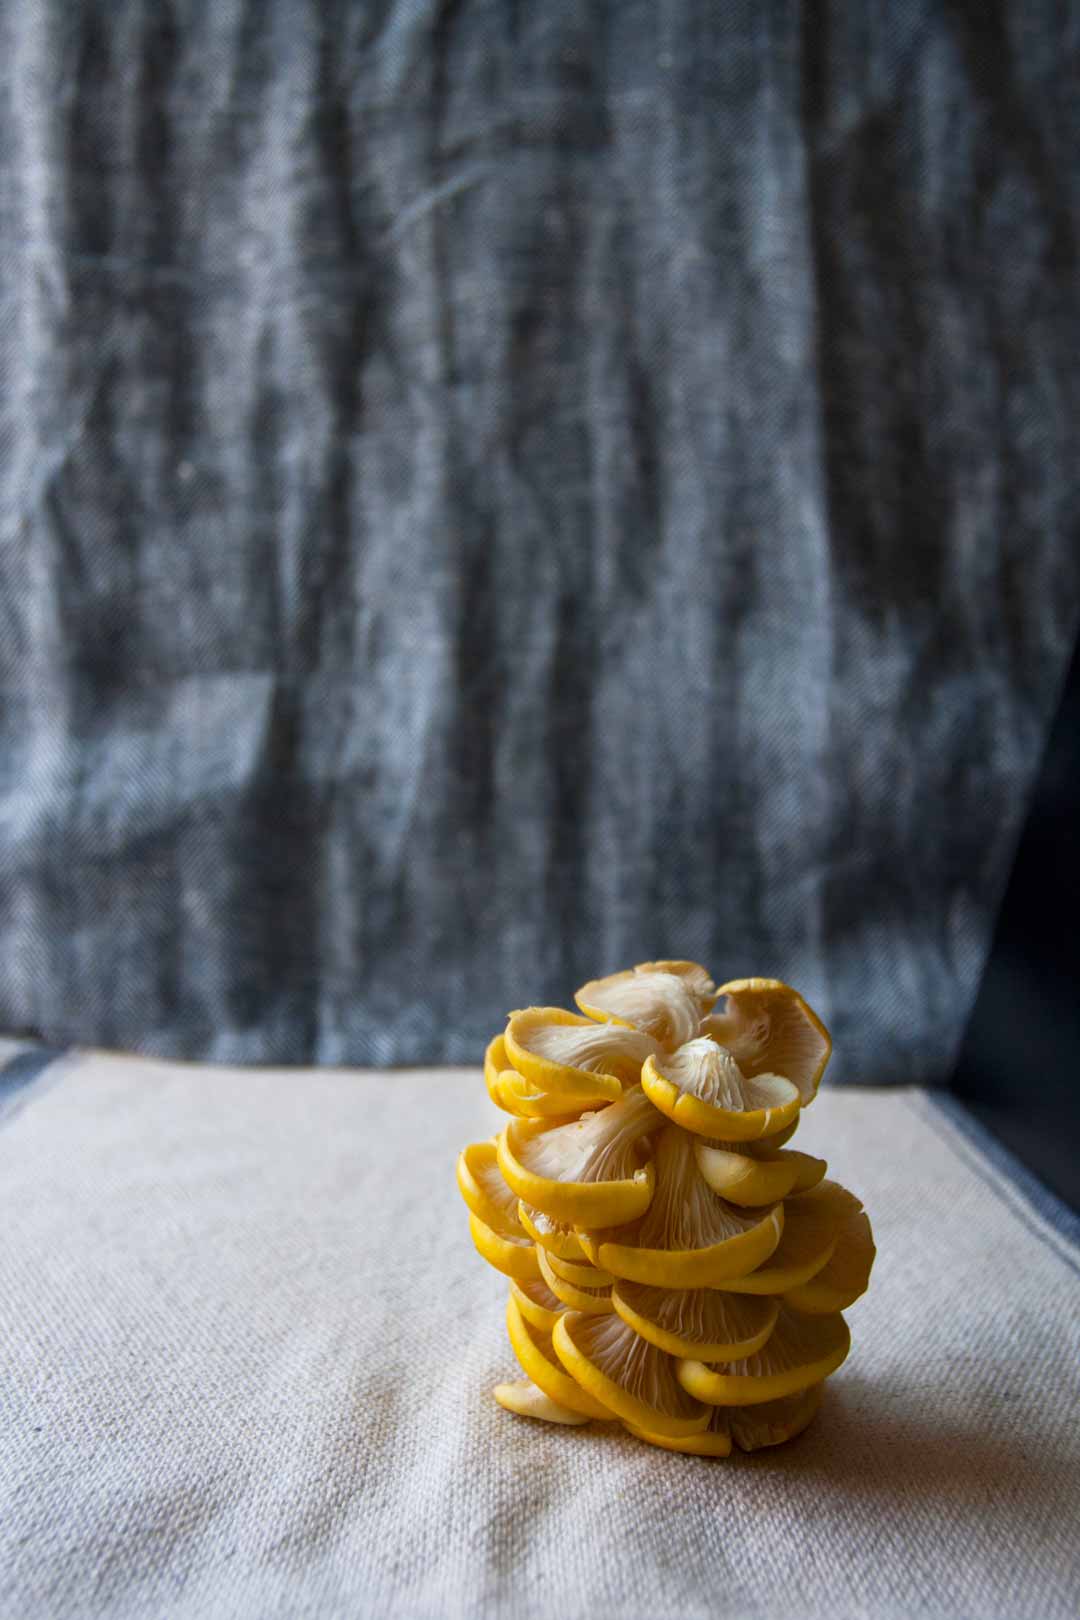
My dear friends, may I present to you the stars of today’s recipe – the wonderfully splenderfull Yellow Oyster Mushrooms. Locally grown by this mushroom guy, which I (as well as other mushroom lovers) discovered at the farmers market and took home, before someone else did (oh, and believe me they do if I don’t get at the market early). These tiny, brightly-colored fragile beauties won my heart and their taste was even more delightful than their look. But before I cooked them, they became the models at my very own photoshoot, and oh the fun we had together.  After some time and attention, I sauté them along with some regular oyster mushrooms, garlic scapes and a touch of thyme. Then I layered them on a melted Brie toast (which itself is finger licking), and enjoyed them with a glass of chilled white wine. You may now ask what do yellow oyster mushrooms taste like, and to me (when sautéed in some butter and olive oil) they taste like crunchy and buttery crispy chicken skin (drooling already?!). And this itself, my dear friends, is something worth trying, especially if you are vegetarian or a mushroom (or a chicken!) fan.

I know that after each recipe I say that I hope you try it, but this time I REALLY hope you do try it, because I will be making it all summer long!

xoxo


Yellow Oyester Mushrooms on Melted Brie Toast

Makes 4 toasts

Ingredients:
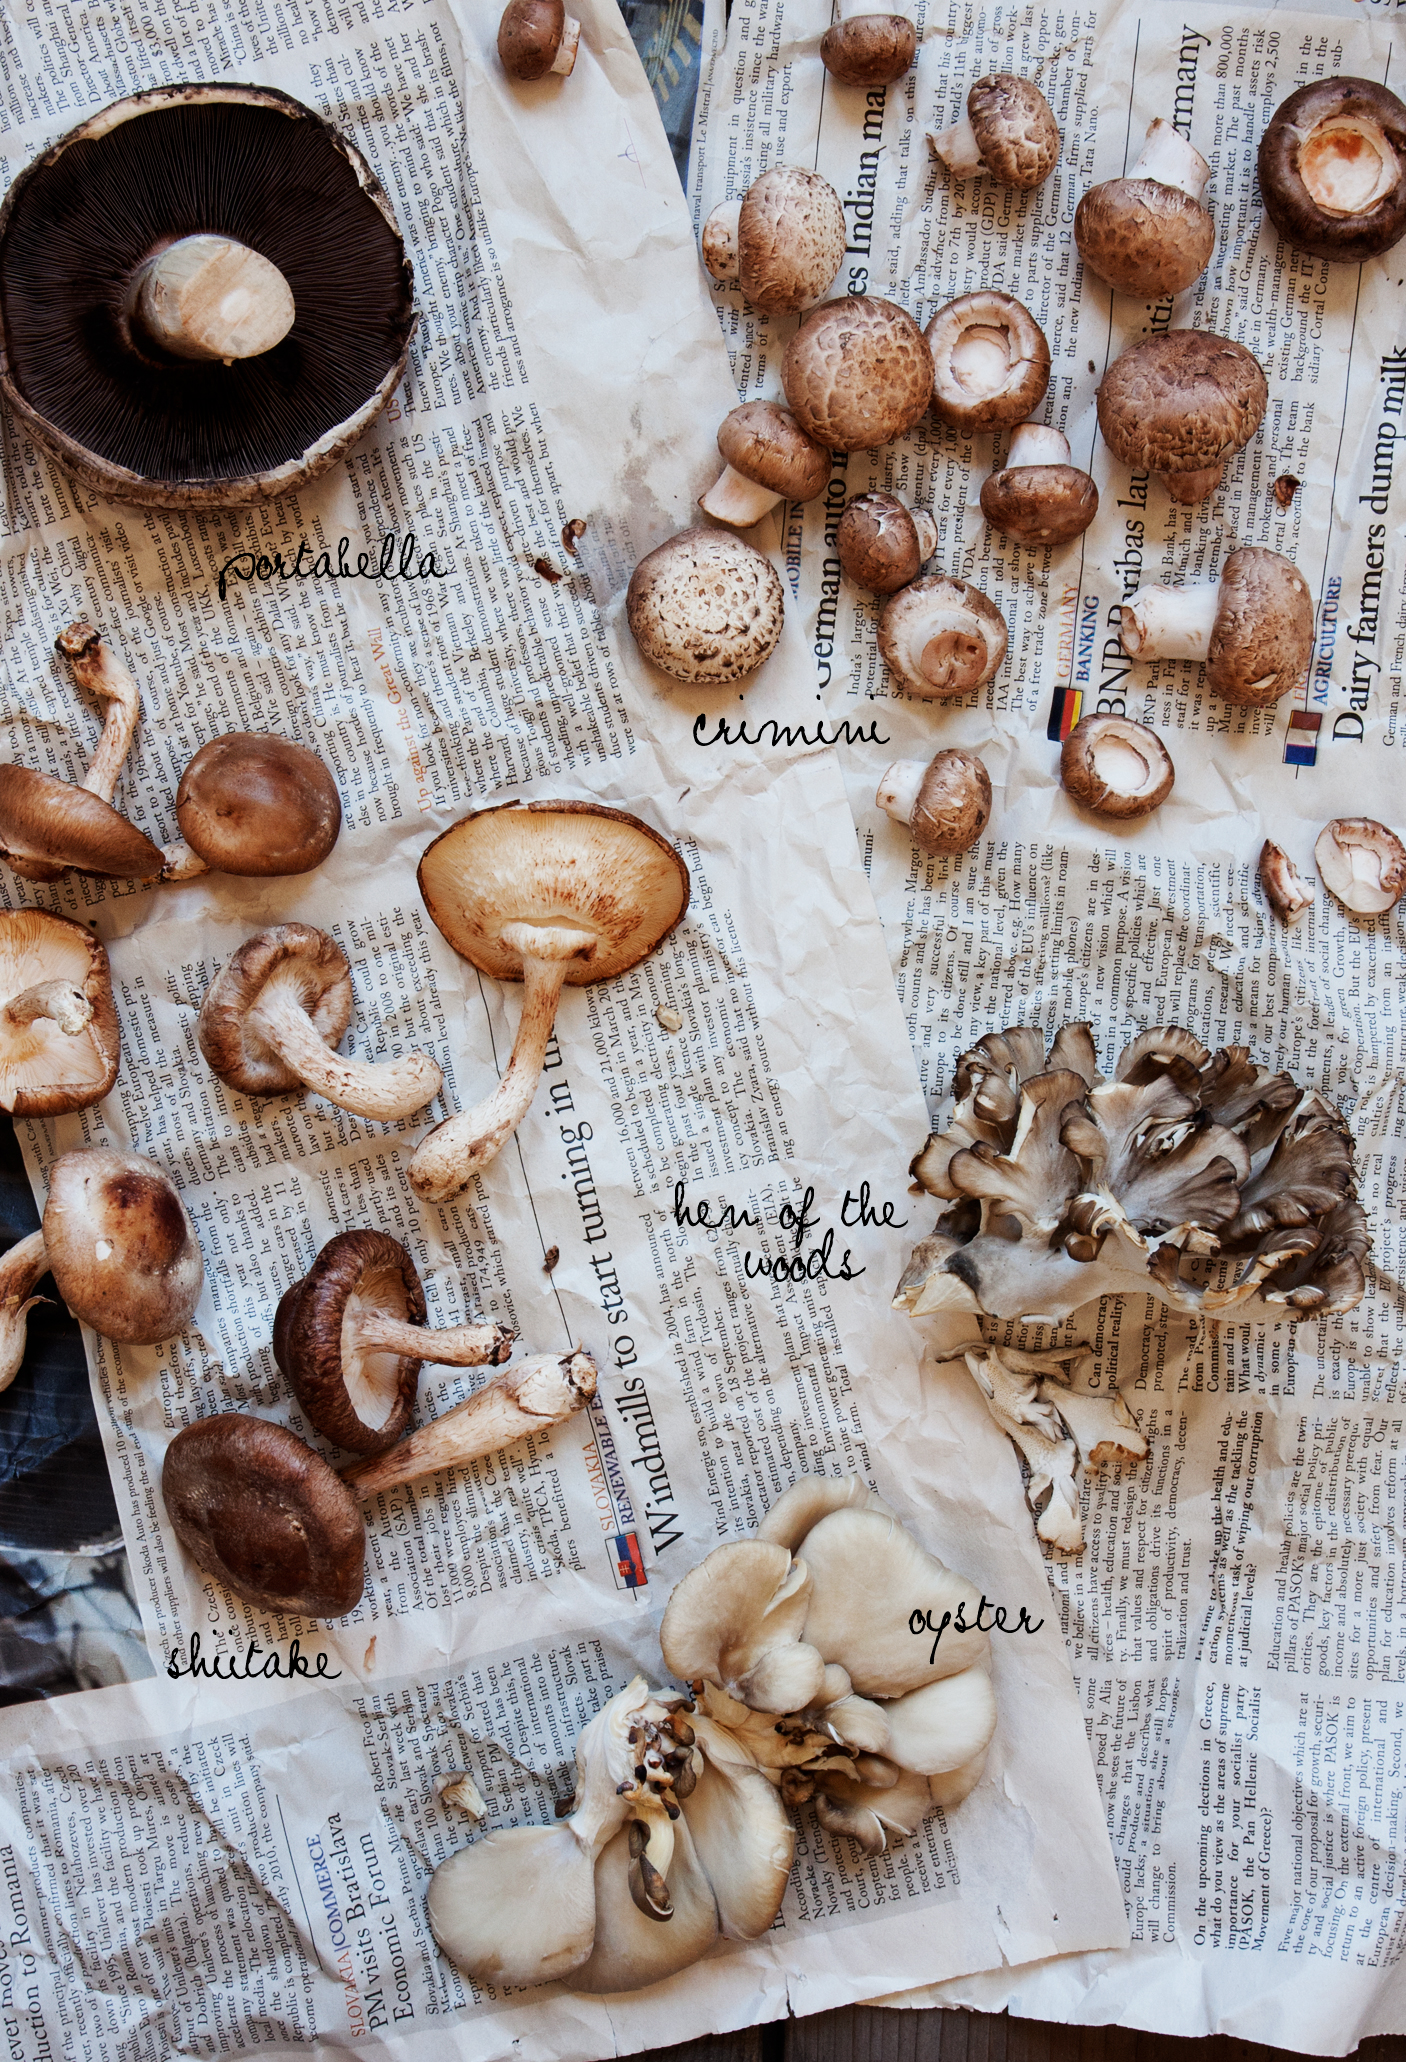
• 7 oz. (200 gr) mixed oyster mushrooms
• 3 tbsp butter (40 gr)
• 6 garlic scapes, chopped (or 2 garlic cloves, crushed)
• 1 tbsp white wine (optional)
• 4 sprigs of thyme
• 4 slices of thick crusted bread, toasted
• 4 oz. (125 gr) good quality Brie cheese (preferably with mushroom tasting rind)


Directions:

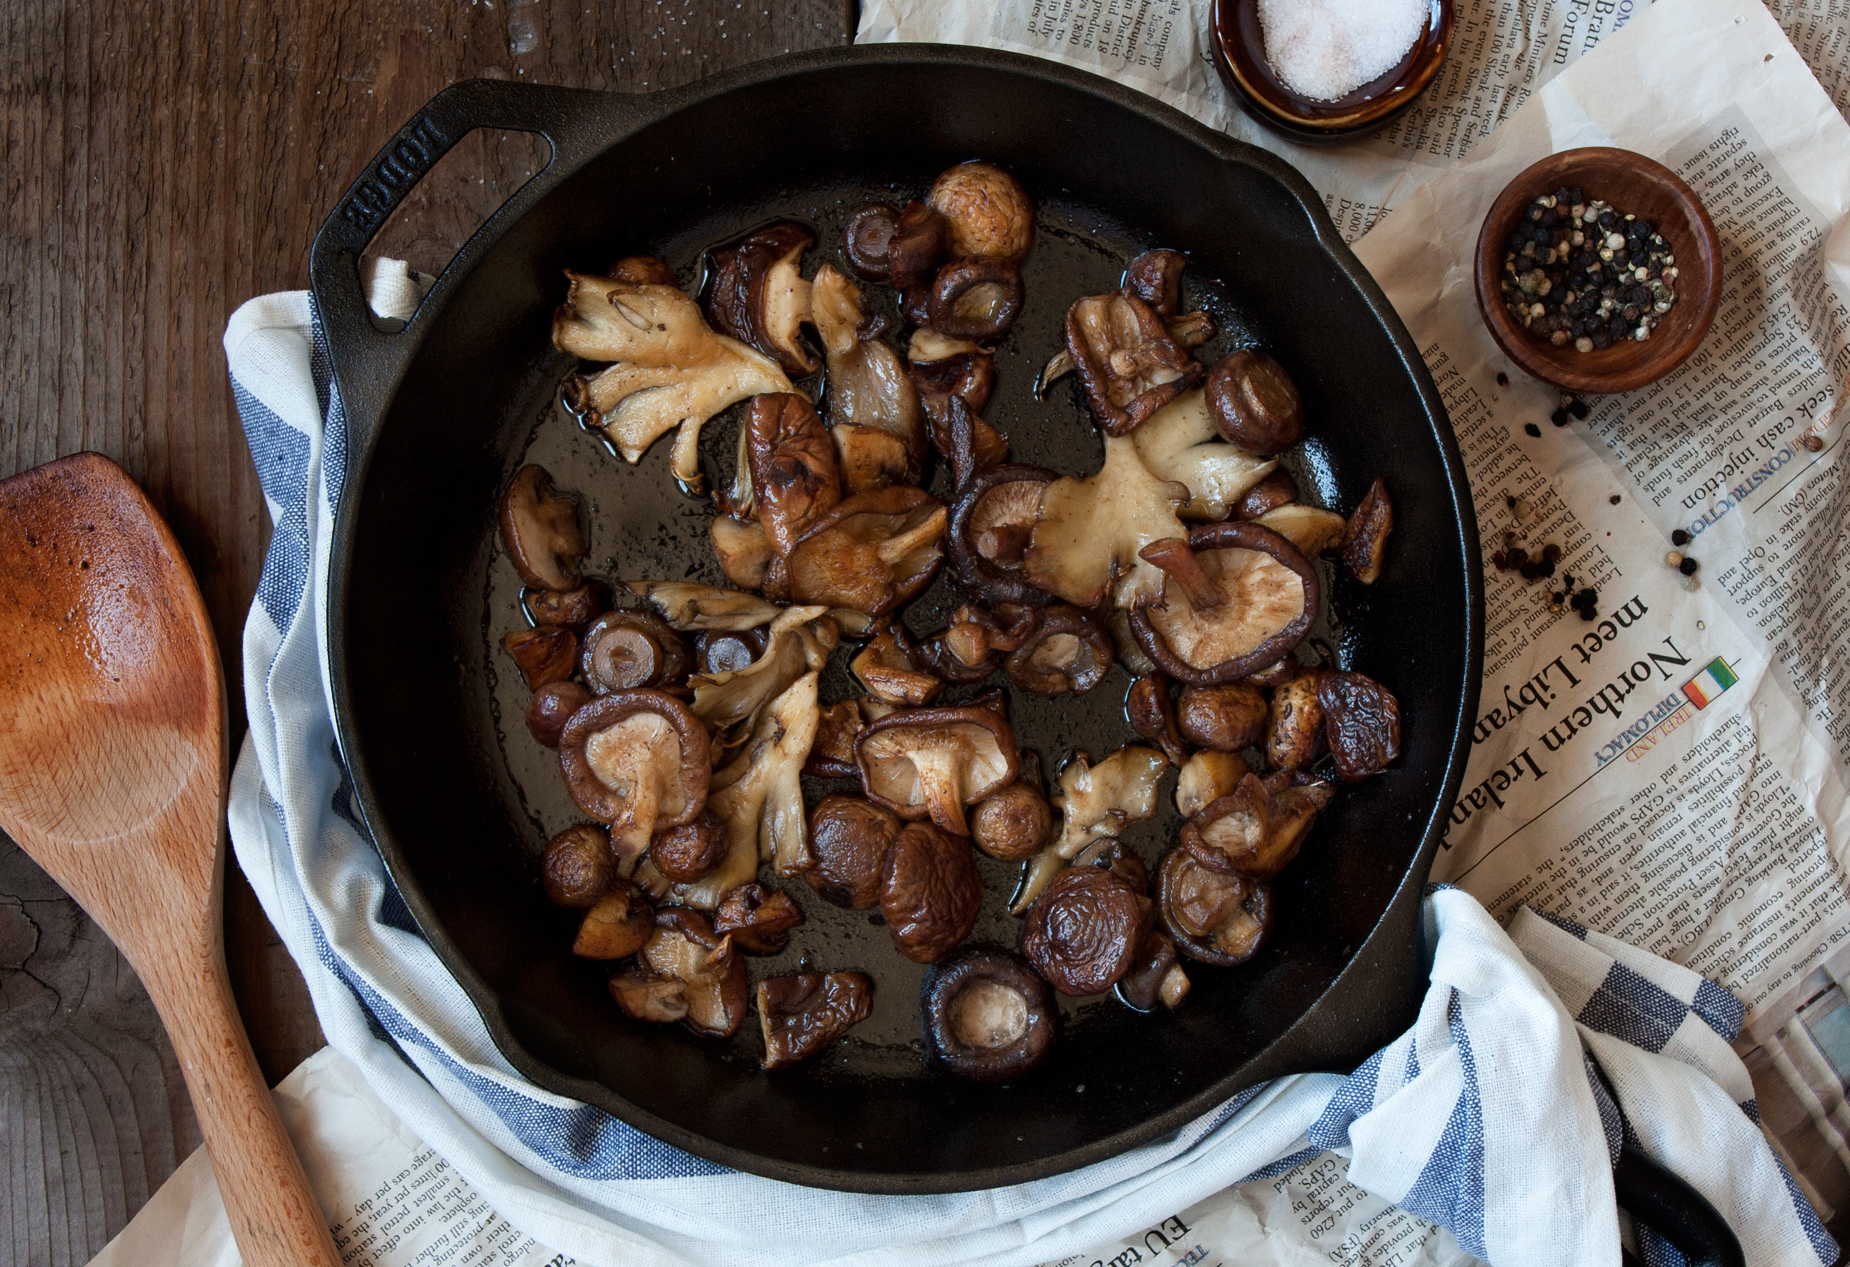
  1. Brush the mushrooms with a dry brush to remove any dirt and tear the large mushrooms into about 1-inch pieces. Heat a large nonstick pan over medium high heat, when nice and hot add the butter, mushrooms and salt. Cook for 2 minutes, stir and add the garlic scapes and the wine (if using). Cook for 1-2 additional minutes until the edges of the mushrooms turn golden brown. Add thyme leaves and set aside.

  2. Heat the broiler. Cut the Brie cheese into about 1/4-inch (5-6 mm) slices. Top the toasts with the Brie and 1/4 of the mushroom mixture. Arrange the toasts on a baking sheet and place them under the broiler. Bake for 1-2 minutes, or until the Brie has slightly melted and has browned on the edges. Since ovens vary, check toasts often or you might end up with totally melted or burnt toasts.

Pour yourself a nice glass of chilled Sauvignon Blanc and enjoy!


Print recipe
2 Comments

TAGS: mushrooms, appetizer, brie cheese, fall


December 7, 2014

Pan roasted fingerling potatoes

by Iglika


The potato. The simple and dearly beloved potato. It can be fried, baked, boiled, mashed, pureed. It can be added to soups and stews, it can be made into dough and shaped as pasta or bread, it can be added to pizza, sandwiches or salads, but most importantly, it can be enjoyed on its own.

When you think about it, you can’t really mess up cooking potatoes (unless you leave them raw or burn them badly). They are quite forgiving when it comes to cooking.

I have to admit that I am a crazy potato eater. I love, love potatoes and I can hardly get tired of them. And, more often than not, I have to restrict myself from eating them regularly. I have my potato phases when I will eat cream of potato soup or potatoes in salad for 2 weeks (yikes!!!). That is why it shouldn’t be a surprise that my mission for several years was to perfect pan fried potatoes. It seems like an easy task; just throw sliced potatoes into a hot pan with some oil, but very often they will come out soggy or slightly uncooked. The texture I was always looking for was a crunchy and crispy skin on the outside and creamy and soft flesh on the inside. 

The technique you will find below does exactly that. The desired texture is achieved by boiling whole small potatoes, smashing them with the flat side of a knife while still warm, and pan frying them in a very hot pan until golden and crispy. By boiling the potatoes they get cooked and their moisture is retained. Smashing the potatoes exposes their soft flesh and creates little nooks and crannies that become crunchy edges during the frying process. The final touch of tossing the hot potatoes with smoked paprika and finely grated fresh Parmesan creates a crispy and very flavorful skin and adds just the perfect amount of seasoning.

I can proudly declare that these potatoes are super-duper awesomly delicious. In fact, I was so happy how they turned out that if you look reaaaaaally close into some of the pictures you can see my little anxious fingers trying to snatch some of them.

Enjoy!


Sprig_of_thyme_Pan_Roasted_Fingerling_4.jpg


Pan Roasted Fingerling Potatoes


Ingredients:

Serves 4


• 1 lb fingerling or small baby potatoes
• 1 tsp salt
• 2 large shallots or 1/2 onion, finely chopped
• 3 garlic cloves, minced 
• 7 tbsp olive oil*
• 4 eggs
• 1.5 tsp smoked paprika
• 1/4 cup finely grated Parmesan cheese, plus extra for serving


Directions:

  1. Wash the potatoes, place them in a medium pot and cover them with cold water. Add salt and heat the pot over medium-high heat until it starts boiling. Lower the heat and simmer for 20-25 minutes or until soft (to check, pierce one potato with the tip of a knife and if there is no resistance, the potatoes are ready).

  2. Drain the potatoes and let them cool for 10-15 minutes.

  3. Meanwhile heat a cast iron skillet** over medium-high heat, add 1 tbsp of olive oil and sauté the shallots and garlic until soft and translucent (about 2 minutes). Transfer the mixture into a small bowl and set aside. Wipe clean the skillet by using a paper towel and keep for using later.

  4. Place one potato on a cutting board and using the flat side of a large knife (or a kitchen towel) and the palm of your hand, gently press to flatten the potato to about 1/2 inch thickness. Repeat with the remaining potatoes. Don’t worry if some potatoes break apart, you can still use them.

  5. Heat the empty (this is important) cast iron skillet over medium-high heat for about 5 minutes or until you see light smoke coming from the surface. Add 2 tbsp of oil into the pan and add a single layer of potatoes (about 1/3). Slightly lower the heat if necessary (if the pan is smoking), and fry until the edges become golden brown (about 3 minutes). Flip the potatoes and fry them for additional 2 minutes.

  6. Place the potatoes into a medium mixing bowl by using a slotted spoon.

  7. Repeat with the remaining potatoes.

  8. While the last batch of potatoes is cooking, poach the eggs using the technique described in this post.

  9. With the heat off and while the pan is still hot, return the potatoes and the shallots mixture into the pan. Add the smoked paprika and the Parmesan cheese. Toss until the potatoes are evenly coated and mixed with all the ingredients. Add black pepper and salt if needed.

  10. Distribute the potatoes into 4 plates. Add a poached egg on top of each potato plate and sprinkle with extra grated Parmesan cheese.

*Olive oil is not recommended for high-heat frying. I use it in spite of this because I like its taste. If you prefer, use canola, sunflower or grape seed oil instead.

**Using a heavy (or cast iron) skillet is important because it will retain the heat for a long time, reducing the frying time and ensuring nicely browned potatoes.

print recipe
5 Comments

TAGS: potatoes, eggs, parmesan, lunch, Vegetarian, fall


July 3, 2014

Wild mushroom risotto

by Iglika


“And it rained and rained and it rained. Piglet so told himself that never in all his life, and he was goodness knows how old–three, was it, or four?–never had he seen so much rain. Days and days and days” – Winnie the Pooh. 

Oh boy, this is how much rain we got here in Minnesota over the past few weeks. We got flooded. Literally. And what does one do after so much rain? One idea is putting rain boots on and jumping in the puddles (in my case street rivers and ponds) until happily drenched. Or grabbing a boat and paddling to work. But I had another idea for the blog, which did not involve more water...and that is mushroom picking.

When I was young, at our cabin in the mountains, and after days and days of rain, mushroom picking is what we did with my dad. We would wait a few days after the rain and if we were lucky enough to get several sunny days, we would get armed with baskets, bags, even huge burlap sacks (I am not kidding, my dad was pretty serious about mushroom picking), and we would be on our way to the mushroom kingdom.

When I first moved to the United States all the houses and the yards reminded me of my cabin. The idea of mushroom picking stayed with me, but the nicely trimmed and magazine perfect American lawns were not exactly the best place for mushroom picking. And it is not that I didn’t try – I did...and yes, I ate those mushrooms. But the result was a bit unexpected and quite unpleasant...

Since then I decided to go mushroom picking at my co-op only. They have such a good selection that to me, it is almost like mushroom picking in the forest. 

So today’s recipe is for a wild mushroom risotto. I picked blend of a few kinds of mushrooms that appealed to my taste, but feel free to use or experiment with mushrooms that are available to you. If you are lucky enough to get a farmers’ market around you that offers wild, hand-picked mushroom, you should take advantage of it and get mushrooms from there. The flavor would be superior. 

When cooking the mushrooms, use lots of butter and cook each kind separately. This way each kind will cook evenly.  Make sure you don’t overcrowd your pan with mushrooms and season after they are done. Salt releases the water from the mushrooms and you don’t want boiling mushrooms in the pan. I used both lemon juice and lemon rind in the risotto, which makes it very fresh and flavorful. At the end I added some fresh thyme, an herb that I find to go very well with mushrooms, but if you wish, you can use parsley instead.


Enjoy, and let me know how it was.

Sprig_of_Thyme_Mushroom_Risotto3.jpg

Wild Mushroom Risotto

Serves 2 (main course), 4 (side dish)


Ingredients:

• 7 tablespoons butter
• 1 lb fresh wild mushrooms (portabella, crimini, shiitake, hen of the woods, oyster)
• 2.5-3 cups low sodium chicken broth
• 1 tablespoon olive oil
• 1 small leek, finely chopped
• 3/4 cup arborio rice
• 1/4 cup white wine
• 1 garlic clove, minced
• 1/2 lemon, zested and juiced
• 1/2 cup grated Parmesan cheese, plus additional for serving
• Black pepper
• 1/2 teaspoon fresh thyme


Directions:

  1. Clean the mushroom by gently brushing or wiping the dirt from them. Remove the end part of the stems. Slice the large mushrooms, quarter the medium ones, halve the small mushrooms or leave them whole if tiny-tiny.

  2. Melt 2 tablespoons of butter in a heavy/cast iron skillet over medium-high heat. Add 1/3 of the mushrooms (same kind or size if possible). Sauté the mushrooms until tender and lightly brown, about 3-4 minutes by stir occasionally to avoid burning. Transfer the mushrooms in a medium bowl, sprinkle with salt and mix well. Repeat the same step with the remaining 2 batches of mushrooms and the 4 more tablespoons of butter.

  3. Bring the chicken broth to simmer in a small saucepan. Keep warm. Add the olive oil in a medium sauce pan over medium-high heat. Add the leek, sprinkle with salt and saute until soft, about 2 minutes. Add the rice and cook until the edges begin to look translucent, about 1 minute. Add the wine and garlic and stir until the liquid is absorbed, about 30 seconds. Add 1/2 cup of the chicken broth and stir until most of the liquid is absorbed, about 1 minute. Repeat 2 more times by adding 1/2 cup of the chicken broth each time until the rice is cooked halfway through. Add the mushrooms and stir. Continue with the remaining broth by adding 1/2 cup each time until almost absorbed before adding more, until the rice is cooked but firm to bite (al dente) and creamy, about 7 minutes. Stir the remaining 1 1/2 tablespoons of butter, lemon zest and juice, Parmesan cheese and thyme.

  4. Remove from the heat and let it stand for 5 minutes. If risotto seems sticky you can add 1/4 cup of chicken broth to loosen the texture. Taste and season with pepper and salt if needed.

  5. Serve the risotto immediately by dividing it between 2 bowls. Serve with a small bowl of grated Parmesan for topping.

print recipe
6 Comments

TAGS: mushrooms, risotto, lunch, Vegetarian, fall


  • Newer
  • Older

Powered by Squarespace 6