Search
  • Journal
  • Recipes
  • About
  • Say Hello
  • Subscribe
Close
Menu
Search
Close
  • Journal
  • Recipes
  • About
  • Say Hello
  • Subscribe
Menu

sprig of thyme

March 28, 2020

How to make homemade pasta without pasta maker

by Iglika in from scratch


Sprig-of-thyme-pasta-dough-cover1.jpg


This pasta recipe is my all-time favorite. I have made it so many times over the years and its my go-to every time. Occasionally, I’ll try a new pasta recipe version – with less eggs, with only whole eggs, adding olive oil, adding lots of water – you name it, and I keep coming time after time to this one. It is a simple recipe containing only eggs and flour. I discovered its original version watching a Julia’s Child episode of ‘In Julia’s Kitchen with Master Chefs’ with Jimmy Sneed where he was so charming, showing Julia how to make pasta telling her that everyone can make a pasta, even a child can do it!  At the time I watched the episode for a first time, I had never made pasta before in my life. I was super intimidated by pasta making, thinking of it as this big, scary, fancy thing requiring years of special chef training, also that I must an Italian grandma, or at the very least must be living in Italy, breathing Italian air, and eating only double 00 flour in order to be able to make a good pasta. I don’t know about you, but growing up my mom only bought packaged dry pasta and the woman was a fabulous home-chef, baking bread and cooking cow’s tongue, but she never made pasta, so I never thought that could I possibly do it myself.  My other mental obstacle (yes, it’s always the head, isn’t it?) was that for years I believed that pasta can’t be made without a pasta roller/machine. And I thought to myself  “I can buy one, but what if I suck at pasta making and then I just blew $80 bucks and have a gadget that I can’t use for anything else! ” That is why that episode of Julia Child and Jimmy Sneed was so revolutionary for me – a turning point in my beliefs about pasta, challenging all of them. And the whole owning a pasta rolling machine, I got over that thought after having the realization that Italian grandmas have made pasta for years and years, far before the pasta machine became available, so if they can do it I can do it too. As a famous slogan goes: Just do it :) so, I put my apron on and I did it, and fresh pasta has become one of my favorite things to cook.

About the pasta dough: the original recipe called for half all-purpose flour and half semolina flour. The large quantity of semolina makes for a denser pasta and I personally prefer a soft pasta that is strong enough to hold ravioli filling, or thin noodles without falling apart. I also found that adding more semolina makes for a very hard dough to roll, mainly due to the high yolk content. So over the years I perfected the pasta consistency to what I like – a firm textured pasta, yet silky and very flavorful. In the recipe I call for mostly all-purpose flour and only a tablespoon of semolina in the dough. Additional semolina is used for the already made noodles as they are being tossed in the semolina, preventing them from sticking together. If you are a beginner at pasta making don’t despair if it doesn’t turn right the very first time, and don’t be an overachiever starting with ravioli, try an easy to cut pappardelle. And if you have a hard time rolling this eggy dough. Start over, or try a different recipe like this one.

IMG_0954_2.jpg
Sprig_of_thyme_Pasta_Dough_Step1.jpg
Sprig_of_thyme_Pasta_Dough_Step2.jpg
Sprig_of_thyme_Pasta_Dough_Step3.jpg
Sprig_of_thyme_Pasta_Dough_Step4.jpg
Sprig_of_thyme_Pasta_Dough_Step5.jpg
Sprig_of_thyme_Pasta_Dough_Step6.jpg
Sprig_of_thyme_Pasta_Dough_Step7.jpg
Sprig_of_thyme_Pasta_Dough_Step8.jpg

How to make homemade pasta without pasta maker

Serves 4

Ingredients:

• 1 cup of all-purpose flour (plus more for dusting)
• 1 tbsp semolina flour (plus more for preventing pasta form sticking together)
• 1/2 tsp salt 
• 3 egg yolks*
• 1 whole egg

*Wondering what to do with those 3 leftover egg whites? Make some meringues. They are so silky and wonderful to snack on, or crumble them over your favorite ice cream

Directions:

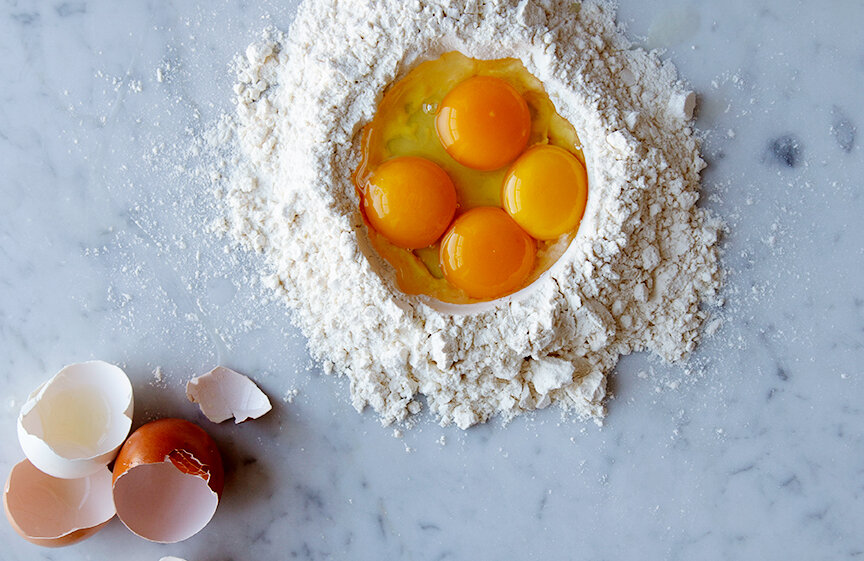
  1. Start with 3/4 cup all-purpose flour as the size of egg yolks vary. On a clean work surface or  a mixing bowl place flour, semolina and salt. Make a well in the center and add egg yolks and the egg. Starting from the center using a fork (easier to clean up and work with) or your fingers start by mixing the eggs together, working outward from the center of well, gradually incorporate flour mixture into egg mixture until a irregular dough forms. If using your hands and they are sticky, remove as much dough from them and wash hands before kneading the dough otherwise you will find it difficult to work. If the dough seems sticky add the remaining flour 1 tablespoon at a time. If the dough becomes stiff add 1 tablespoon of water, but only enough to keep the dough together.

  2. Transfer to a lightly floured work surface and knead until dough is smooth and springs back when pressed with a finger, 8 to 10 minutes. While kneading, add more water, 1 tablespoon at a time, if dough feels too dry; or add more flour, 1 tablespoon at a time, if dough feels too sticky.

  3. Shape dough in a ball, wrap it in a plastic wrap. Let it rest on the counter for 30 minutes.

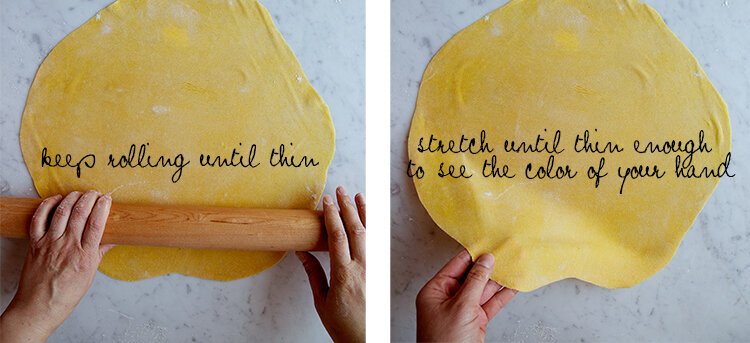
  4. Roll out the pasta: cut the dough in half. Roll out one half at a time, keeping the rest of the dough wrapped. Very lightly flour the work surface. Shape the dough into a ball. Press dough down so it flattens like a disk. Start rolling by placing your rolling pin in the center of the disk and roll away from you and then back towards you to even out the dough thickness. Lift up the dough and turn it 90 degrees, roll in the same manner described. With each pass as you roll, lift the dough up, re-dust the counter beneath if needed, and turn it over. Keep rolling and stretching until the pasta is thin enough to see the color of your hand or its print through it. 

    For pappardelle: flour the dough really well, roll it and cut strips as wide as you prefer. When done cutting, loosen up the ribbon-like strips and toss them generously with semolina. Place in an airtight container until ready to boil. 

    For ravioli: see my next post. 

  5. Repeat with the remaining dough. 

    To cook the pasta: Bring a pot of salted water to a boil. Shake off the extra semolina and add the pasta handful by handful to the water, gently stir, lower the heat to a medium-high and cook for 5 minutes. Taste a noodle to check if it is done to your desired firmness.

print recipe
Comment

TAGS: pasta, eggs, handmade pasta, main dish


July 29, 2018

Fresh Pasta with Chanterelle Mushrooms

by Iglika in from scratch


IMG_7624.jpg
IMG_7624.jpg


Homemade pasta is one of those lush and comforting type of foods that I love to do on a regular basis. There is something so wonderful when my hands get to touch the wet pile of eggs and flour and feel the stickiness that through gentle movements turns into a soft ball of dough. The process gives me a child-like feeling. Like the feeling when you find yourself in the middle of an unexpected experience and your curiosity just makes you go for it. You are not sure you can do it. You are not sure why you are doing it. Yet, the doing of it brings you so much joy that you want to do it again. And again. And again. That is how pasta making is for me. I can buy an already made pasta. Dry pasta, or even fresh store bought pasta. Yet, every time I want to go through the messiness and the stickiness and the flour everywhere in my kitchen. And oh, what to do with the left over noodles? So many of them!!! It is totally worth it. Just like life itself...I can get someone else’s version of it. I can read a book about someone else’s experience – then attempt to skip some steps in order to save myself that’s person opinion on perceived struggles. Or, go and experience life myself and see how I feel about it. The bottom line is, making homemade pasta makes my heart happy and brings me joy just as life is.

As a person that cooks often I fall into my loving-this-one-recipe-to-the-end-of-life mode (quite often, lets be honest). However, I try to remind myself that I haven’t tried it all and I don’t know it all, so lets see what other people are doing in their kitchens. And fresh pasta fell into this “I am sticking with my recipe” category for me, but I broke it. I went and tried a different recipe and let me tell you that I was wonderfully surprised because the dough turned out to be soft and silky and yummy. Basically, my new favorite go-to pasta dough thanks to the lovely Rachel form On the Acre.

I met Rachel a few months ago and I loved her instantly. She is one of these passionate people who follows her heart and makes magic with every step she takes. Rachel’s love for growing her own food and making down to earth, simple and true recipes is so transparent in her photography and writing. And if I could describe her with few words it would be: honest and with a heart (all of the profits form her class went to help a friend who is adopting a child from India). Rachel thought me so many things that day in her pasta making class. How to color my pasta with vegetable paste like a tomato and kale (she made the kale paste herself from the kale from her garden!!!). How to use a pasta roller (I am that close to buy one because I got obsessed wit it by the end of class). And how to make wonderful, silky pasta dough only with 2 eggs (my staple old recipe called for 3 egg yolks and 1 whole egg...I see saving money in my future). 

So, if you are wondering what to do for dinner and want to be inspired, head to On the Acre and make this lush, velvety pasta. I guarantee you that you will find your new staple dinner recipe that makes your heart and tummy happy and will give you lots of delicious and envious leftovers for work lunch tomorrow. 


xoxo


IMG_7531.jpg
IMG_7559.jpg
IMG_7592.jpg
IMG_7593.jpg
IMG_7624_2.jpg


Fresh Pasta with Chanterelle Mushrooms

Sevres 4 (plus some leftover noodles)


Ingredients

• Fresh made pasta. Recipe from On the Acre
• 6 tbsp butter, divided
• 2 tbsp olive oil
• 3 cups of Chanterelle Mushrooms (about 1/2 pound), brushed clean (halved if large)
• 6 garlic cloves, thinly sliced
• 2 shallots, finely chopped
• 1/4 cup of white wine (rose works too)
• 2 tbsp Crème Fraiche or Mascarpone
• 1 cup grated Parmigiano Reggiano + extra for serving
• 1/4 cup of shopped fresh herbs (thyme, lemon thyme, oregano, parsley, chives), only parsley or thyme works well too
• Salt + Pepper 


Directions

Fresh Pasta
Follow instructions from On the Acre on how to make the fresh pasta. 

Sauce and Assembly

  1. Bring a large pot of salted water to a boil and follow the instructions from On the Acre on how to cook the pasta.

  2. Meanwhile, melt 3 tablespoons butter with 1 tablespoon oil in a large skillet over medium-high heat. Add the Chanterelles, season with salt and cook, stirring occasionally until mushrooms are lightly golden, about 5 minutes. If the mushrooms are a bit dry and woody, add a 1/4 cup of water to soften them and cook until the water is fully evaporated. Place the mushrooms in a bowl and set aside. Add remaining 3 tablespoons butter, remaining 1 tablespoon oil in the skillet and the shallots. Season with salt and pepper, and cook, stirring occasionally, until softened and lightly golden, 2 minutes. Add garlic and cook for 1 minute. Stir in wine and cook until liquid is reduced by half, about 1 minute.

  3. When pasta is ready add the desired amount of noodles for 4 people in the skillet (you might have some leftover cooked noodles, which you can store for the next day or two to enjoy with your favorite sauce). Add a ladle of the pasta water in the skillet and toss gently to mix the pasta with the sauce. Add the cooked chanterelles, toss and let pasta cook for 2 min to let all the flavors come together. Add the Crème Fraiche or Mascarpone + the Parmigiano Reggiano and toss until the sauce becomes lush and creamy. Add a bit more of the pasta water if it seems dry. Add the fresh herbs and toss until fully incorporated. Taste and add salt and pepper if desired. Divide pasta into 4 pasta bowls and serve with grated Parmigiano Reggiano.

  4. Enjoy!

print recipe
Comment

TAGS: pasta, handmade pasta, mushrooms, chanterelle mushrooms, parmesan, summer


November 11, 2014

Lutenitsa–Pepper Tomato Spread

by Iglika in Bulgarian recipe, from scratch


This story begins with a gigantic bucket of red peppers on a sunny fall day. The bucket was supposed to weigh 11 lbs (as my mom advised me), but in fact the bag ended up being 25 lbs. You know how the farmers market has these big buckets of bumper crop at the end of the season, the produce is usually at a good price and is perfect for canning and winter storing. That is what I ended up buying for $13 and I didn’t realize the weight of the bucket until I got home. Oh, well...what is a girl to do in this situation...I tried staring at the pile of peppers hoping that my stare will reduce the amount in half, but it didn’t work. So, as the Americans say, “the more, the merrier”.

The story then continues with me trying to start the coal grill, which for some reason decided not to cooperate with me on the day I had to roast 25 lbs of peppers. After 30 minute struggle and a step by step phone tutorial from a friend, I managed to get the stubborn grill going. After this success I put my plan in order and estimated that I will be done grilling all the peppers in about an hour. The grill had other plans though and it got its revenge on me by making the process 4.5 hours long. Phew! 

As you are reading you are probably wondering why on earth I am doing all this work. Well, the story goes back many, many years ago to the time when I was a young girl back with my family in my hometown of Sofia. It was another sunny fall day and my mom, sister and I would go on several trips to the farmers market and buy (what back then looked to me like) at least 200 lbs of peppers. Of course we didn’t buy that many peppers, but the bags seemed sooooooo heavy and the trips soooooo long.  Then the whole family will be organized into a mini factory line – roasting, cleaning, grinding, chopping, mixing, jar filling and sterilizing. The end product was Lutentitsa. I remember how tired I would be after the intense long process but we had to keep going otherwise the peppers will get spoiled (back in the 80’s we didn’t have freezers in Bulgaria and those European refrigerators were of miniature sizes). The best part of the day, at this point night, was a chilled watermelon that we ate when we were done – at about midnight. I remember the fragrant aroma coming from the heavy watermelon slice with juices running all over my hand and along my arm. I didn’t care, I was about to bite into the crisp juicy flesh and enjoy it with my eyes closed. What a nice prize for all that hard work.

Everyone made Lutenitsa when I was younger. All of my friends will have those family canning days, especially in the fall when the nature’s abundance is so great. But what stuck with me the most was the smell of the roasted peppers. The charred sweet aroma would fill the air and it could be sensed all over the city. Every family, every balcony had a pepper grill (chushkopek) and it would be used with great pride every summer and fall. 

Lutenitsa to Bulgarians, my dear American friends, is what peanut butter is to you. It is spread on breakfast toast and enjoyed as a snack or a party/appetizer bite. 

Back to my story and the present day. I always missed Lutenitsa, not just any Lutenitsa, but my mom’s Lutenitsa. It is the best! It is chunky and sweet (not from sugar but pureed carrots) and with tons of parsley. I liked my mom’s Lutenitsa so much when I was younger that I always wished we would make more...it never seemed enough. And as people say, be careful what you wish for. Life has its own ways of giving us what we want. In my case, it came as a misjudged 25 pounder bucket of peppers.

Spread on the love, my friends, and enjoy Lutenitsa as Bulgarians do, on a piece of crusty bread with some butter, feta or soft goat cheese.


To my mom, with all my love!

Lutenitsa


Equipment:
• 8-10 (16oz) jars with jars with new metal lids
• 1 large pot (at least 7” deep)


Ingredients:
Makes about 8-10 16oz jars


• 10-11 pounds (25-30 peppers) of sweet red peppers
• 6 medium carrots, peeled and sliced in half
• 2 sticks of celery, sliced in four
• 1 cup parsley, chopped
• 18oz (1 medium + 1 small cans) tomato paste
• 1.5 tsp salt
• 3/4 cup olive oil
• 1/2 tblsp balsamic or red wine vinegar (optional)


Directions:

  1. Wash and dry the jars.

  2. Preheat your grill, if using. If you don’t have a grill, you can use the oven broiler instead (for step 3)

  3. Wash and dry the the peppers. Arrange on a rimmed baking sheet (work in batches if needed), leaving at least 1/2 inch space around each pepper. Place peppers under the broiler (alternatively you can use the grill) and roast until their skin blisters and turns black. Check peppers every 3-5 minutes to make sure they are not burning. Turn peppers over when a side is blistered and with dark spots. Roast until all sides of the peppers are blistered and with black spots, 25-40 min depending on your oven type and broiler settings. Remove peppers from the oven and place in a large pot or bowl and cover tightly with a lid. Repeat with the remaining peppers, if any. Let peppers cool completely, the steam in the bowl/pot will loosen their skin. The skins should peel away off of the peppers easily when cooled.

  4. Place carrots and celery in a medium pot, cover them with water and bring to a boil. Lower down to a low-heat and simmer until the carrots and celery are soft, about 10-15 minutes. Drain the water and let the carrots and celery to cool down for 15 minutes.

  5. Meanwhile, peel the pepper skins from the cooled roasted peppers, remove the stem and the seeds. Seeds can be easily removed if the roasted peppers are cut open and the seeds are gently scraped with a spoon or back of a knife. Do not run peppers under water to clean, you’ll lose most of the roasted flavor that you worked so hard to get.

  6. Place as many peppers as you can fit in your food processor (using an immersion blender works well too). Pulse a few times until peppers are pureed but still a bit chunky. Place the pureed peppers in a large mixing bowl.

  7. Add the boiled carrots, boiled celery and the tomato paste in a food processor, blender (using an immersion blender works well too) and puree until smooth. Place the puree in the large bowl with the peppers. Add the chopped parsley, olive oil, salt and balsamic vinegar. Mix everything until well incorporated. Taste and add more salt, vinegar or olive oil per your liking.

  8. Take a jar, make sure it is dry, and fill it with Lutenitsa using a spoon. Make sure the jar is not filled all the way to the top, fill only to the point where the jar neck starts. Wipe clean the jar top, otherwise it might not create a solid vacuum with the lid. Close the jar with a lid and make sure the lid is tight. Repeat the process with the remaining jars until no Lutenitsa is left.

  9. Working in batches if necessary, place the Lutenitsa jars in a large pot, standing and lid side up. Leave a little room between the jars, just enough so they are not touching. Make sure that the pot is deep enough; you need at least 2 inches of space above the top of the jars. Fit as many jars as you can but make sure the jars are not touching each other. Fill the pot with water so that it covers the jar lids by at least an inch.Bring the pot to a boil, lower to med-heat and simmer bubbling for 10 minutes (start timing after the water starts boiling). During the 10 minutes of canning make sure the water is bubbling but not super aggressive and splashing. Check the jars from time to time to make sure no jar is leaking.

  10. After the 10 minutes of canning, pour the water from the pot carefully, it will be really hot! If some water is still left at the bottom of the pot that is ok, the most important thing is to be careful when pouring the hot water from a pot filled with jars. Let jars sit for 10 min to cool off slightly.  Using a jar lifter or a thick kitchen towel, carefully remove jars from the pot and place them on a kitchen towel. Repeat the sterilizing process with the remaining jars, if any.

  11. Cool the jars completely and store in a cool place. Lutenitsa can be stored for up to 1 year. Refrigerate opened Lutenitsa jars, and consume within 10 days of opening.

print recipe
18 Comments

TAGS: appetizer, peppers, tomatoes, Лютеница, Домашна лютеница, summer


  • Newer
  • Older

Powered by Squarespace 6